
Walkthrough Menu
- General Tips
- Chapter 1: Beach
- Chapter 2: Cliffs
- Chapter 3: Stonehenge
- Chapter 4: The Bridge
- Chapter 5: The Library
General Tips
- This is the official guide for Yuletide Legends: Frozen Hearts.
- This guide will not mention each time you have to zoom into a location; the screenshots will show each zoom scene.
- Hidden-object puzzles are referred to as HOPs. This guide will not show HOP solutions. It will identify the location of the HOP and the inventory item acquired.
- This guide will show solutions for non-random puzzles. Please read the in-game instructions for each puzzle.
- In this game, you will sometimes have to select the new scene to trigger dialog, cut-scenes, or tasks prior to interacting with the scene.
Chapter 1: Beach
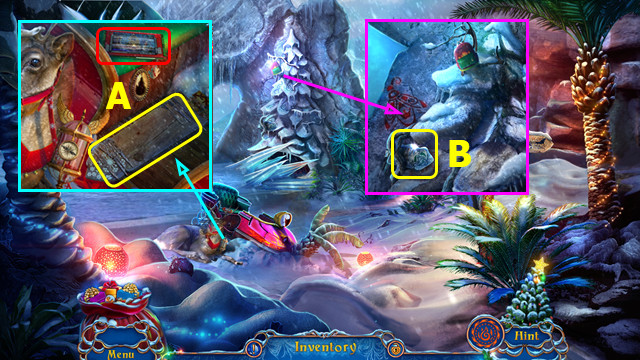
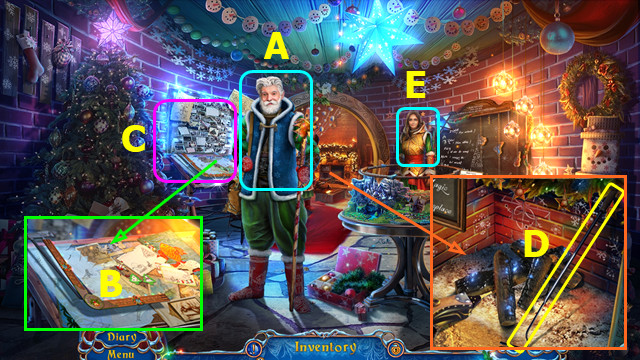
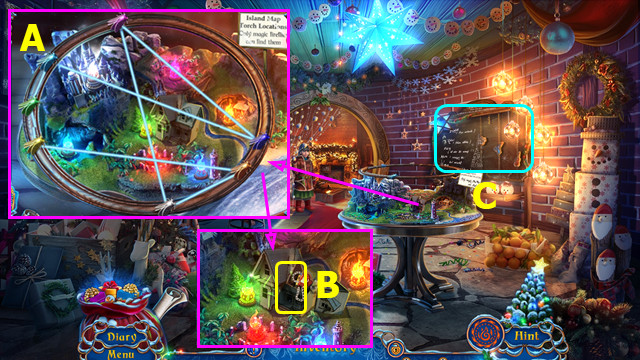
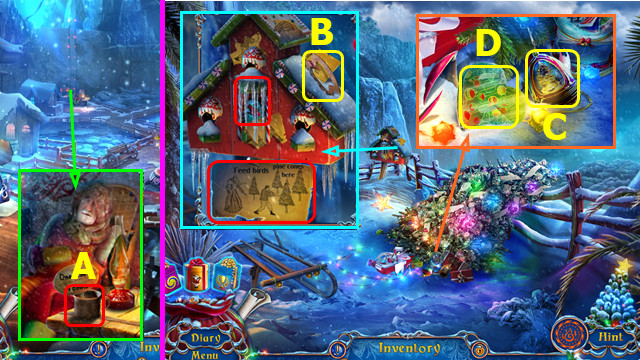
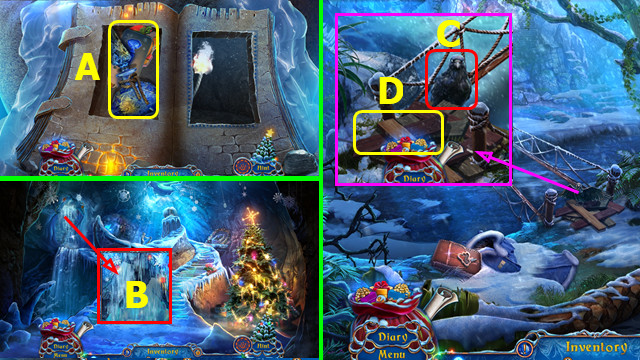
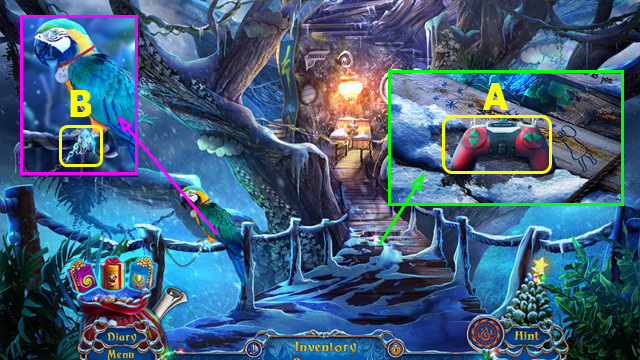
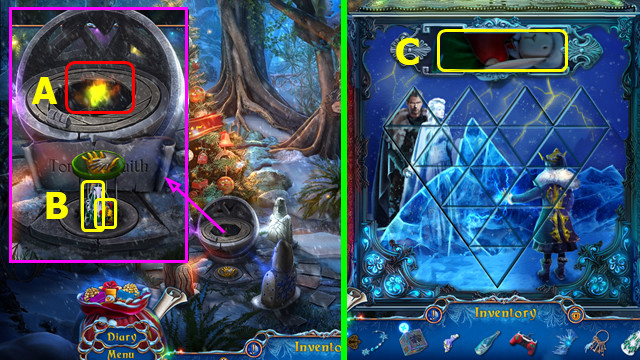
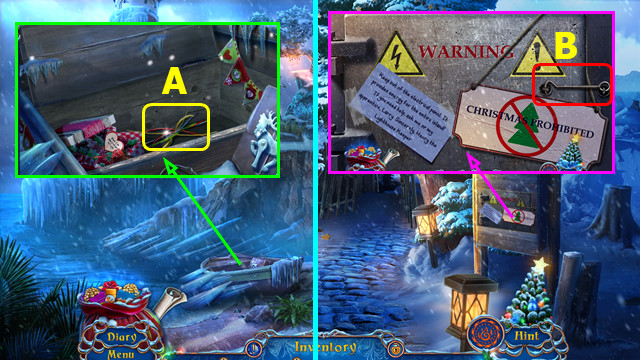
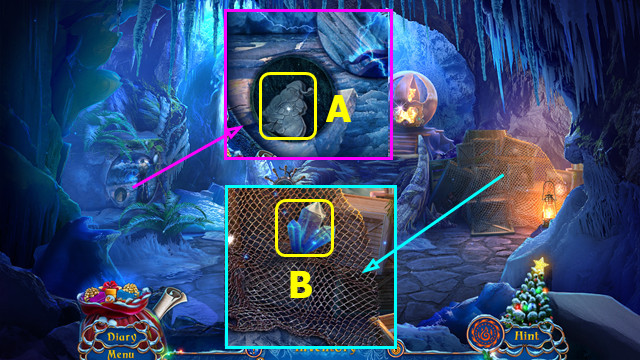
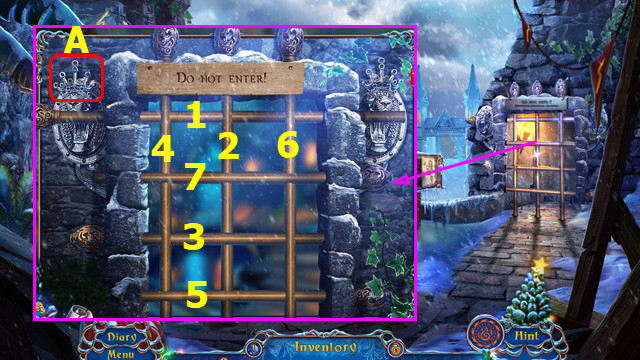
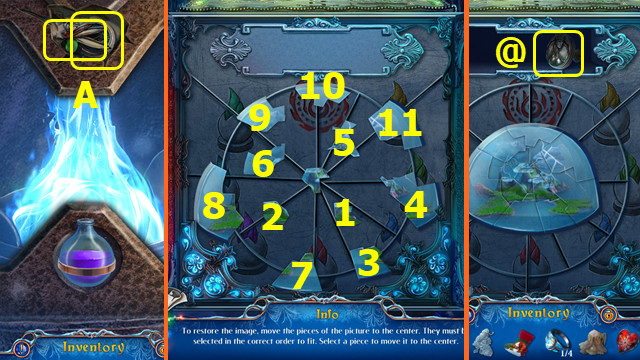
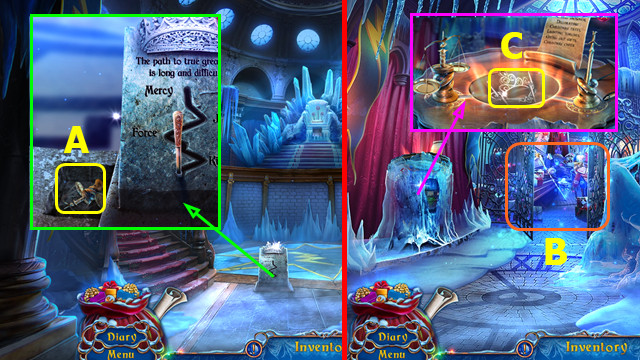
- Take 1/2 POINTER; use smartphone (A).
- Take BROKEN POINTER (B).
- Select BROKEN POINTER to earn 2/2 POINTER.
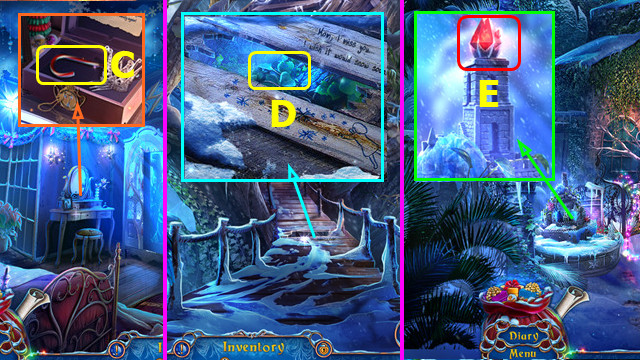
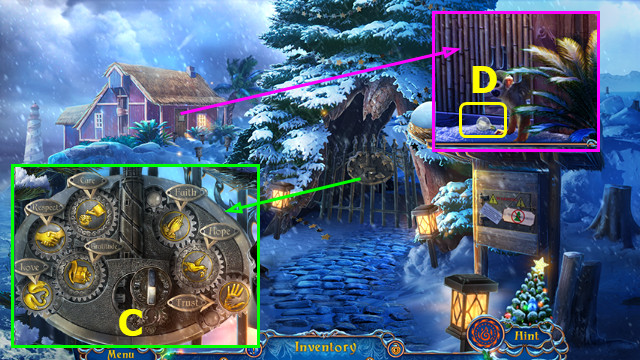
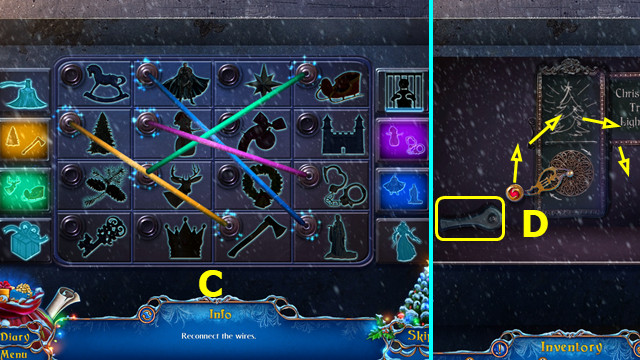
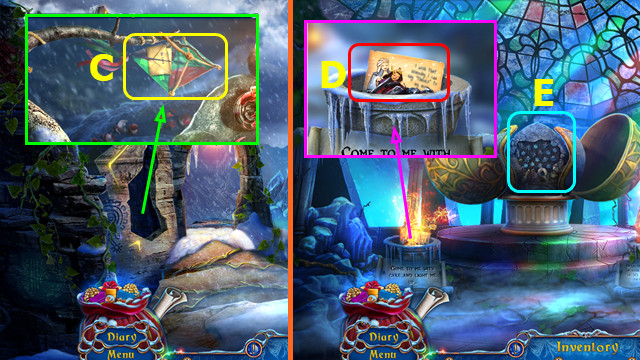
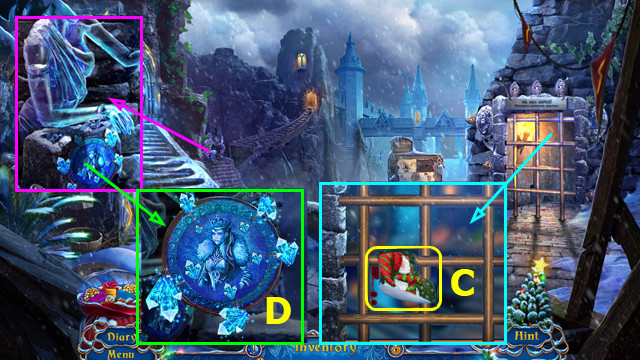
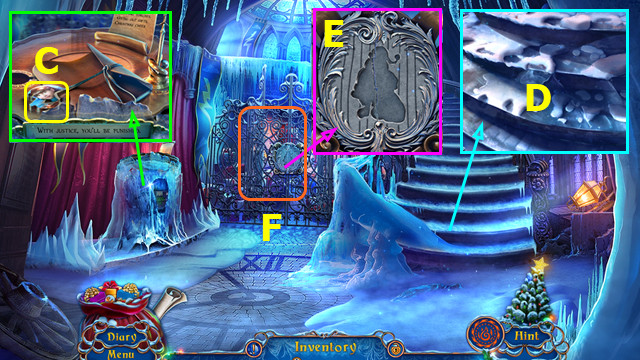
- Place 2 POINTERS; select (C).
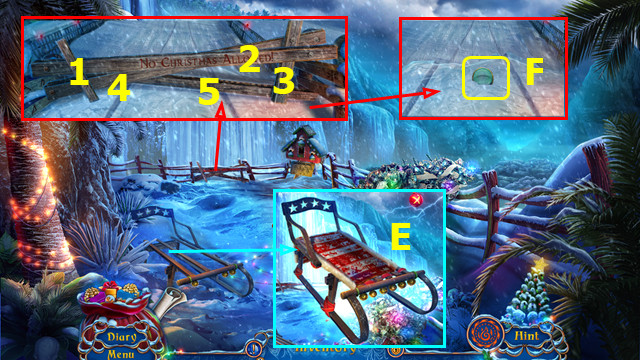
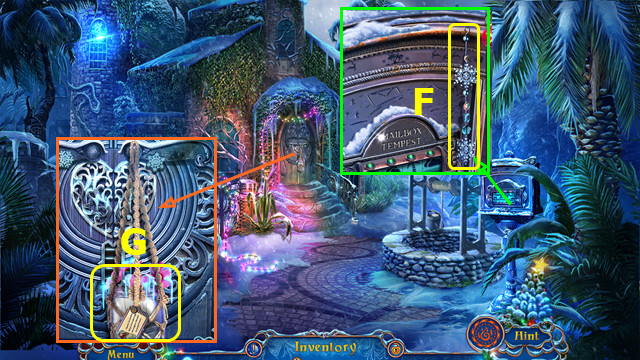
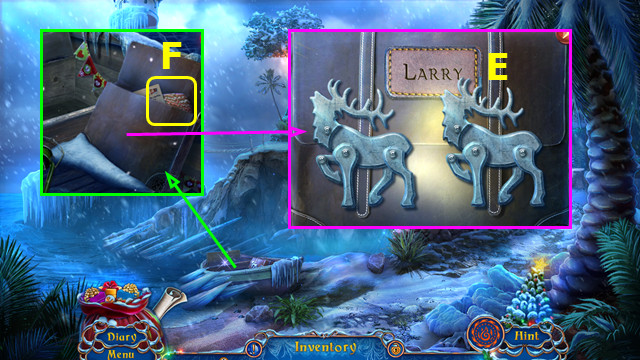
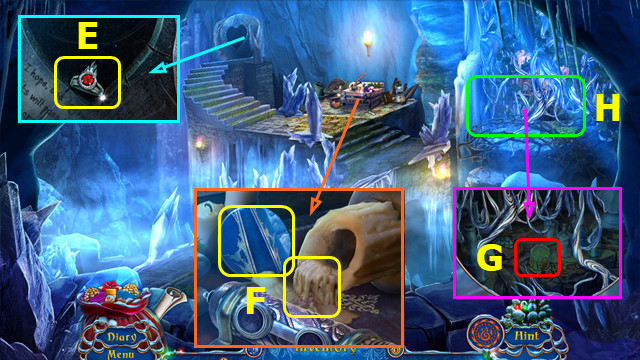
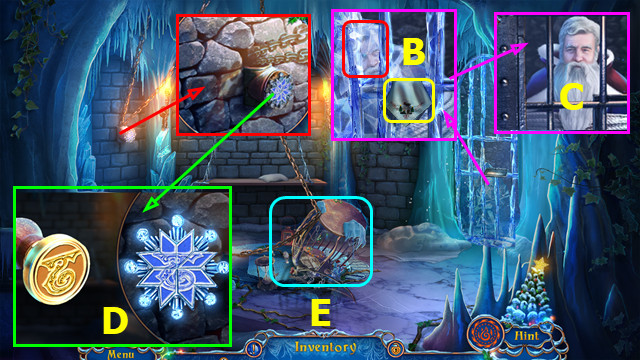
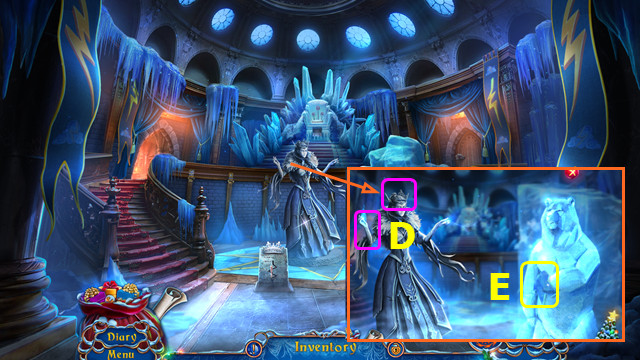
- Use FIRE MAGIC (D) on (E); use key on (F); earn FIREFLY KING.
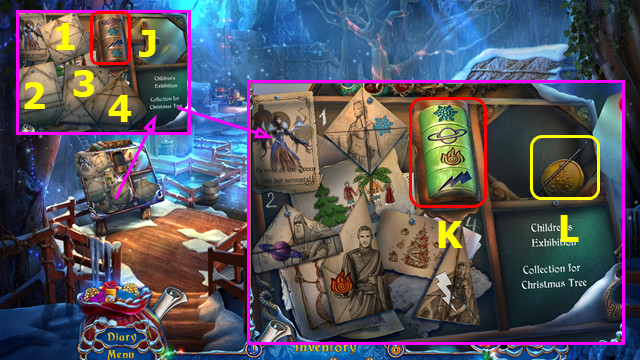
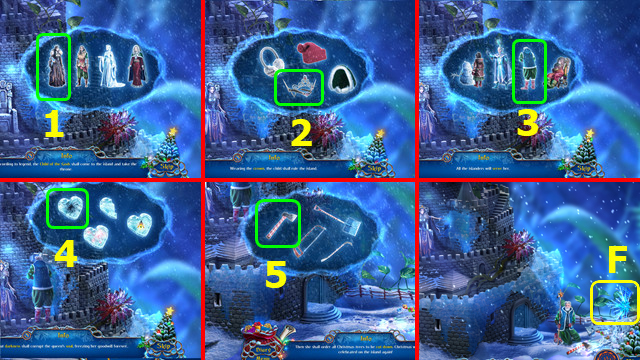
- Place FIREFLY KING; select 1-4.
- Go forward.
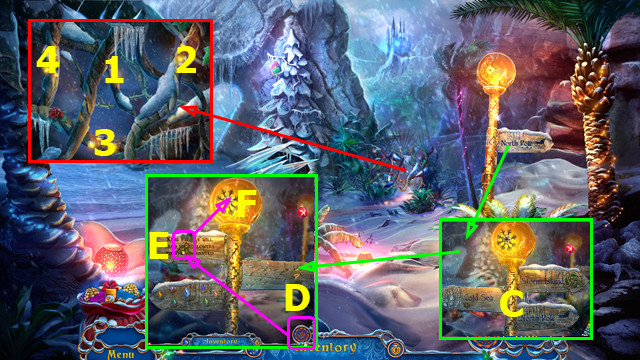
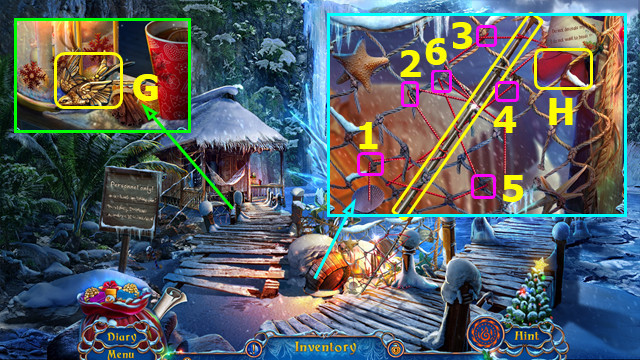
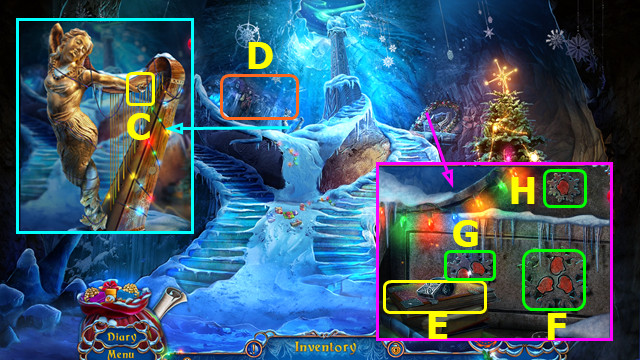
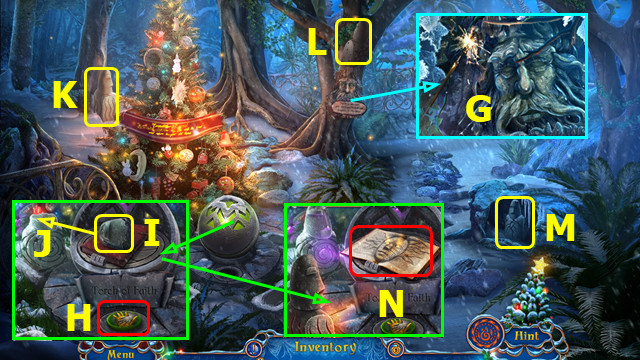
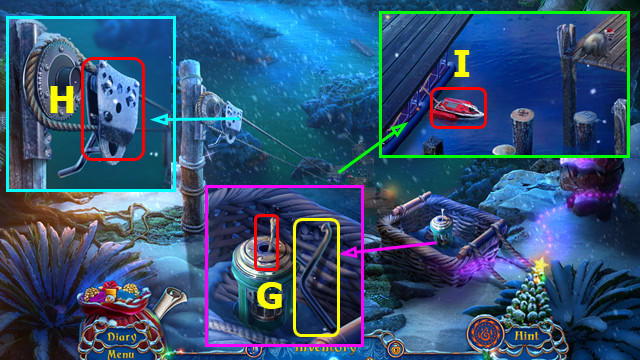
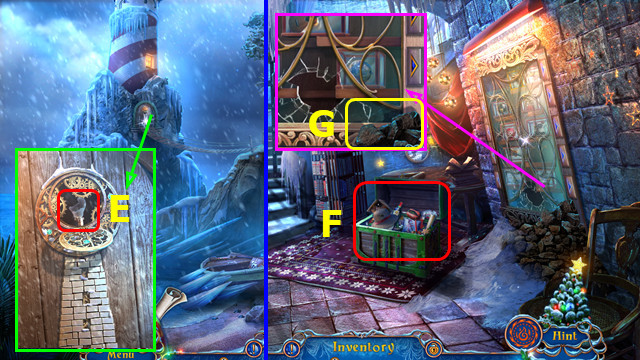
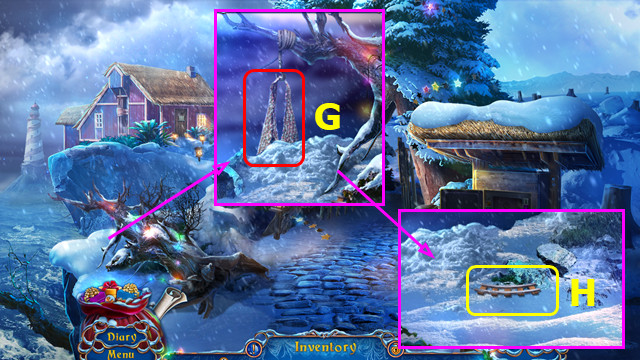
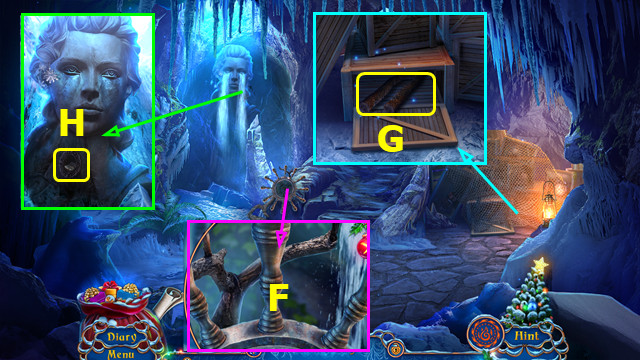
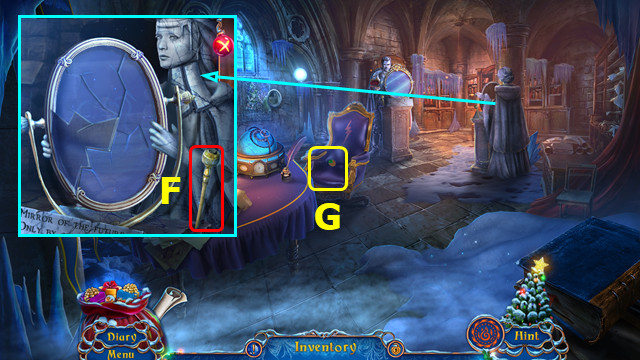
- Take 1/3 ELEMENTAL LORDS (G).
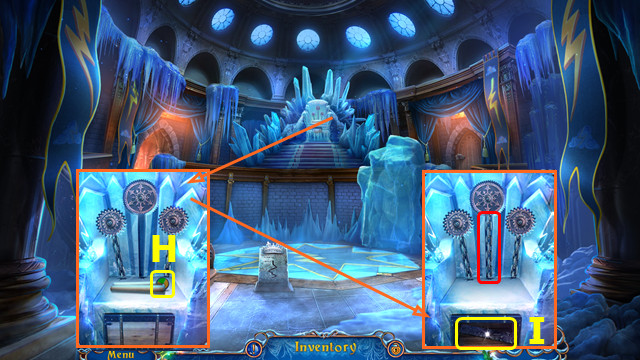
- Take GLASSES CASE (H).
- Open GLASSES CASE; take SANTA'S GLASSES.
- Go forward.
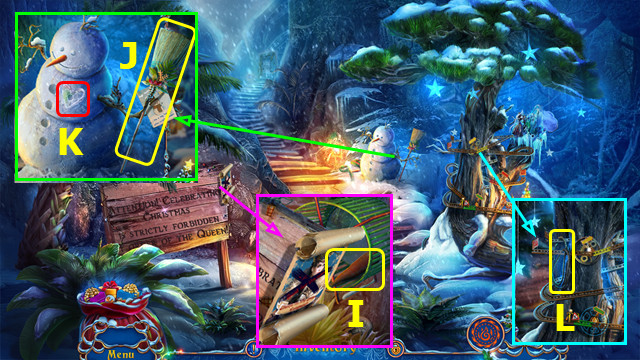
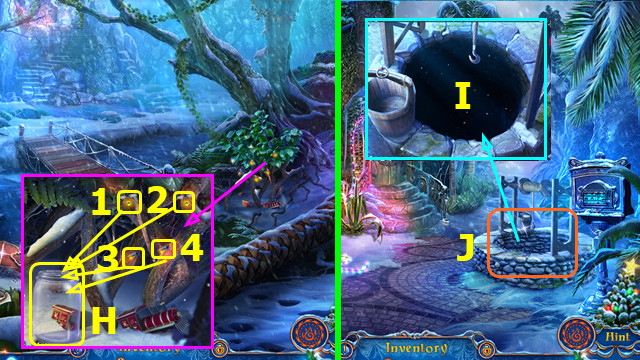
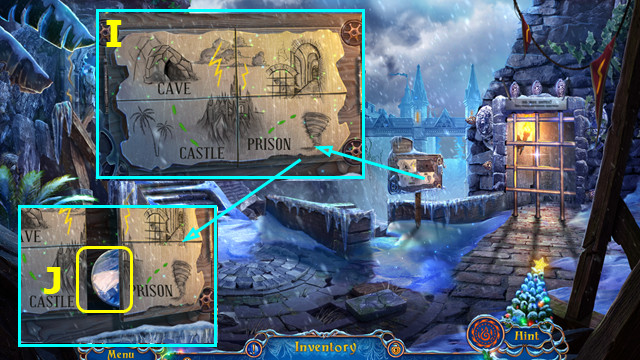
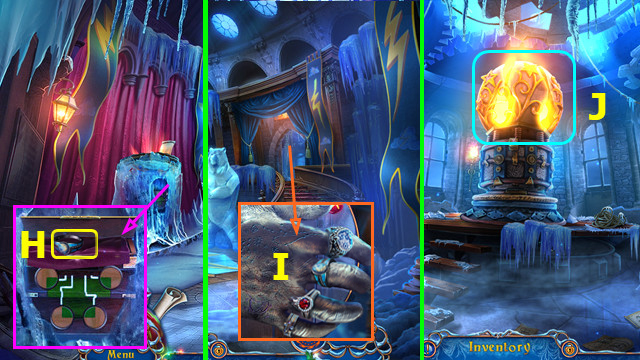
- Read sign; take CARROT (I).
- Read card; take BROOM (J).
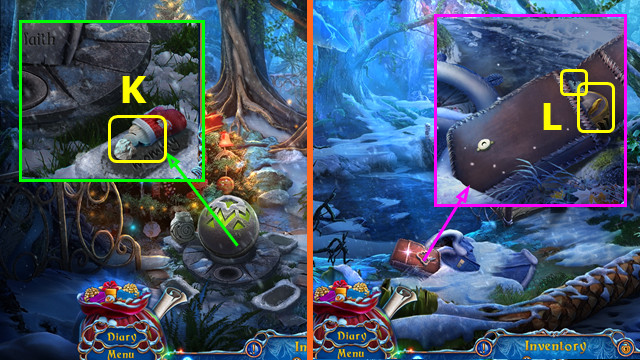
- Use FIREFLY KING; talk (K).
- Take ROPE (L).
- Walk down.
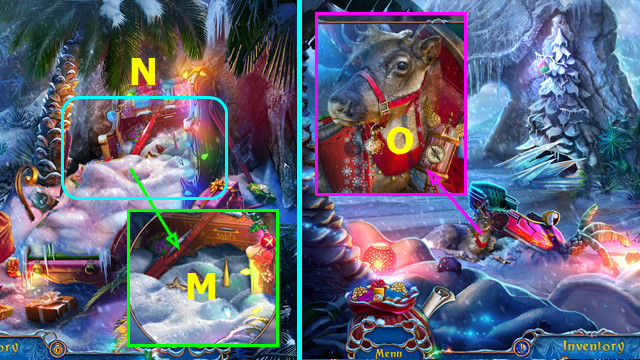
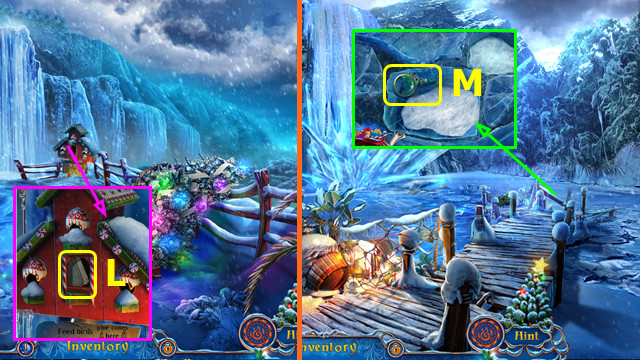
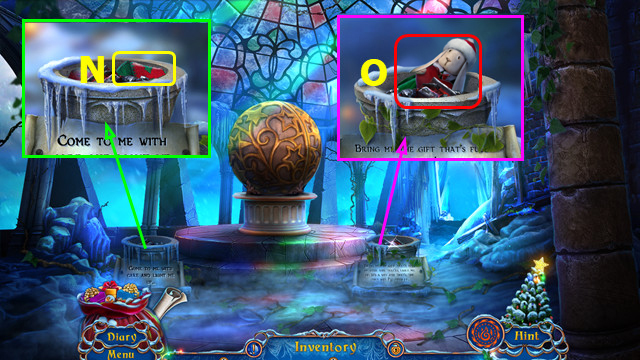
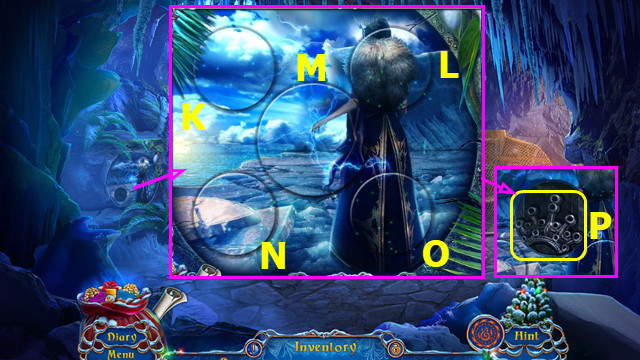
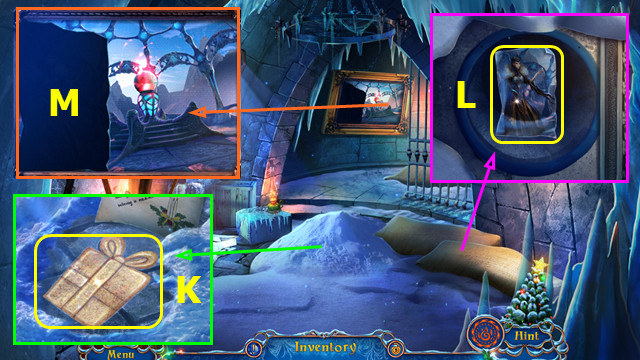
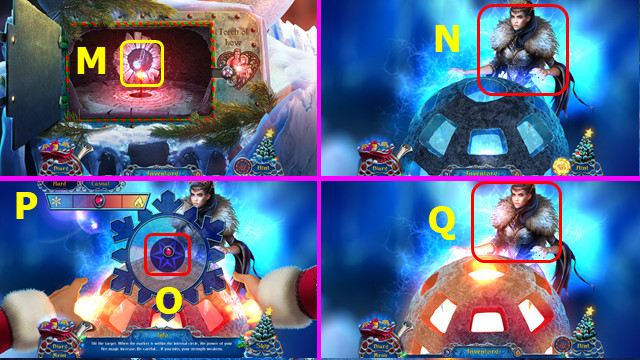
- Use BROOM (M).
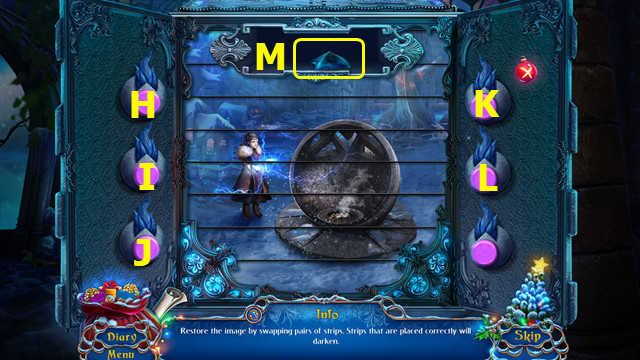
- Play HOP; earn FLIGHT POTION (N).
- Walk down.
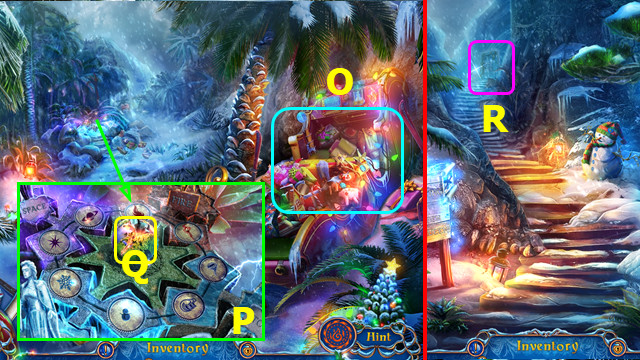
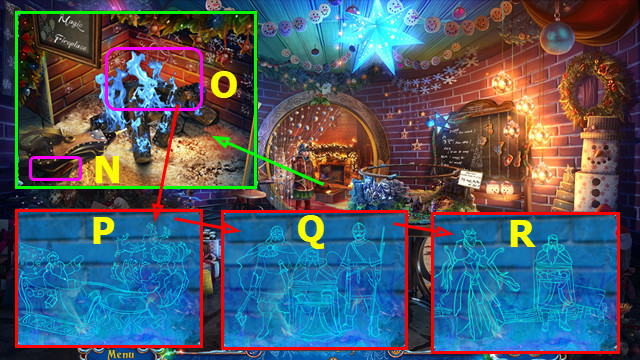
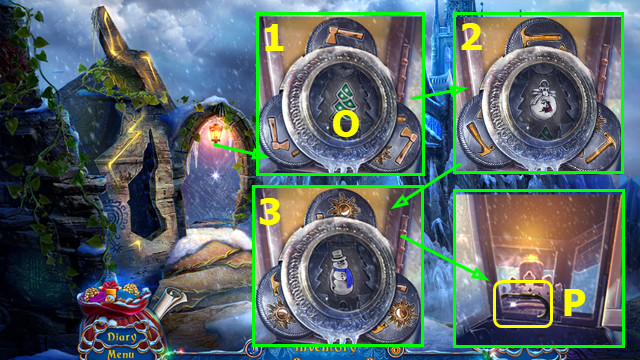
- Use FLIGHT POTION (O).
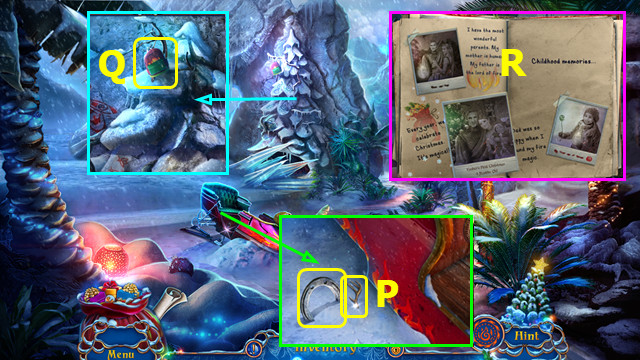
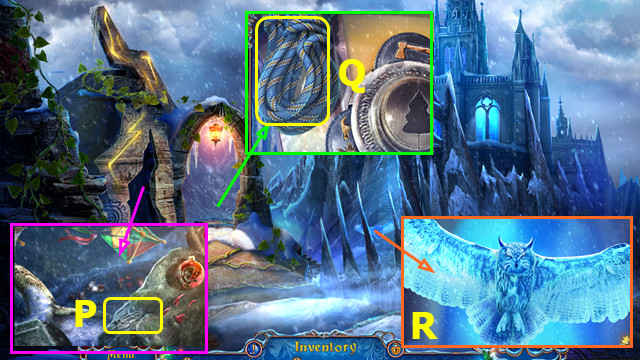
- Take ANTLER and HORSESHOE (P).
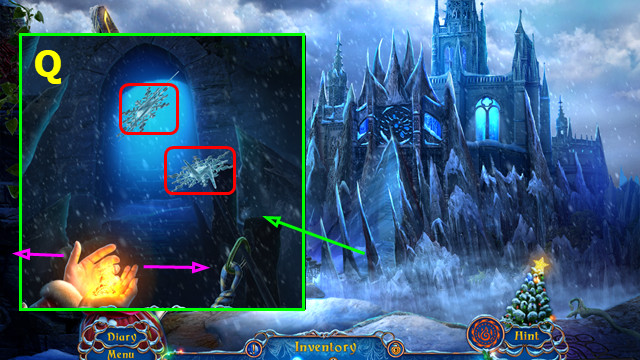
- HORSESHOE on ROPE; make WEIGHTED ROPE.
- Use WEIGHTED ROPE; take BAG (Q).
- Open BAG: take BROKEN FIRE KEY, DIARY, and UNLIT BLOWTORCH.
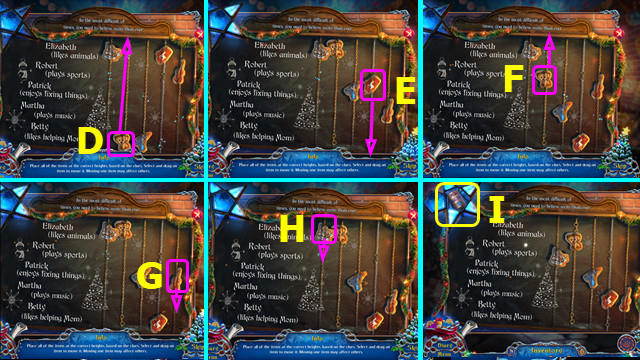
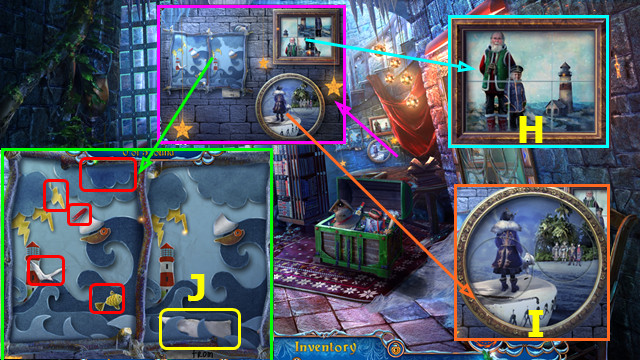
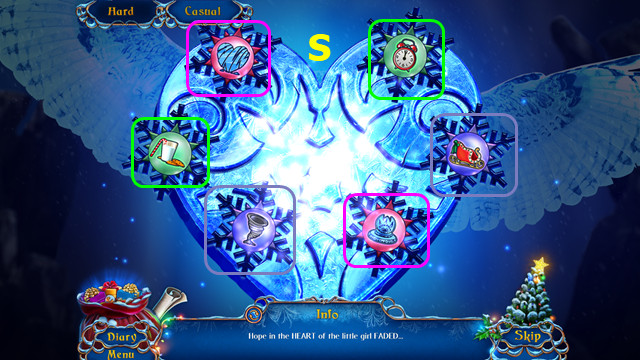
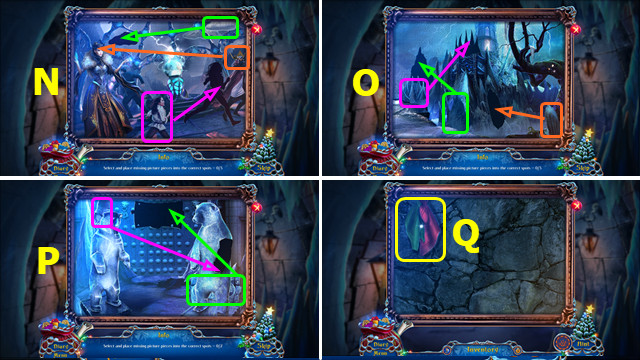
- Open DIARY; restore photos (R). Take BUTTONS.
- Use FIRE MAGIC on UNLIT BLOWTORCH; earn BLOWTORCH.
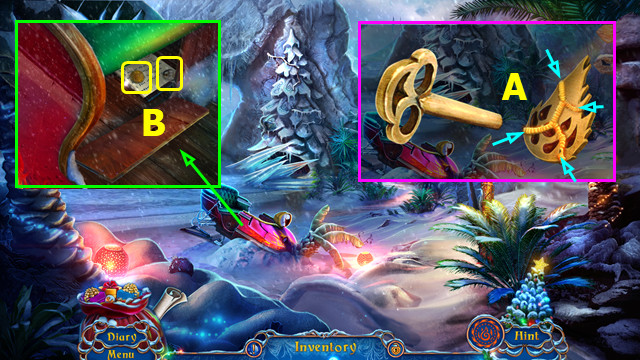
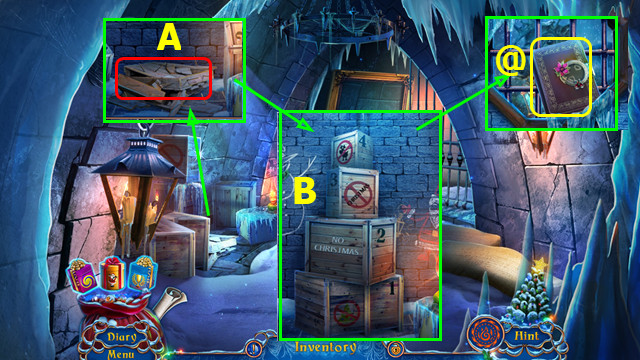
- BLOWTORCH on BROKEN FIRE KEY; trace lines (A); earn FIRE KEY.
- Use FIRE KEY; take 1/4 COINS and GEAR (B).
- Go forward.
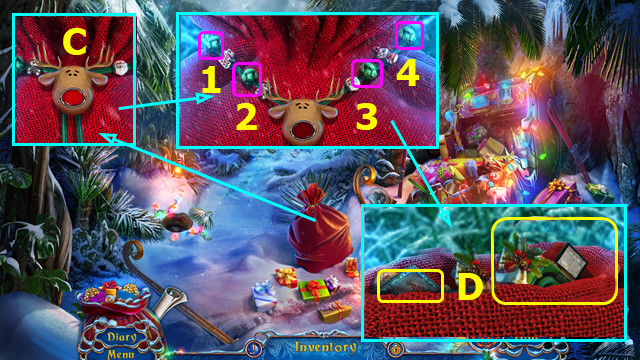
- Place ANTLER; select 2x; press nose (C).
- Select 1-4.
- Read note; take CUBE and CAMERA (D).
- Walk down.
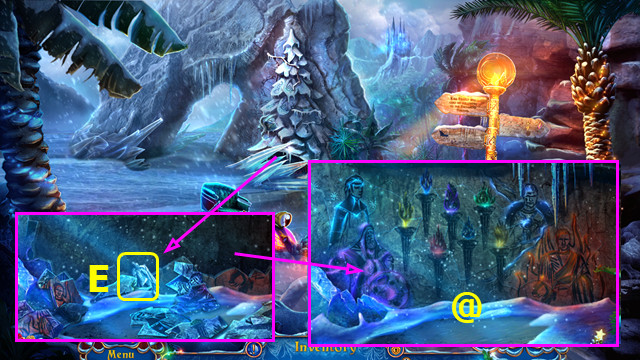
- Use BLOWTORCH; take 2/3 ELEMENTAL LORDS (E).
- Restore image; use CAMERA; earn CODE PART (@).
- Walk forward 2x.
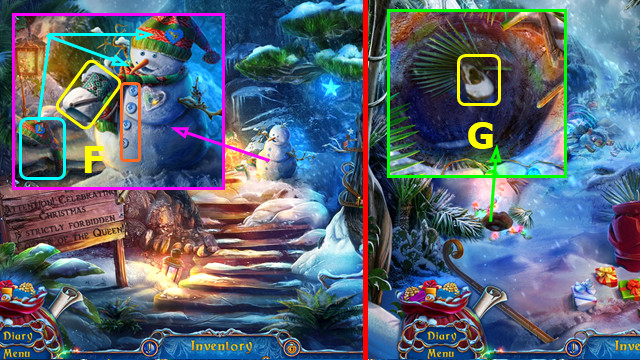
- Move hat and scarf; place BUTTONS; take MUFF (F).
- CARROT in MUFF; make MUFF WITH CARROT.
- Walk down.
- Use MUFF WITH CARROT; earn GUINEA PIG (G).
- Go forward.
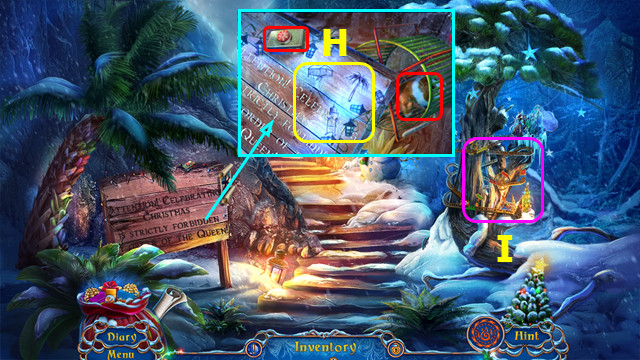
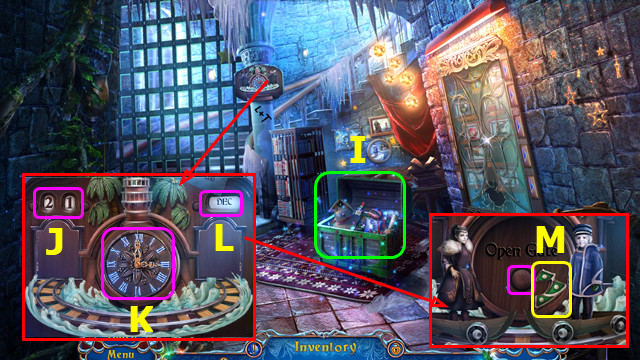
- Place GUINEA PIG; press button 3x. Use CAMERA; CODE PART becomes CODE (H).
- Select (I).

- Place GEAR (K).
- Select (L) before reindeer nears; select again once it passes.
- Select (M) before reindeer nears; select again once it passes.
- Take 3/3 ELEMENTAL LORDS (N).
- Walk down.
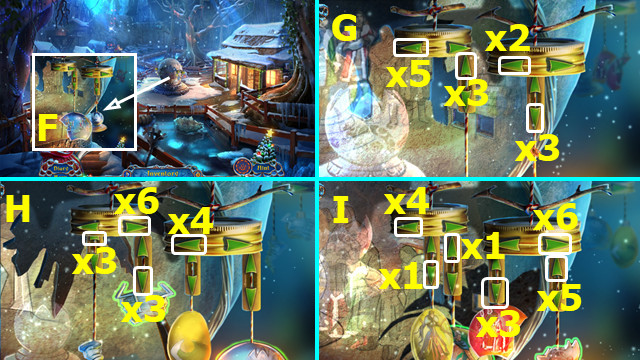
- Play HOP; earn GATE PART (O).
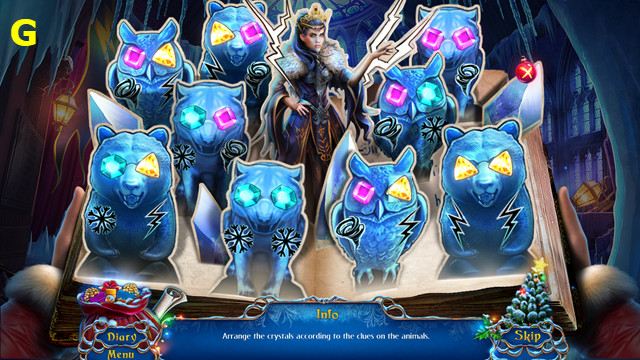
- Place 3 ELEMENTAL LORDS; solution (P).
- Take TORCHES (Q).
- Go forward; select (R).
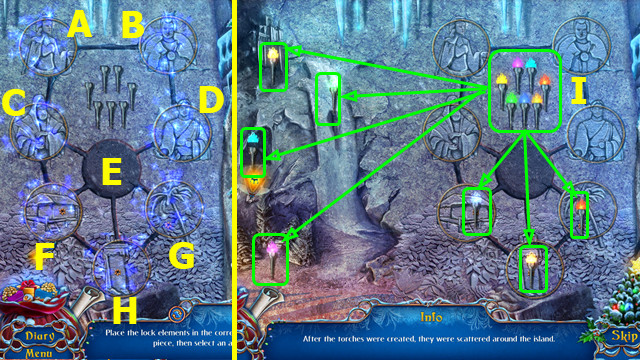
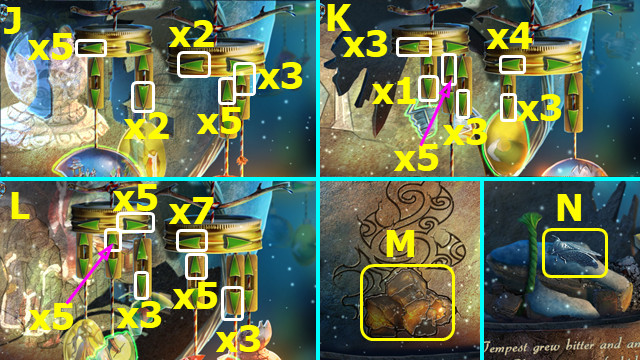
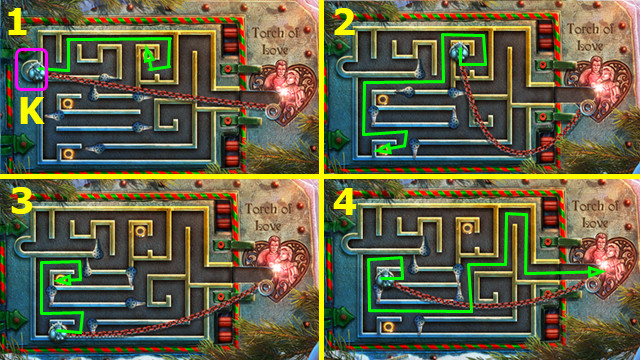
- Place TORCHES, GATE PART, and CODE.
- Solution (C-E)-(A-C)-(B-A)-(D-B)-(E-D)-(C-E)-(A-C)-(B-A).
- (D-B)-(E-D)-(F-E)-(H-F)-(G-H)-(E-G)-(C-E)-(F-C)-(E-F).
- Move torches (I) to locations (green).
- Go forward.
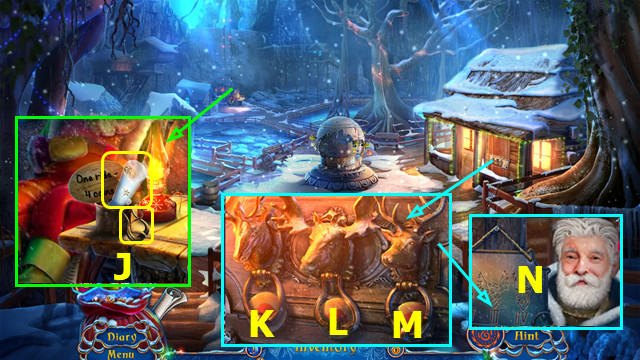
- Take DOOR KNOCKER and DRAWING (J).
- Read note; place DOOR KNOCKER; select K-M-L-K-M.
- Talk (N).
- Talk; earn TORCH PART (A).
- Place DRAWING (B).
- Play HOP; earn 1/2 CHAINS (C).
- Take POKER (D).
- Talk; earn BLANKET (E).
- Walk down.
- Place TORCH PART; use FIRE MAGIC (F).
- Casual solutions (G-H-I).
- Hard solutions (J-K-L).
- Take COAL (M).
- Take MODEL FIREFLY (N).
- COAL on CUBE; play HOP; take THREAD.
- Go right.
- Place MODEL FIREFLY; solution (A).
- Take 2/2 CHAINS (B).
- Select (C).
- Place 2 CHAINS.
- Drag D-E-F-G-H.
- Take LOCK PART (I).
- Walk down.
- Place LOCK PART (J).
- Select and fold papers (1-4).
- Solution (K).
- Take 2/4 COINS and NEEDLE (L).
- NEEDLE on THREAD; earn NEEDLE AND THREAD.
- Go right.
- Use NEEDLE AND THREAD (N).
- Place SANTA'S GLASSES (O).
- Solution (P-R).
- Earn 3-4 of 4 COINS.
- Walk down.
Chapter 2: Cliffs
- Place 4 COINS (A).
- Take WINDER; restore notice and use FIRE MAGIC (B).
- Take MUSIC BOX (C).
- Open package; take HEART (D).
- Open MUSIC BOX; take RIBBON.
- Play HOP; use RIBBON and BLANKET; earn SLED (E).
- Use POKER; select (1-5).
- Take LENS and use SLED (F).
- Take BIRD TILE (G).
- Take MITTENS (H).
- Place WINDER; select (1-6); take HARPOON.
- Walk down.

- Use MITTENS; open box. Read note; take BROKEN HARPOON (I).
- HARPOON on BROKEN HARPOON; earn HARPOON GUN.
- Go forward.
- Use HARPOON GUN; open crate. Take HEART PART and HARP STRINGS (J).
- Place HEART PART; take CANDLES and PINE CONE (K).
- Walk down.
- Use PINE CONE; take CLUE (L).
- Go forward.
- Take BROKEN MAGNIFIER (M).
- LENS and CLUE on BROKEN MAGNIFIER; earn MAGNIFIER WITH CLUE.
- Use MAGNIFIER WITH CLUE.
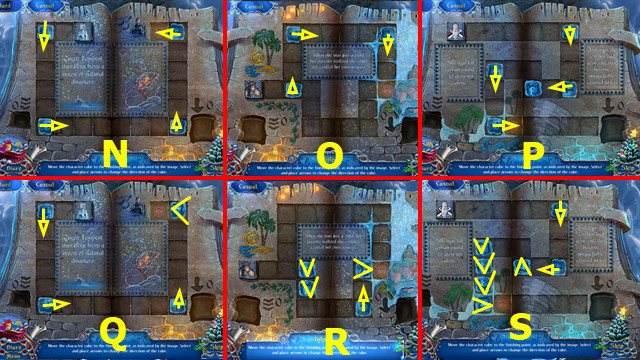
- Select symbols 1-8 (N).
- Use FIRE MAGIC (A).
- Place CANDLES; use FIRE MAGIC (B).
- Take RING; place HARP STRINGS (C).
- Play HOP; earn SNOWFLAKE (D).
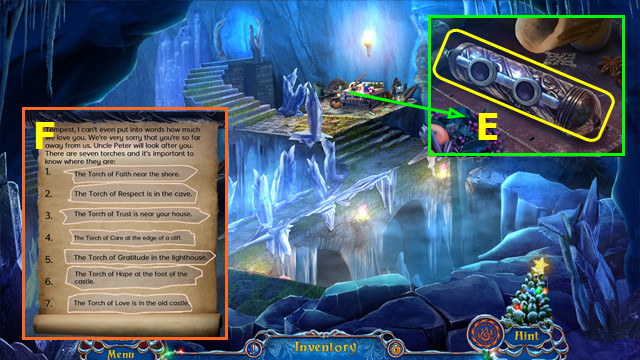
- Take WHISTLE and BOOK LEGEND (E).
- Place SNOWFLAKE; select 3x (F).
- Select 2x (G); select (H).

- Select (I-Jx2-Kx3).
- Play HOP; earn LIGHTNING (L).
- Use FIRE MAGIC; place LIGHTNING and HEART (M).
- Casual solutions (N-P).
- Hard solutions (Q-S).
- Use FIRE MAGIC; take FREEZING POTION and PART OF BEAR (A).
- Use FREEZING POTION (B).
- Go left.
- Use WHISTLE (C).
- Select (D).
- Solution (E).
- Go forward.
- Take PENDANT (F).
- Read note; take EMPTY JAR (G).
- Walk down.
- Place EMPTY JAR; drag 1-4 to jar; take JAR WITH FIREFLIES (H).
- Go forward.
- Use JAR WITH FIREFLIES (I).
- Play HOP; earn BOW (J).
- Go right.
- Read note; take PART OF BAG (K).
- Walk down 2x.
- Place PART OF BAG; take TORCH TRIGGER and SNOWFLAKE (L).
- Go forward.

- Place SNOWFLAKE; drag 4 snowflakes (M).
- Go forward.
- Take GLUE (N).
- PART OF BEAR and GLUE on CUBE.
- Solution (O); select center; take RUBY.
- Place RING; take TEMPEST FIGURINE (P).
- Use BOW; select when red line is on target 2x; earn BOTTLE and CHARM (Q).
- CHARM on BOOK LEGEND; drag arrow tabs to move through book; take WOODPECKER.
- Place BIRD TILE and WOODPECKER; select 1-3.
- Go forward.
- Take CONTROLLER (A).
- Talk; use FIRE MAGIC; take TEMPEST'S PENDANT (B).
- Walk down.
- Place TEMPEST'S PENDANT; open box; take CANDY CANE (C).
- Go forward.
- Use CANDY CANE; take SPARKLER (D).
- Walk down 2x.
- Place RUBY (E).
- Select (1-5).
- Take ICE CROWN (F).
- Go right.
- Use SPARKLER and FIRE MAGIC; earn KEYS (G).
- Place TORCH TRIGGER (H).
- Move (I-J).
- Select (K-L-M).
- Select (N).
- Move items 1-11 (P).
- Use FIRE MAGIC (A).
- Read note; take BELLS and CANDLE (B).
- BELLS on CUBE; solution; take RABBIT (C).
- Walk down; go forward 2x.
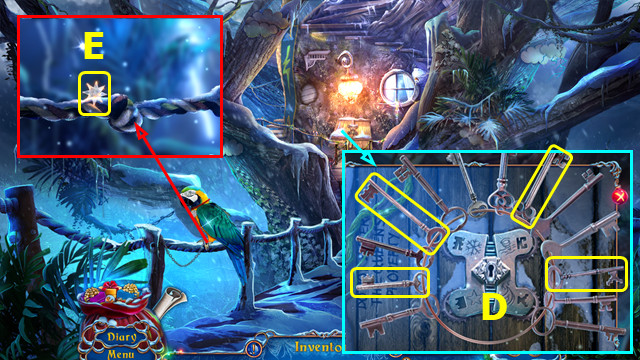
- Place KEYS; use 4 keys on lock (D).
- Play HOP; earn LORD OF SPACE.
- Use KEYS; take STAR (E).
- Go down 2x; go right.
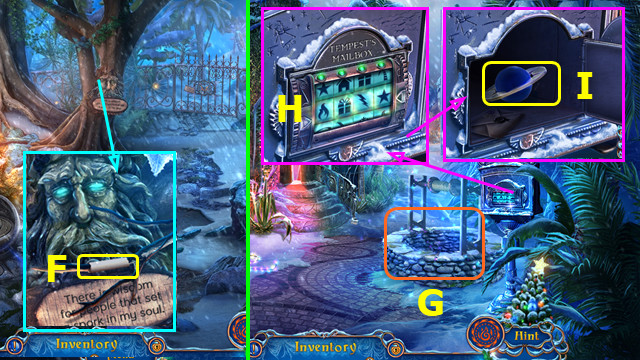
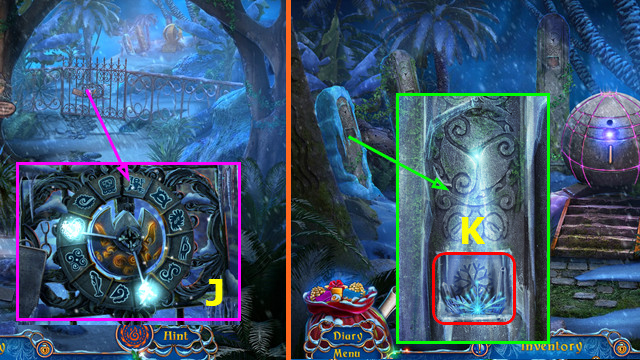
- Give STAR, TEMPEST FIGURINE, LORD OF SPACE; take PAPER CODE (F).
- Walk down.
- Play HOP; earn PART OF GATE (G).
- Place PAPER CODE; set code (H).
- Read note; take PLANET (I).
- Go right.
Chapter 3: Stonehenge
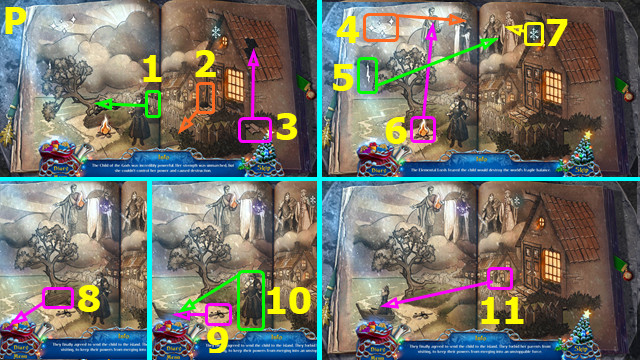
- Place PART OF GATE; solution (J).
- Go forward.
- Place ICE CROWN (K).
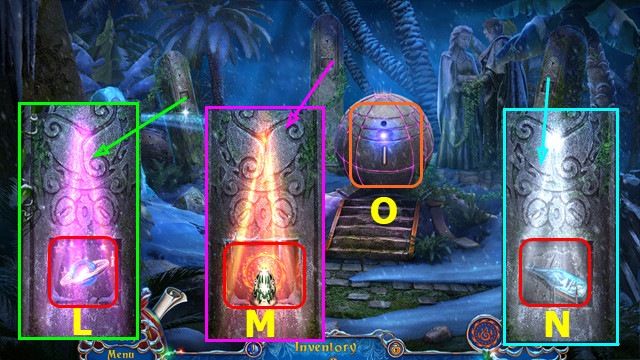
- Place PLANET (L).
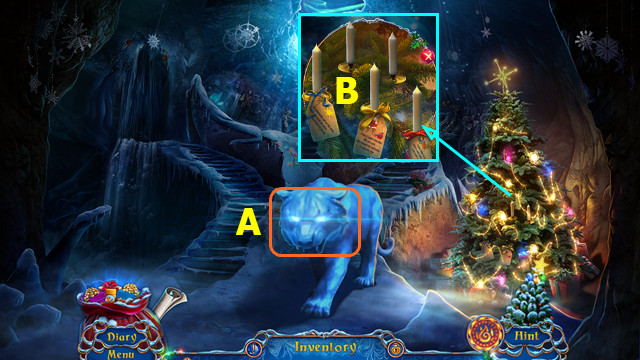
- Use CANDLE and FIRE MAGIC (M).
- Take OLD COIN; place BOTTLE (N).
- Select (O).
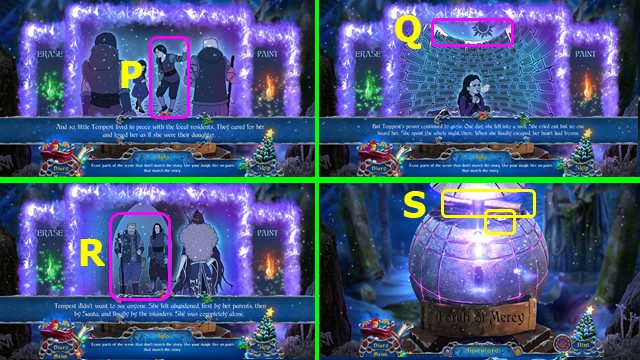
- Use erase and then paint (P-Q-R).
- Use FIRE MAGIC; take SADNESS and MAP (S).
- Open MAP.
- SADNESS on CUBE.
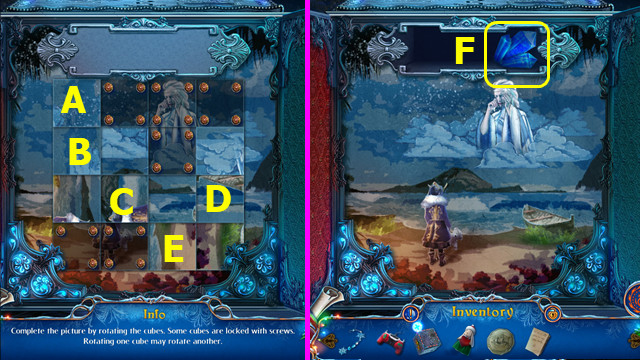
- Select A-Bx2-C-Dx2-E.
- Take 1/2 CRYSTALS (F).
- Go forward.
- Use FIRE MAGIC; take HANDLE (G).
- Use HANDLE (H).
- Use CONTROLLER (I).
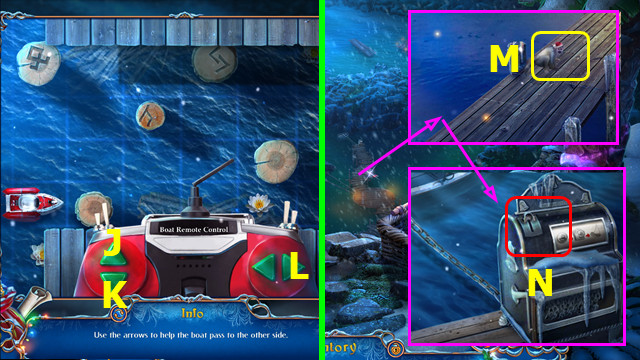
- Select (J-L-K-L-J-L).
- Take MONKEY (M).
- Use OLD COIN and MAP (N).
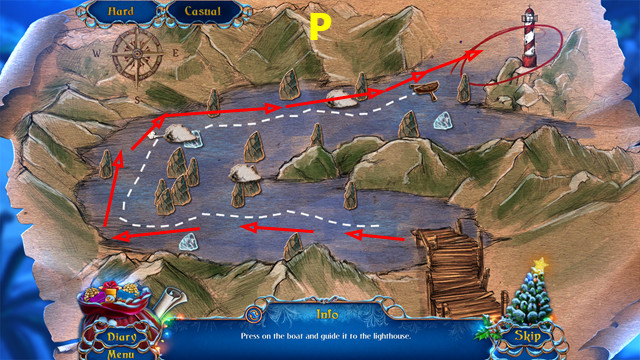
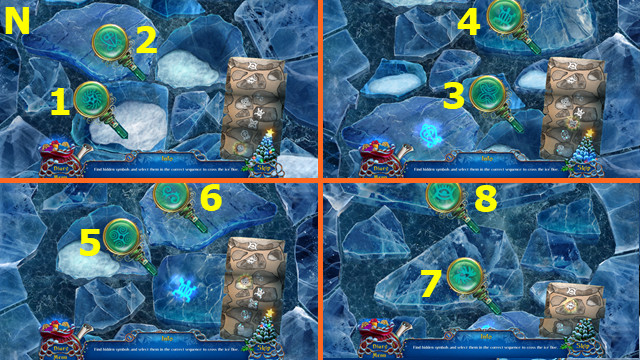
- Move boat on path (P).
- Hard level; avoid ice and wind.
- Casual level; no ice or wind.
- Take GEARS (A).
- Place PENDANT; solution; take PART OF REINDEER (B).
- Go forward.
- Place GEARS; solution (C).
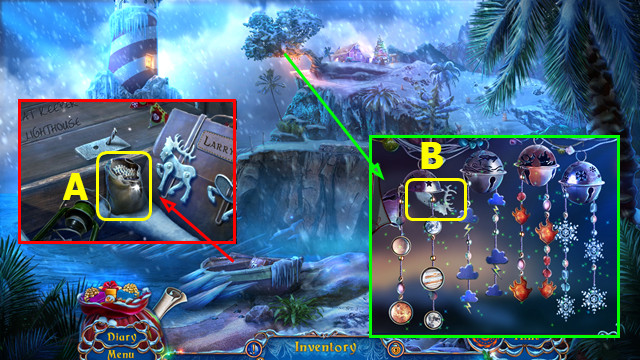
- Take RING; use MONKEY; take LIGHTBULB (D).
- Walk down.
- Open; replace LIGHTBULB (E).
- Go left.
- Open; play HOP; earn 1/2 LEG OF REINDEER (F).
- Take STONES (G).
- Restore image; take 1/3 PART OF PAPER (H).
- Restore image; take 2/3 PART OF PAPER (I).
- Select differences; take 3/3 PART OF PAPER (J).
- Select each PARTS OF PAPER; take PAPER WITH CODE.
- Walk down.
- Use RING; take WIRES (A).
- Go forward.
- Open (B).
- Place WIRES; solution (C).
- Turn switch; take 2/2 LEG OF REINDEER (D).
- 2 LEGS OF REINDEER on PART OF REINDEER; earn REINDEER.
- Walk down.
- Place REINDEER; solution (E).
- Read postcard; take BASKET (F).
- STONES in BASKET; earn BASKET WITH STONES.
- Go forward.
- Place BASKET WITH STONES (G).
- Take RAILWAY (H).
- Walk down, left.
- Play HOP; earn BOLT (I).
- Place PAPER WITH CODE and RAILWAY; set J-K-L as shown.
- Take BROKEN CHRISTMAS TREE; push button (M).
- Go left.
- Take SCARF (N).
- Place RABBIT; use FIRE MAGIC (O).
- Go right.
Chapter 4: The Bridge
- Take STRING (P).
- Take ROPE (Q).
- Use FIRE MAGIC (R).
- Select pairs (S).
- Hard level will shuffle after incorrect choice.
- Walk down 2x.
- Use SCARF; select 1-7.
- Take TELESCOPIC HAND (A).
- Extend TELESCOPIC HAND.
- Go forward and right.
- Use TELESCOPIC HAND; earn KITE (C).
- Take TEMPEST'S DRAWING from KITE.
- Walk down.
- Use TEMPEST'S DRAWING and FIRE MAGIC (D).
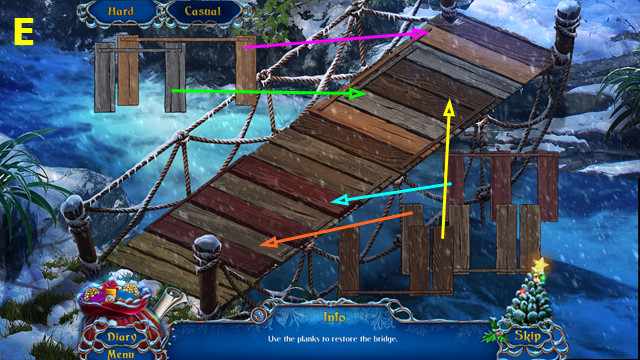
- Select (E).

- Solution (F).
- Use FIRE MAGIC; take TORCH and PART OF CHRISTMAS TREE (G).
- PART OF CHRISTMAS TREE on BROKEN CHRISTMAS TREE; earn CHRISTMAS TREE.
- TORCH on CUBE.
- Select (L-J-I-L-K-I-K-H).
- Take ICE PYRAMID (M).
- Walk right.
- Place and select CHRISTMAS TREE (O).
- Set dials (1-3).
- Take CARABINER (P).
- CARABINER and BOLT on ROPE; earn CLIMBING EQUIPMENT.
- Use CLIMBING EQUIPMENT and FIRE MAGIC; move left or right to avoid snowflakes (Q).
- Go forward.
- Go left.
- Take SANTA FIGURINE (A).
- Take 2/2 CRYSTALS (B).
- Walk down.
- Take STOCKING (C).
- Place CRYSTALS; solution (D).
- Go forward.
- Take 1/4 RINGS OF THE ELEMENTS (E).
- Take WAX and 1/2 PART OF PICTURE (F).
- Use FIRE MAGIC (G).
- Play HOP; earn PART OF MAP (H).
- Walk down.
- Place PART OF MAP; solution (I).
- Take 2/2 PART OF PICTURE (J).
- Walk left.
- Place 2 PARTS OF PICTURE.
- Rotate into position M-N-O-L-K.
- Take CROWN (P).
- Walk down.
- Place CROWN (A).
- Select 1-7.
- Walk right.
- Take SHAWL; use FIRE MAGIC (B).
- Talk; take STAMP (C).
- Place STAMP; solution (D).
- Play HOP; earn SHARP STONE (E).
- Walk down, left.
- Use SHAWL (F).
- Use SHARP STONE. Read note; open box; take BROKEN STICK (G).
- STRING on BROKEN STICK; earn STICK.
- Use STICK; take HINT (H).
- Walk down, right.
- Play HOP; earn HEART (J).
- Place HINT; select 1-4.
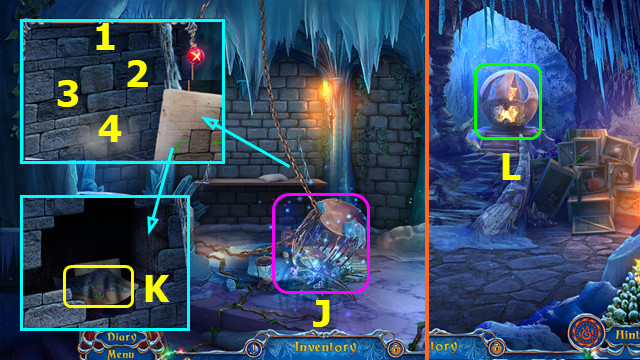
- Read letter; take TORCH HINT (K).
- Walk down. left.
- Select (L).
- Remove cover; place TORCH HINT.
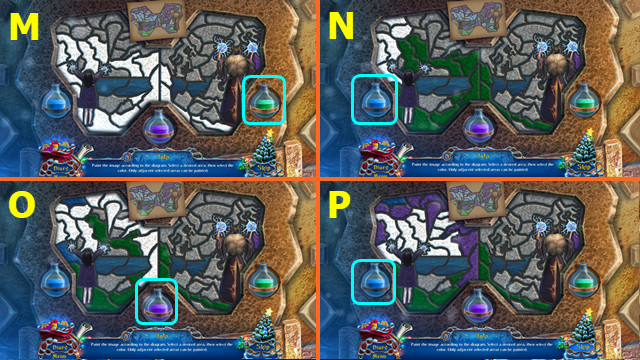
- Select white areas; then select indicated paint (M-N-O-P).
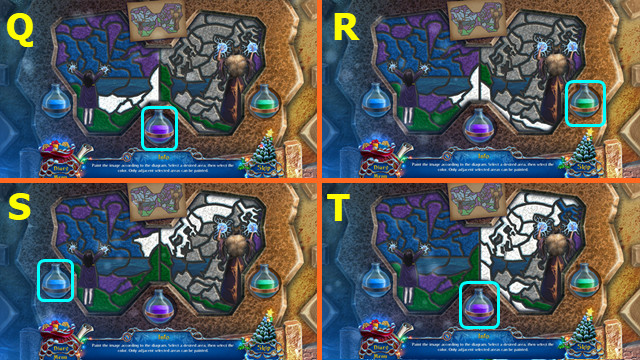
- Select white areas; then select indicated paint (Q-R-S-T).
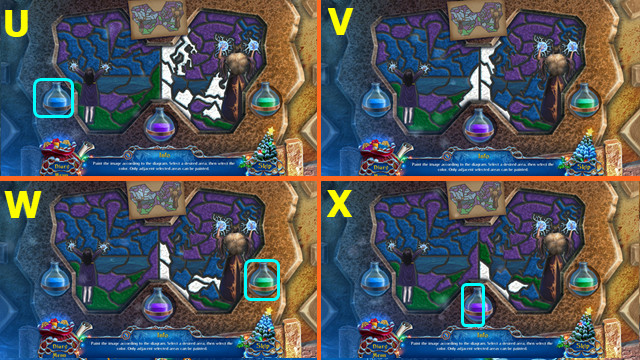
- Select white areas; then select indicated paint (U-V-W-X).
- Use FIRE MAGIC; take FIREFLY and 1/2 SNOWFLAKE (A).
- FIREFLY on CUBE.
- Select 1-11.
- Take PORTRAIT OF TEMPEST (@).
- Walk down, forward.
Chapter 5: The Library
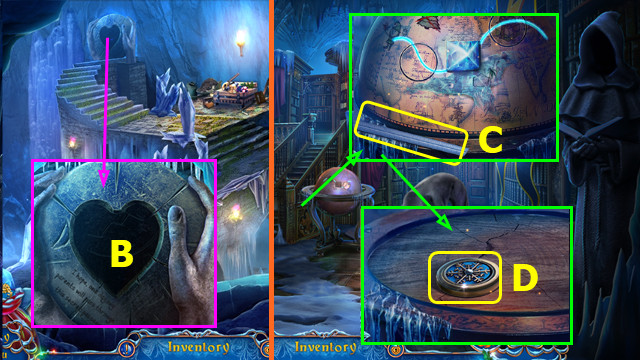
- Place HEART (B).
- Go forward.
- Take RULER; place ICE PYRAMID; solution (C).
- Take 2/2 SNOWFLAKE (D).
- Walk down.
- Use RULER; take SCROLL (E).
- 2 SNOWFLAKES on SCROLL.
- Solution (F).
- Take NOTES.
- Go forward.
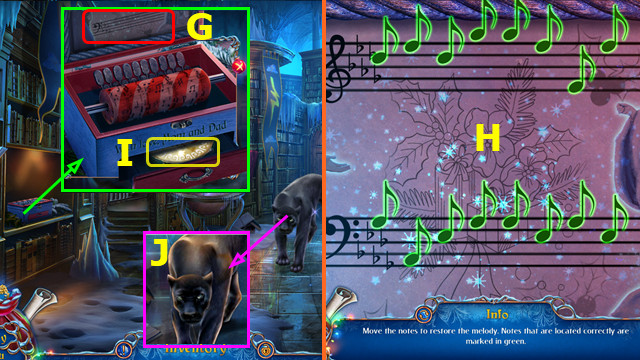
- Open box; place NOTES (G).
- Solution (H).
- Take TAMBOURINE (I).
- Use TAMBOURINE (J).
- Remove snow; use WAX and FIRE MAGIC; take GIFT (K).
- Remove items; place GIFT; take PART OF PICTURE (L).
- Place PART OF PICTURE (M).
- Restore items (N-P).
- Take TOWELS (Q).
- Break crate; use STOCKING (A).
- Stack crates (B).
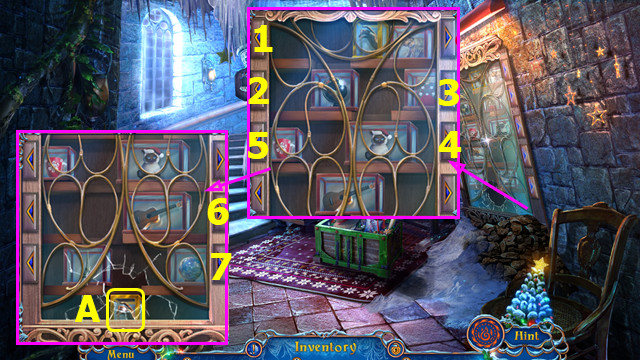
- Take DIARY; use TOWELS (@).
- Take PORTRAIT OF ABIGAIL and read file (C).
- Use FIRE MAGIC (D).
- Place SANTA FIGURINE (E).
- Play HOP; earn CHAIN (F).
- PORTRAIT OF ABIGAIL on DIARY; select snowman.
- Solution (G).
- Take STORM.
- Go forward.
- Take 1/2 CIRCLE; read note (H).
- Place CHAIN; take PANELING (I).
- Go left.
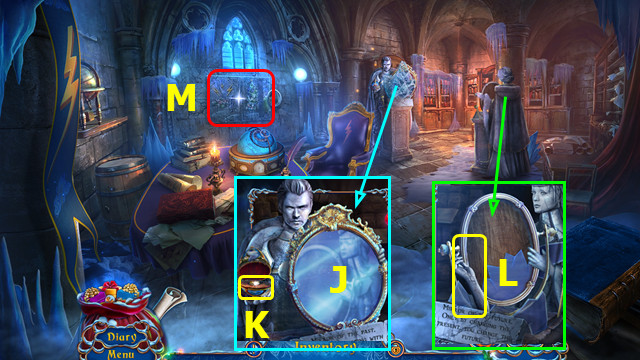
- Use FIRE MAGIC; select mirror 2x (J).
- Place STORM; take 2/4 RINGS OF THE ELEMENTS (K).
- Take STONE ARM (L).
- Select (M).
- Place PANELING.
- Select N-O-P.
- Take LEVER (Q).
- Walk down.
- Use LEVER; take BALANCE OF JUSTICE (A).
- Walk down.
- Play HOP; earn 3/4 RINGS OF THE ELEMENTS (B).
- Place BALANCE OF JUSTICE; take STONE CROWN (C).
- Go forward.
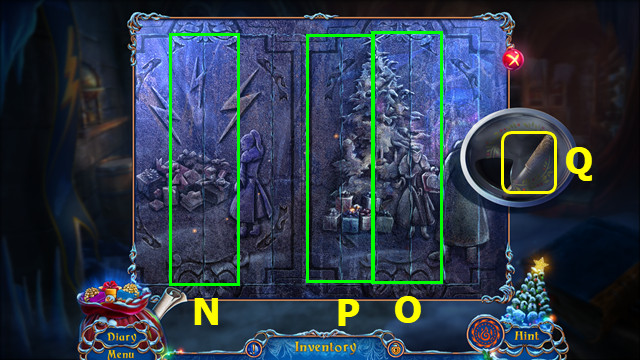
- Play HOP; place STONE ARM and STONE CROWN (D).
- Take MIRROR SHARD (E).
- Go left.
- Place MIRROR SHARD; restore mirror; select lever 2x (F).
- Take 2/2 CIRCLE (G).
- Go down 2x.
- Place 2 CIRCLES; solution; take 4/4 RINGS OF THE ELEMENTS (H).
- Go forward.
- Place 4 RINGS OF THE ELEMENTS; solution (I).
- Walk right.
- Select (J).
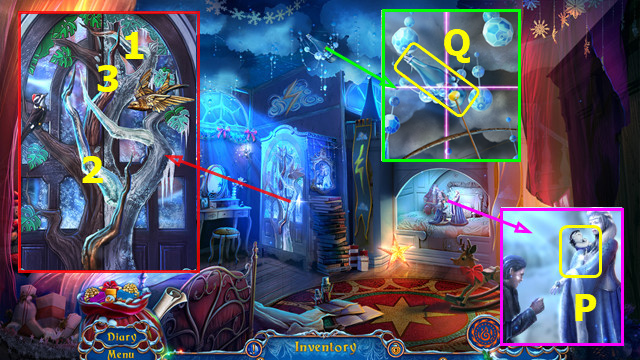
- Place PORTRAIT OF TEMPEST (K).
- Solution (1-4).
- Use FIRE MAGIC; take PENDANT FOR TEMPEST (M).
- Use FIRE MAGIC (N).
- Select center when ball is present (O) to fill up bar (P).
- Use PENDENT FOR TEMPEST (Q).
- Congratulations! You have completed Yuletide Legends: Frozen Hearts!
Created at: 2017-12-25