

Walkthrough Menu
- General Tips
- Introduction
- Chapter 1: Shipwrecked
- Chapter 2: The House
- Chapter 3: The Balcony
- Chapter 4: The Chapel
- Chapter 5: The Dome
General Tips
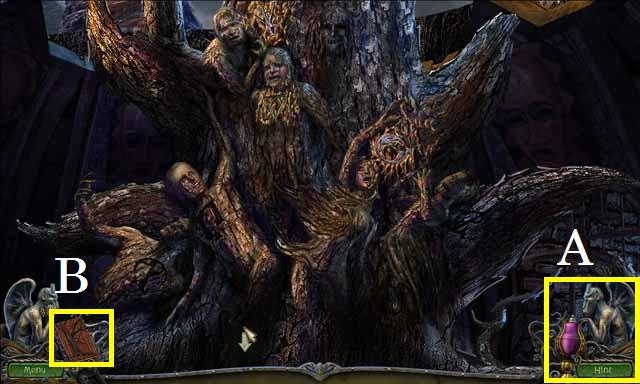 • This is the official guide for Natural Threat Ominous
Shores. • You will not need to follow the exact path of this
guide; however, some actions are required before you can
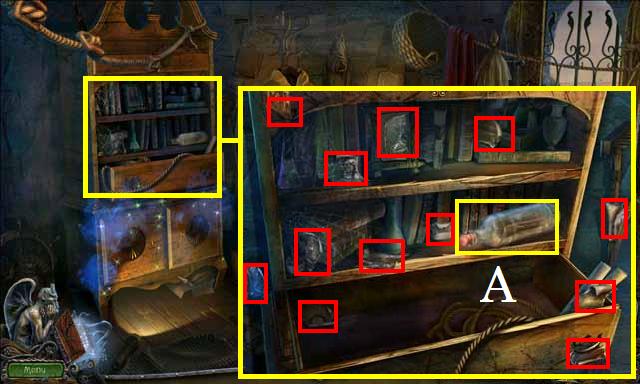
complete another scene. • If you get stuck in your game play
you can use the Hint Button (A). • Zoom into the sparkling
areas to trigger a Hidden Object Scene. Throughout the guide,
we will use the acronym ‘HOS’ for Hidden Object Scenes. • All
of the items in the HOS are marked in green unless otherwise
noted. • Make sure to watch the videos for additional game
play hints. • Make sure to pick up notes along the way for
additional hints in the game. • The notes can be viewed in the
journal (B).
• This is the official guide for Natural Threat Ominous
Shores. • You will not need to follow the exact path of this
guide; however, some actions are required before you can
complete another scene. • If you get stuck in your game play
you can use the Hint Button (A). • Zoom into the sparkling
areas to trigger a Hidden Object Scene. Throughout the guide,
we will use the acronym ‘HOS’ for Hidden Object Scenes. • All
of the items in the HOS are marked in green unless otherwise
noted. • Make sure to watch the videos for additional game
play hints. • Make sure to pick up notes along the way for
additional hints in the game. • The notes can be viewed in the
journal (B).
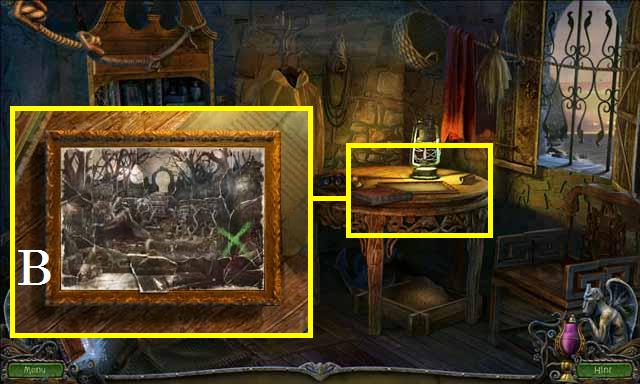
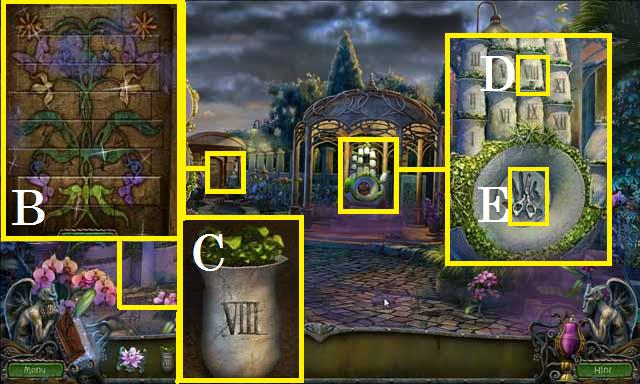
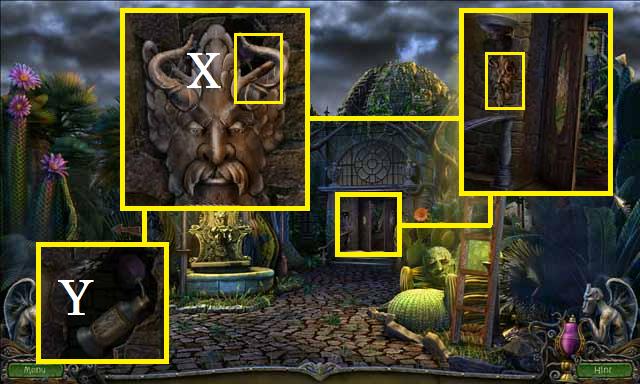
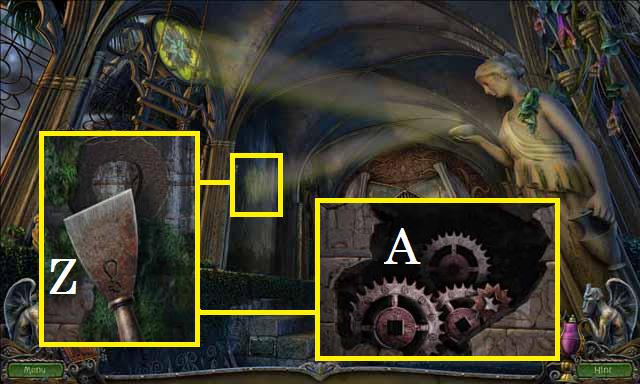
Introduction
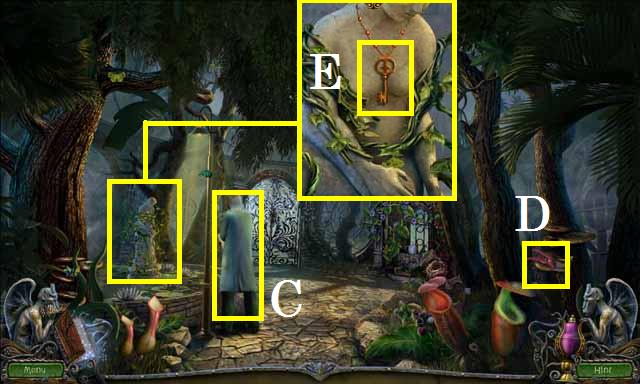 • Tap Professor Steiner (C). • Pick up the PRUNING SHEARS (D).
• Zoom into the statue; cut the vines with the PRUNING SHEARS
and pick up the KEY (E).
• Tap Professor Steiner (C). • Pick up the PRUNING SHEARS (D).
• Zoom into the statue; cut the vines with the PRUNING SHEARS
and pick up the KEY (E).
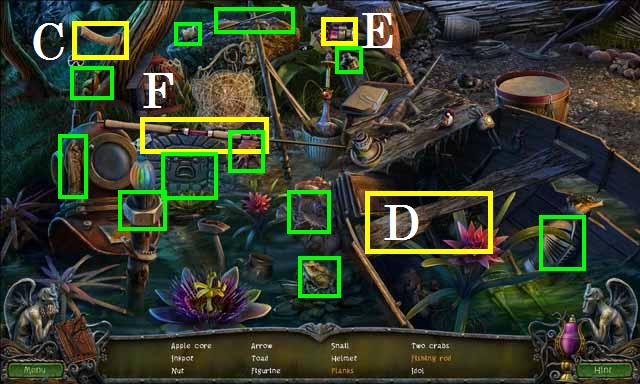
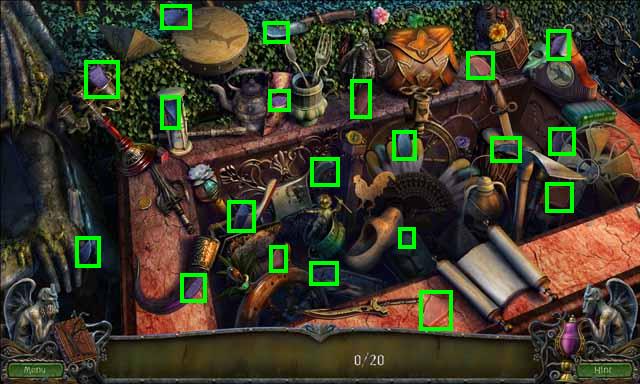
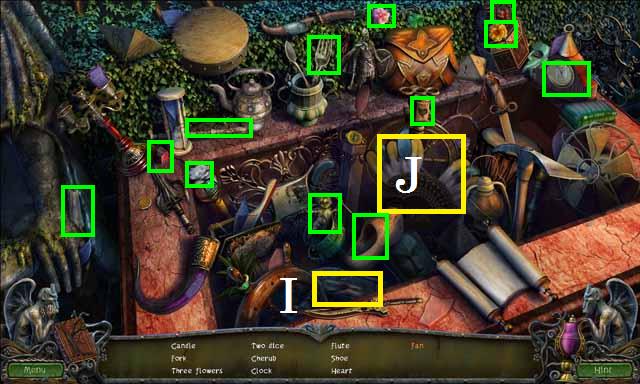
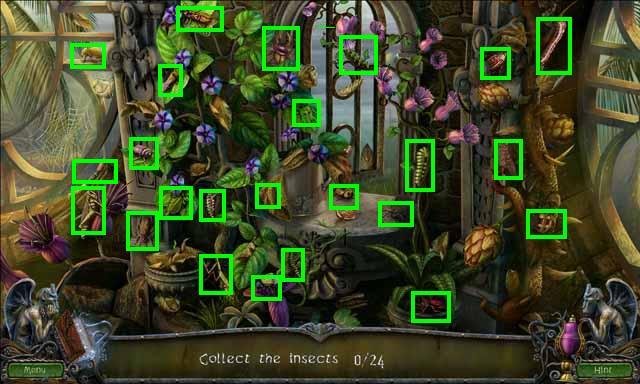 • Zoom into the sparkles to play a HOS. • Collect all of the
insects marked in green, to receive the INSECTS.
• Zoom into the sparkles to play a HOS. • Collect all of the
insects marked in green, to receive the INSECTS.
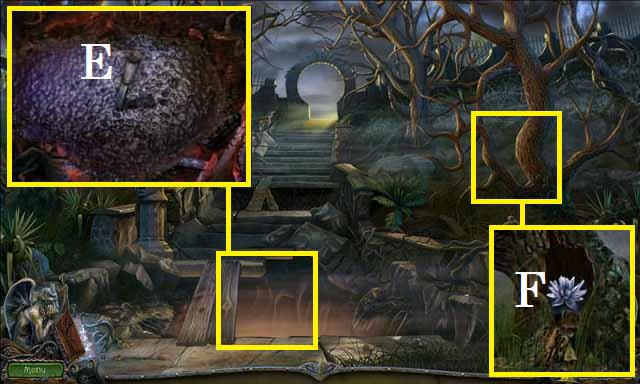
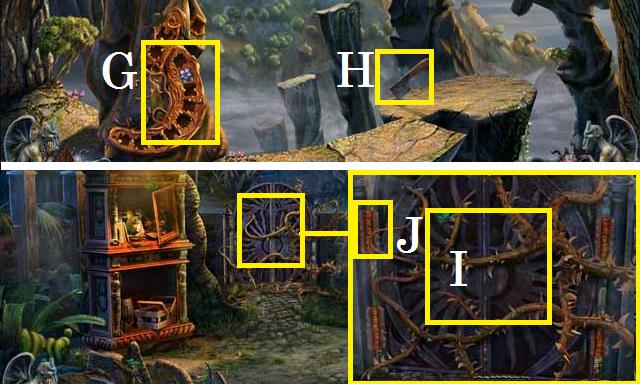
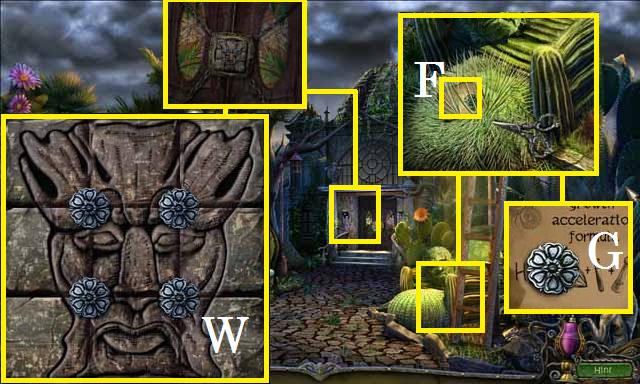
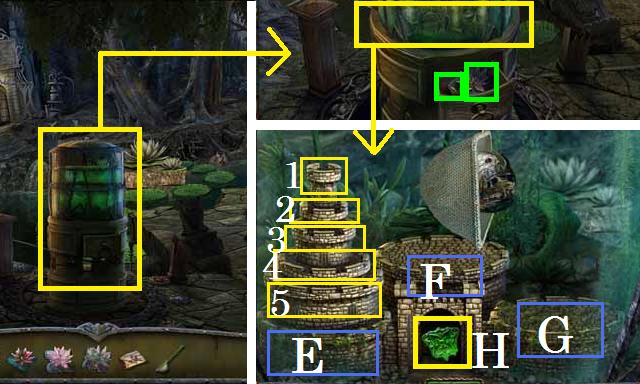
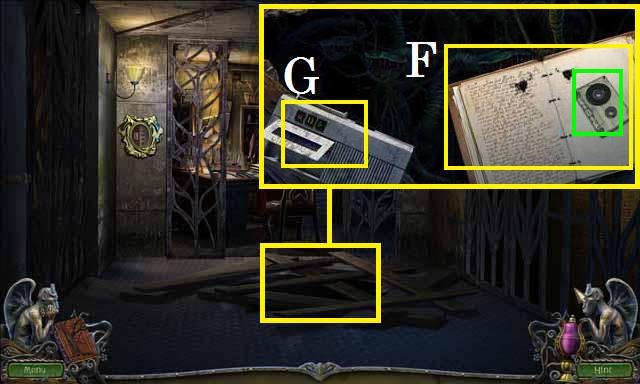
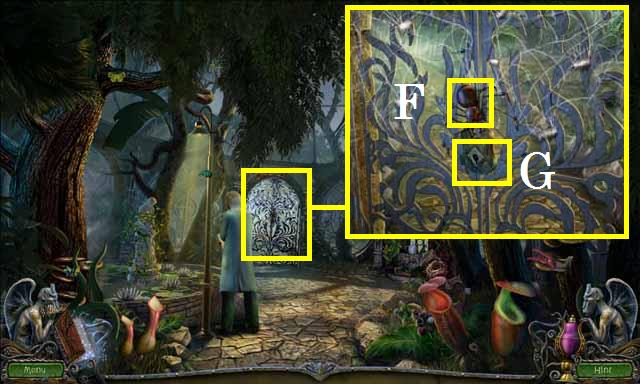 • Zoom into the gate; feed the INSECTS to the spider (F). •
Place the KEY in the lock (G) and move forward to the house
entrance.
• Zoom into the gate; feed the INSECTS to the spider (F). •
Place the KEY in the lock (G) and move forward to the house
entrance.
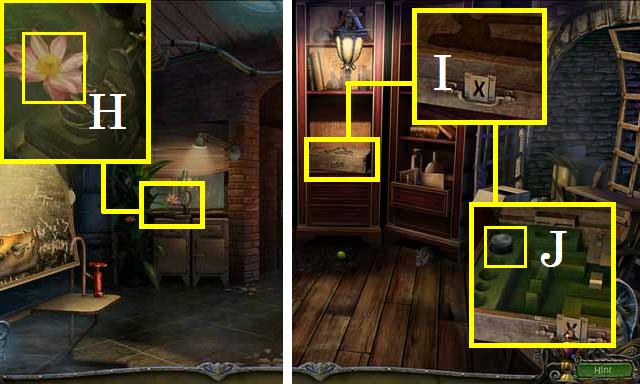
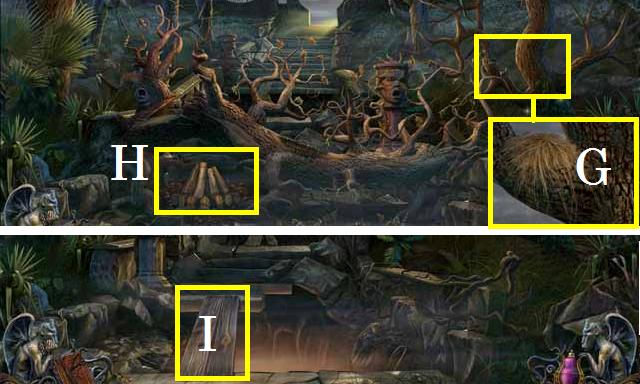
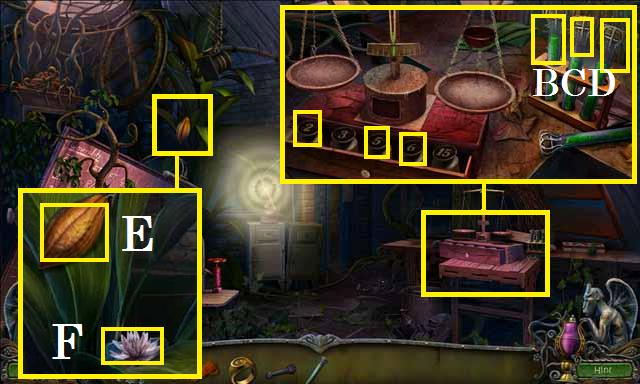
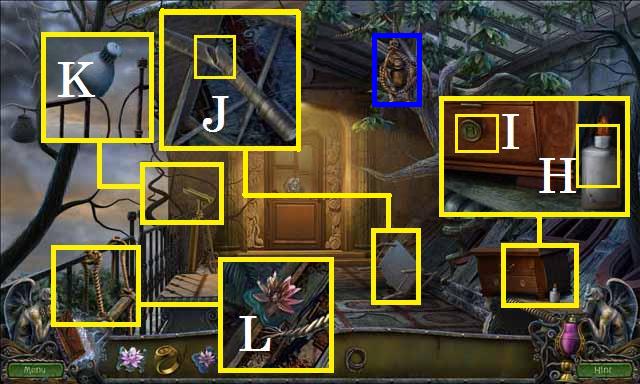
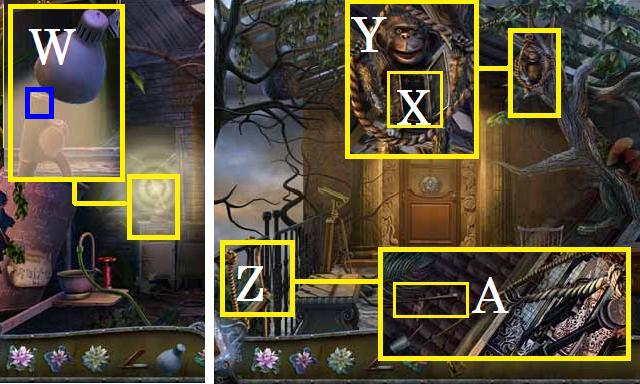
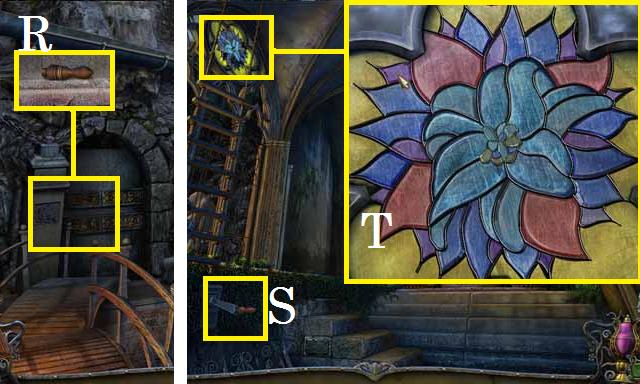
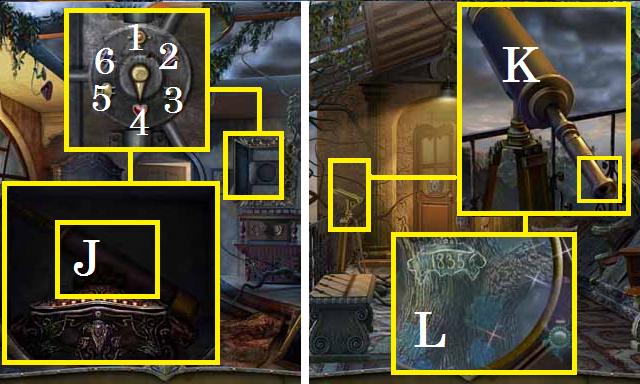
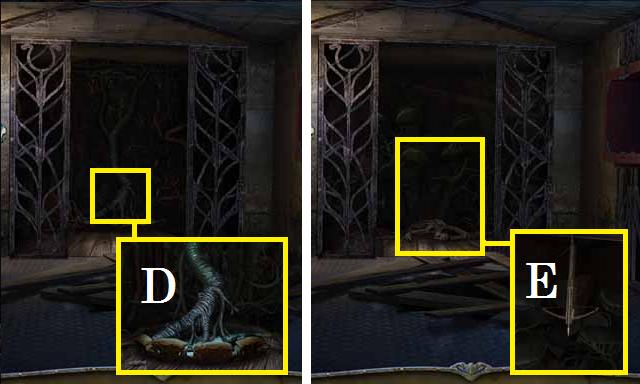
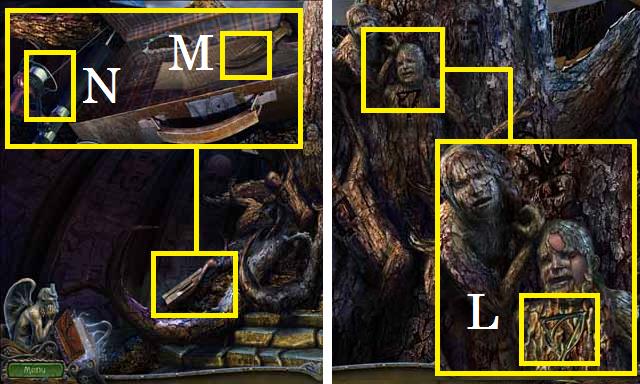
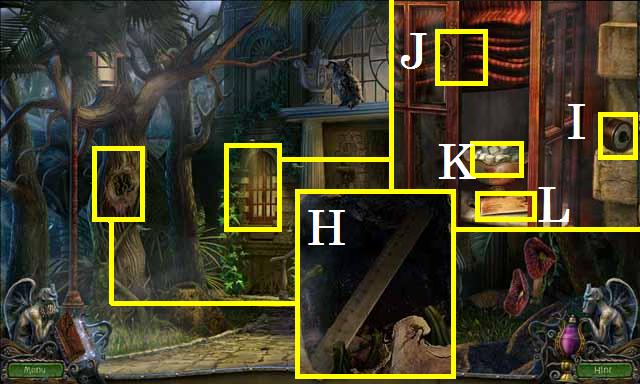 • Zoom into the tree; cut the vines with the PRUNING SHEARS
and pick up the RULER (H). • Zoom into the window; pick up the
SMALL WHEEL (I) and open the latch (J) with the RULER. • Pick
up the SUGAR (K) and note (L).
• Zoom into the tree; cut the vines with the PRUNING SHEARS
and pick up the RULER (H). • Zoom into the window; pick up the
SMALL WHEEL (I) and open the latch (J) with the RULER. • Pick
up the SUGAR (K) and note (L).
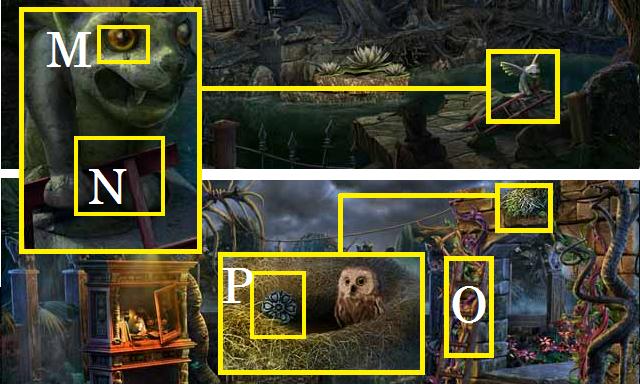
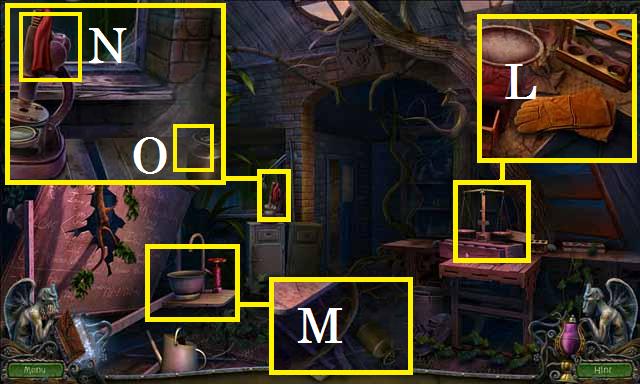
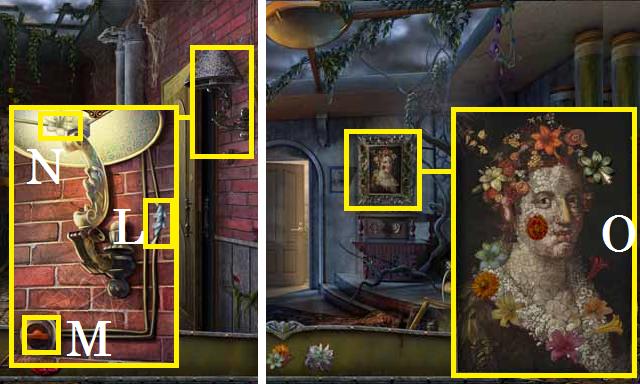
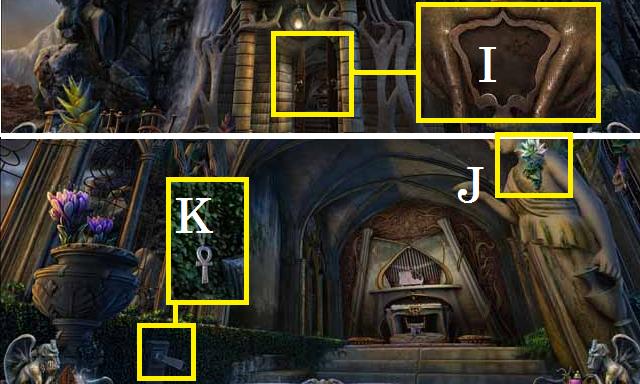
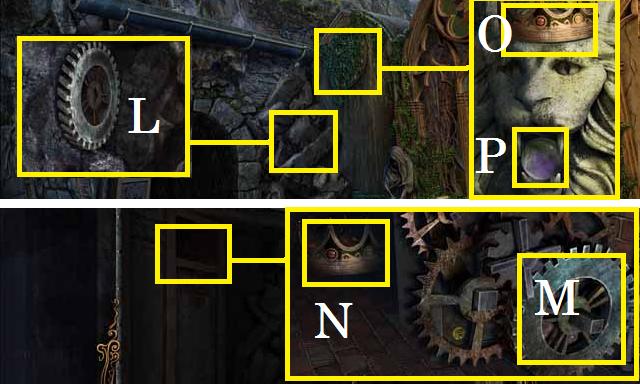
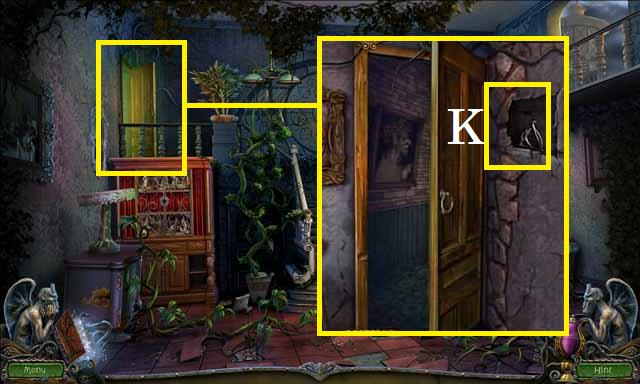
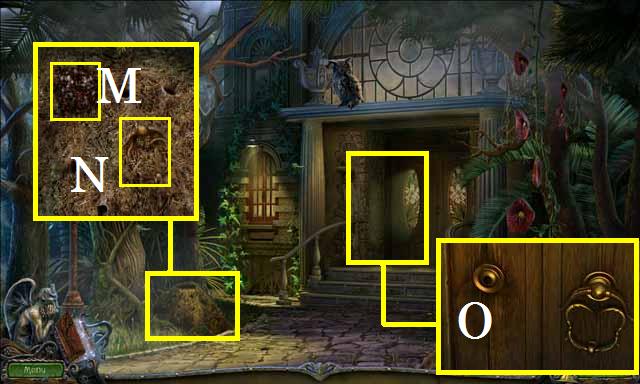 • Zoom into the anthill; place the SUGAR (M) and pick up the
DOOR KNOB (N). • Zoom into the door; place the DOOR KNOB (O)
and enter to the main entryway.
• Zoom into the anthill; place the SUGAR (M) and pick up the
DOOR KNOB (N). • Zoom into the door; place the DOOR KNOB (O)
and enter to the main entryway.
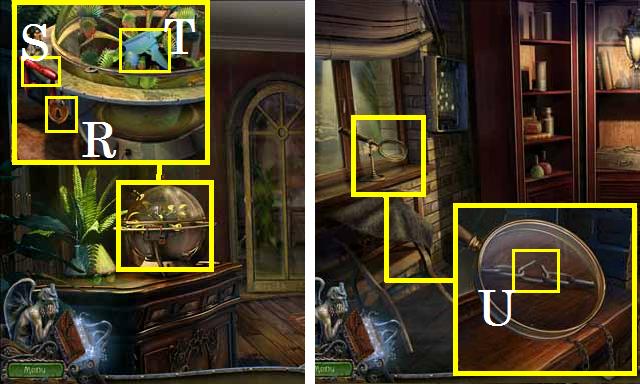
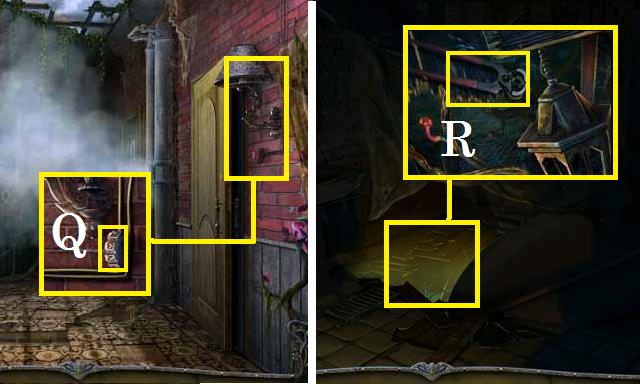
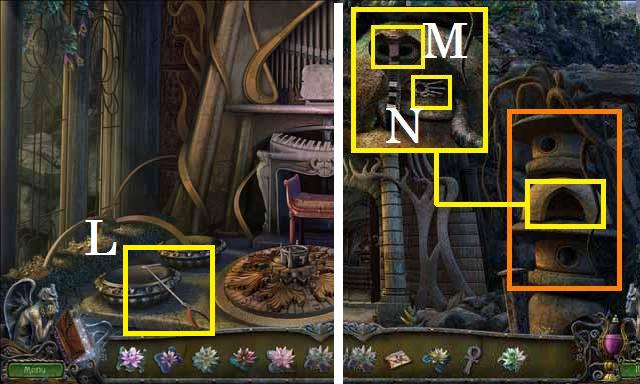
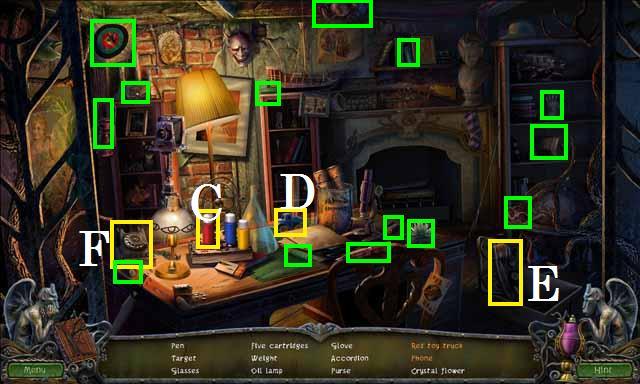
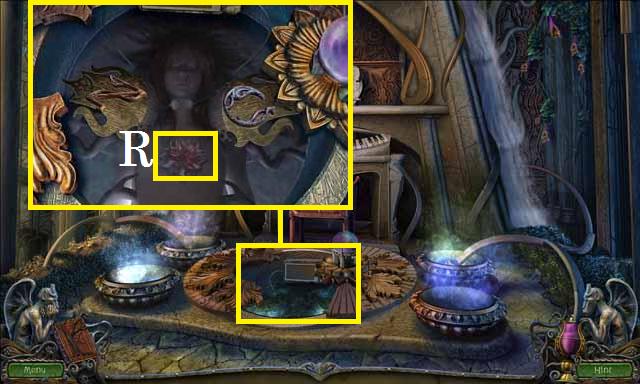
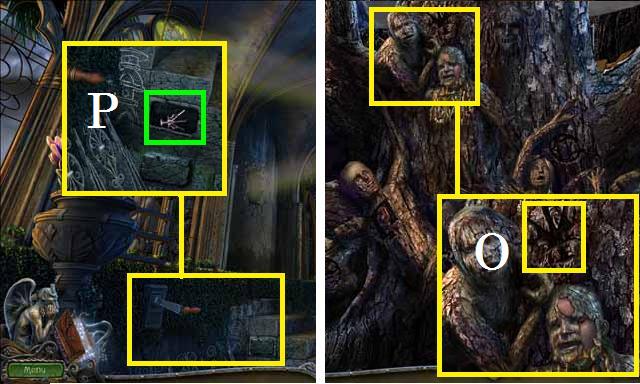
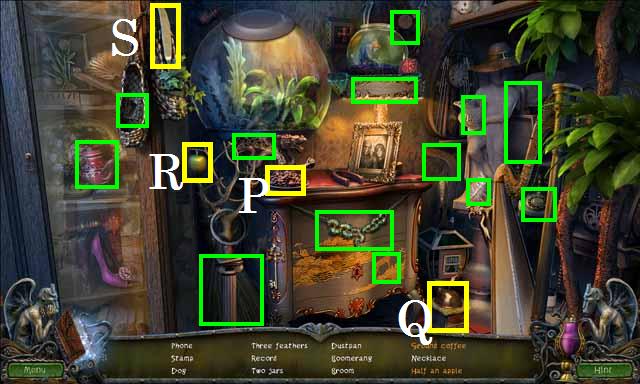 • Zoom into the sparkles to play a HOS. • Pour the coffee (P)
into the grinder (Q). • Cut the apple (R) with the knife (S).
• Receive the BROOM AND DUSTPAN.
• Zoom into the sparkles to play a HOS. • Pour the coffee (P)
into the grinder (Q). • Cut the apple (R) with the knife (S).
• Receive the BROOM AND DUSTPAN.
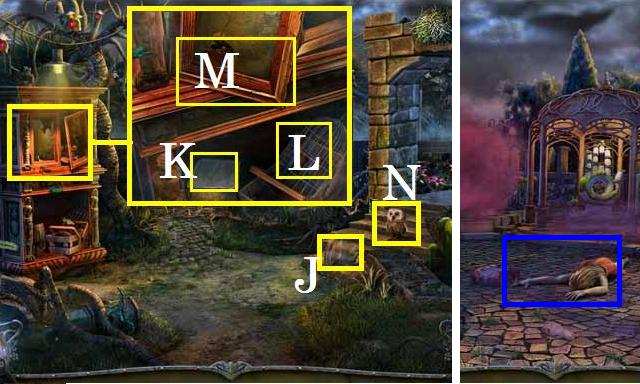
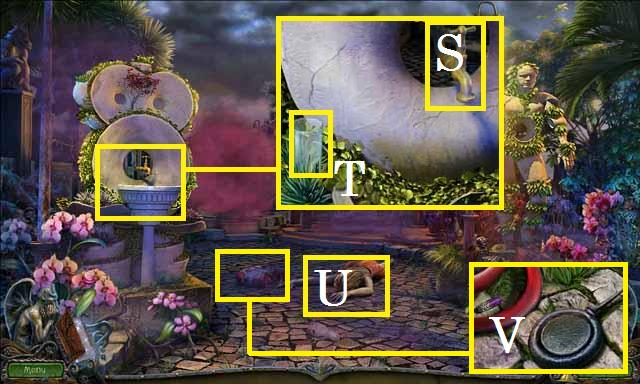
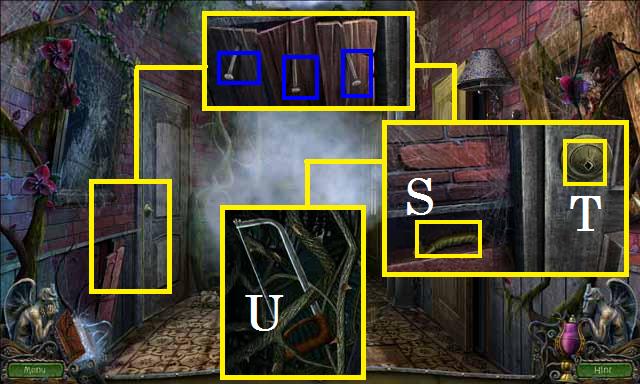
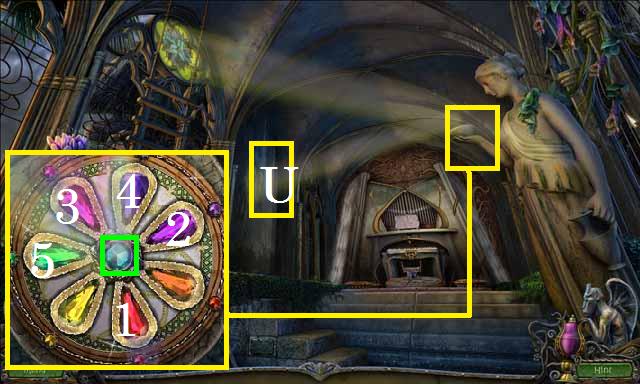
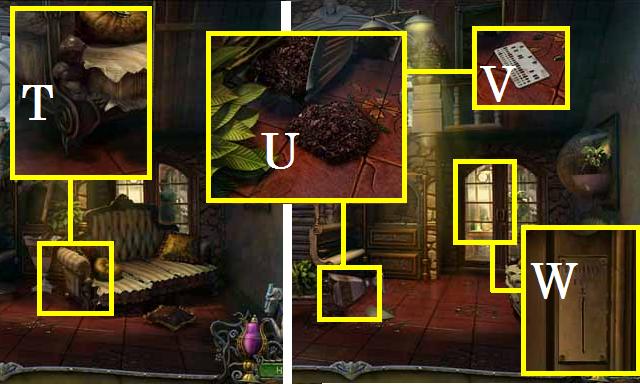 • Zoom into the couch; place the SMALL WHEEL (T). • Move the
couch and zoom into the plant; clean up the dirt (U) with the
BROOM AND DUSTPAN, then pick up the ACCESS CARD (V). • Zoom
into the door; place the ACCESS CARD in the lock (W) and enter
the back room.
• Zoom into the couch; place the SMALL WHEEL (T). • Move the
couch and zoom into the plant; clean up the dirt (U) with the
BROOM AND DUSTPAN, then pick up the ACCESS CARD (V). • Zoom
into the door; place the ACCESS CARD in the lock (W) and enter
the back room.
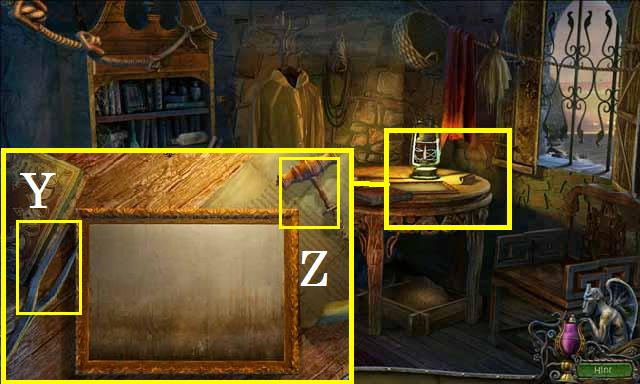
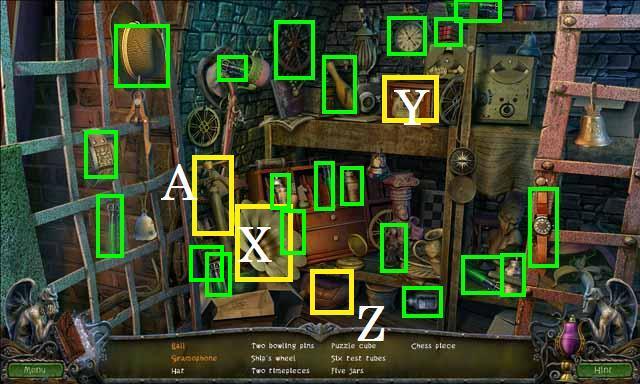
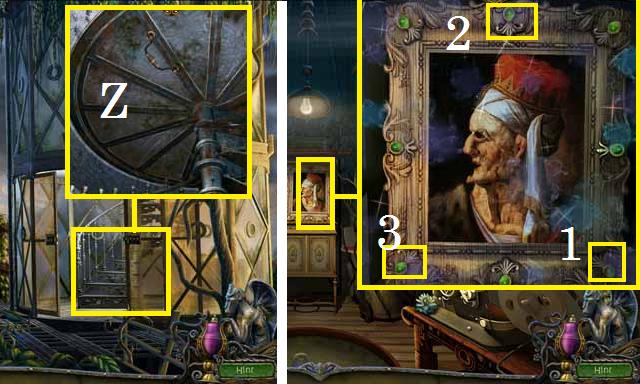
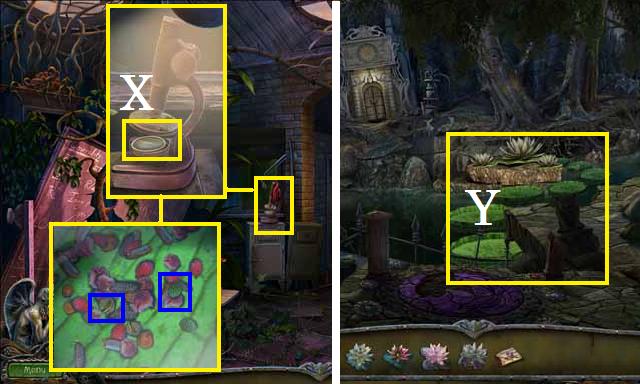
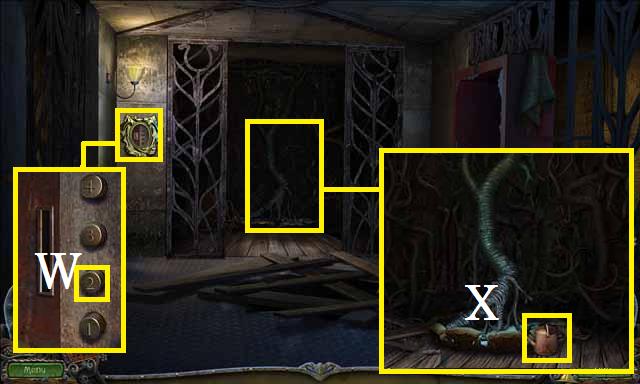
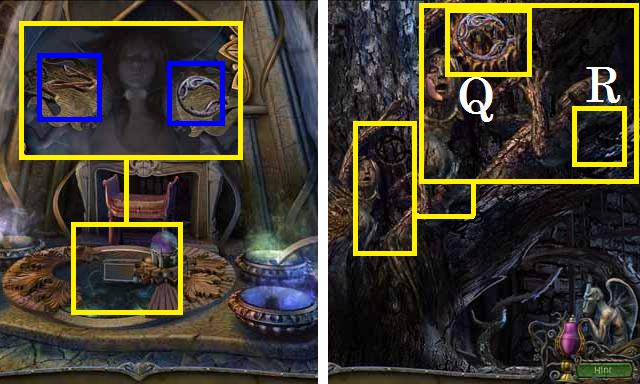
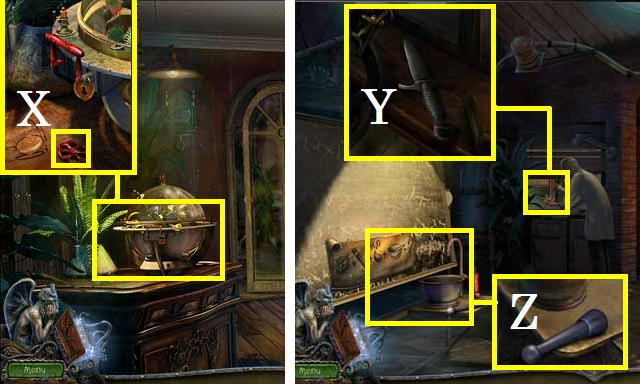 • Zoom into the plant holder; pick up the VALVE HANDLE (X). •
Move forward to the lab. • Zoom into the microscope; pick up
the KNIFE (Y). • Zoom into the chalkboard; pick up the PESTLE
(Z). • Enter the storage room in the back.
• Zoom into the plant holder; pick up the VALVE HANDLE (X). •
Move forward to the lab. • Zoom into the microscope; pick up
the KNIFE (Y). • Zoom into the chalkboard; pick up the PESTLE
(Z). • Enter the storage room in the back.
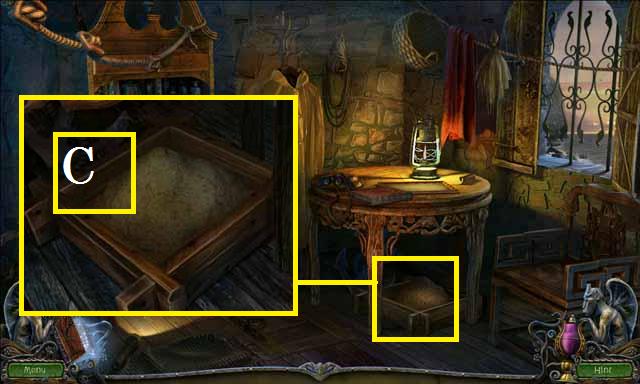
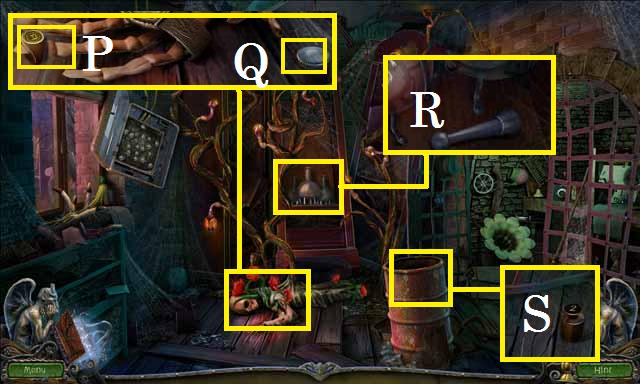
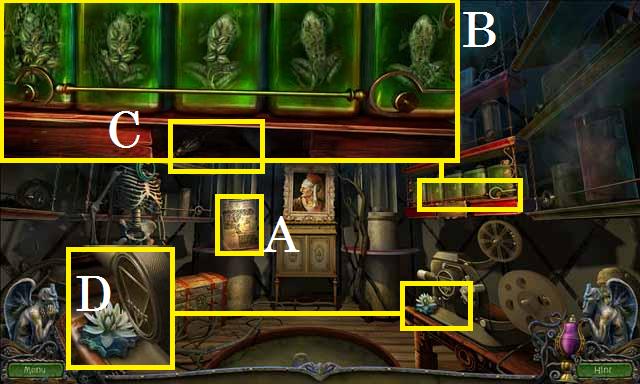
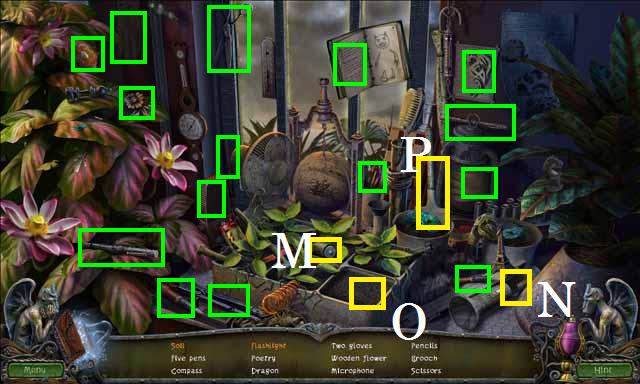
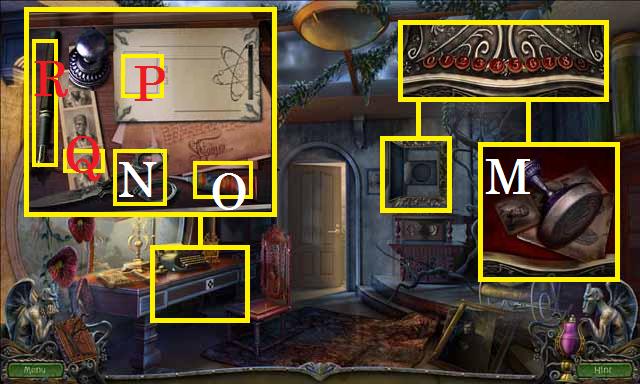
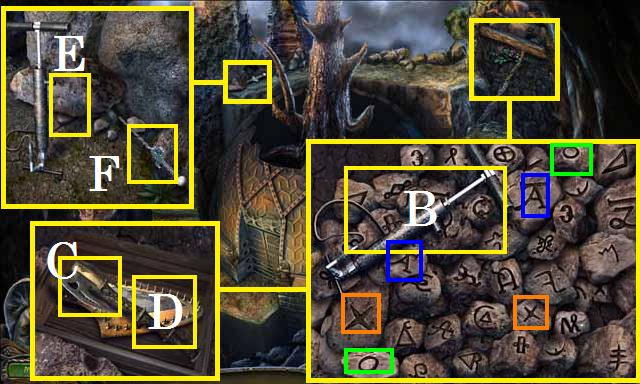
 • Pick up the BROOM HANDLE (A). • Zoom into the box; cut the
rope (B) with the KNIFE and pick up the BATTERY (C). • Zoom
into the shelf; place the BATTERY (D) and pick up the
FLASHLIGHT and the GENETIC MATERIAL (E). • Zoom in under the
shelf; place the FLASHLIGHT (F) and pick up the SAFETY PIN
(G). • Use the BROOM HANDLE to pick up the MAGNIFYING LENS
(H).
• Pick up the BROOM HANDLE (A). • Zoom into the box; cut the
rope (B) with the KNIFE and pick up the BATTERY (C). • Zoom
into the shelf; place the BATTERY (D) and pick up the
FLASHLIGHT and the GENETIC MATERIAL (E). • Zoom in under the
shelf; place the FLASHLIGHT (F) and pick up the SAFETY PIN
(G). • Use the BROOM HANDLE to pick up the MAGNIFYING LENS
(H).
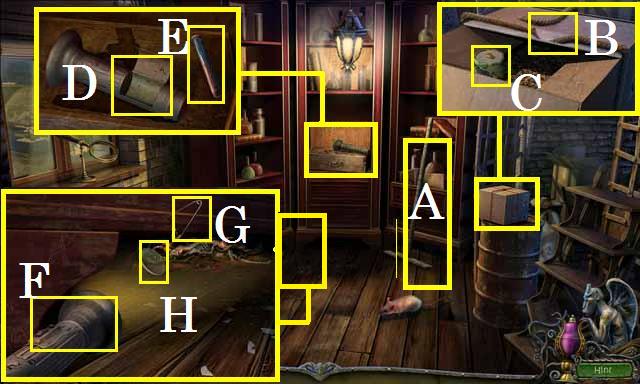
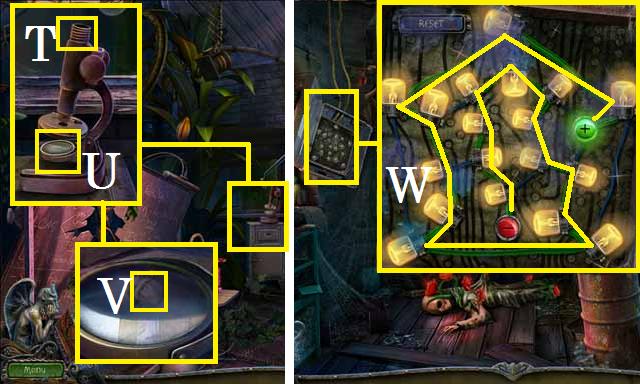
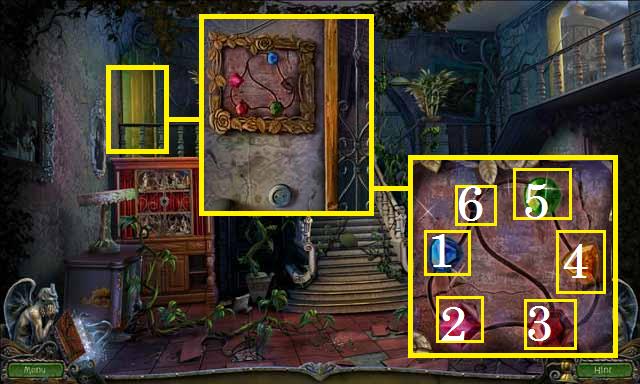
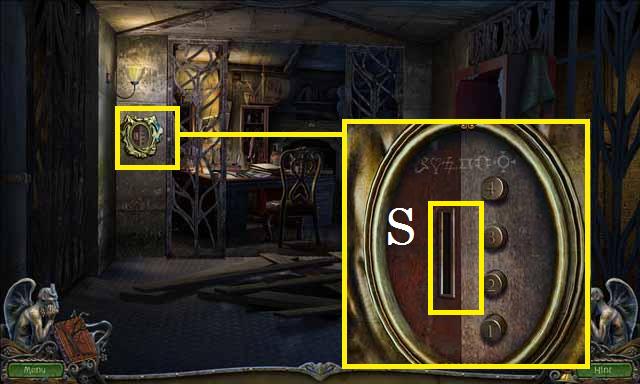
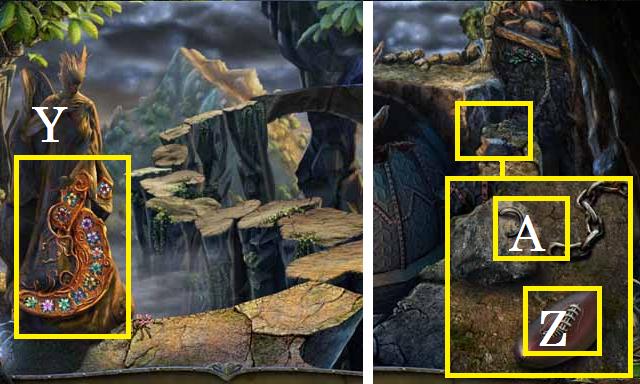
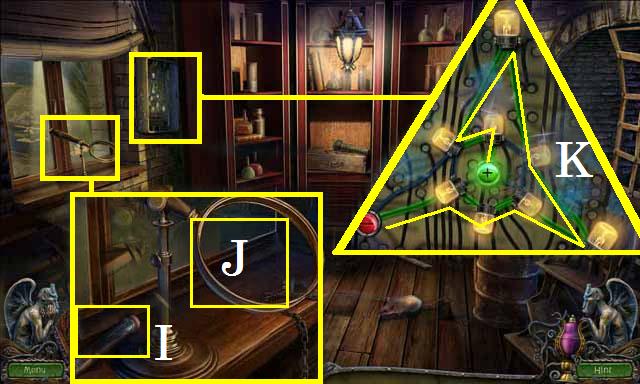 • Zoom into the magnifying glass; pick up the GENETIC MATERIAL
(I) and place the MAGNIFYING LENS (J). • Zoom into the circuit
panel; follow the path shown in the screenshot (K) to turn on
all of the lights. • Exit back to the front stairs.
• Zoom into the magnifying glass; pick up the GENETIC MATERIAL
(I) and place the MAGNIFYING LENS (J). • Zoom into the circuit
panel; follow the path shown in the screenshot (K) to turn on
all of the lights. • Exit back to the front stairs.
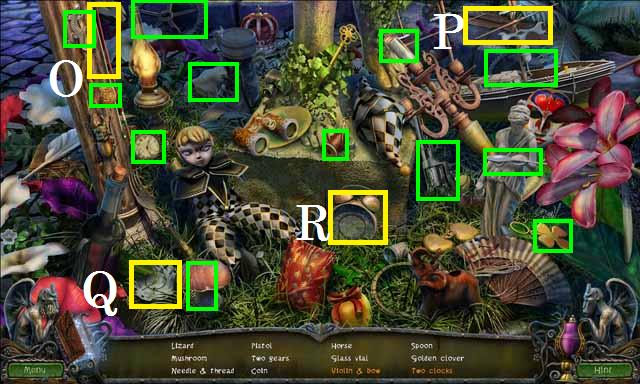
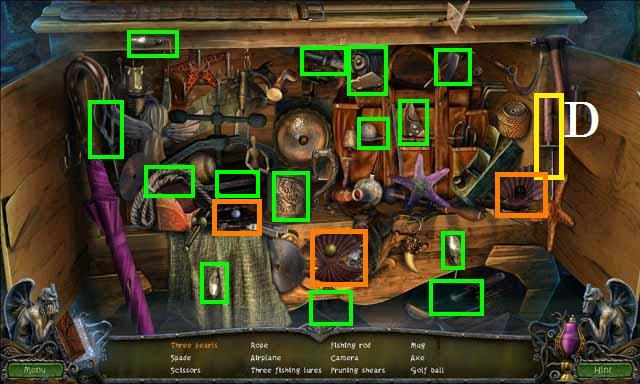
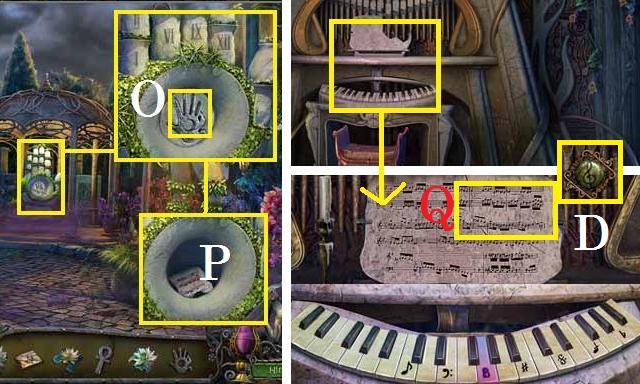
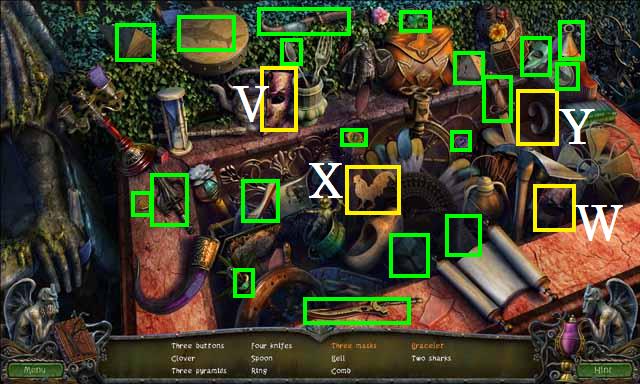
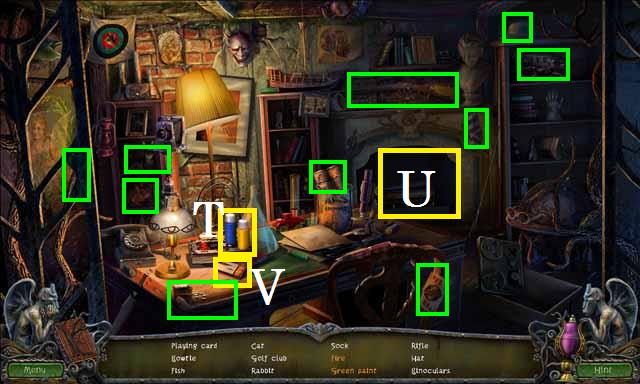
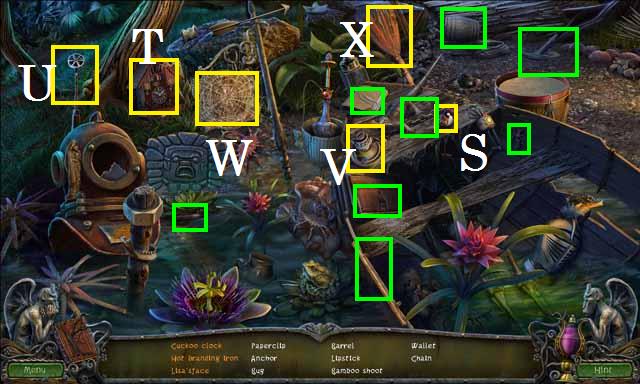
 • Zoom into the sparkles to play a HOS. • Dip the net (L) into
the fishbowl (M) to catch the fish. • Place the strings (N) on
the harp (O). • Unlock the drawer (P) with the key (Q) to find
the towel. • Receive the PLIERS.
• Zoom into the sparkles to play a HOS. • Dip the net (L) into
the fishbowl (M) to catch the fish. • Place the strings (N) on
the harp (O). • Unlock the drawer (P) with the key (Q) to find
the towel. • Receive the PLIERS.
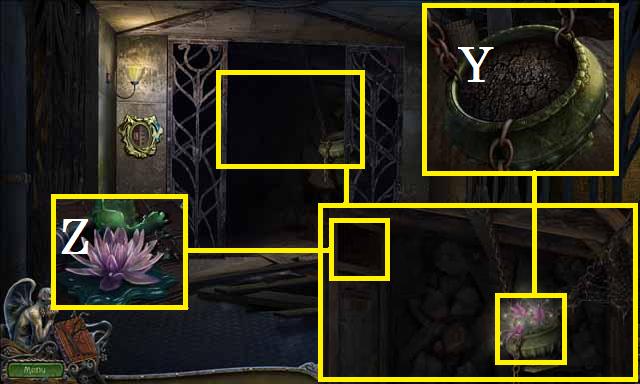
 • Move forward to the back room. • Zoom into the plant holder;
open the lock (R) with the SAFETY PIN. • Flip the red handle
(S) and pick up the SPRAY BOTTLE NOZZLE (T). • Return to the
storage room. • Zoom into the magnifying glass; fix the chain
link (U) with the PLIERS and pick up the CHAIN. • Exit back to
the lab.
• Move forward to the back room. • Zoom into the plant holder;
open the lock (R) with the SAFETY PIN. • Flip the red handle
(S) and pick up the SPRAY BOTTLE NOZZLE (T). • Return to the
storage room. • Zoom into the magnifying glass; fix the chain
link (U) with the PLIERS and pick up the CHAIN. • Exit back to
the lab.
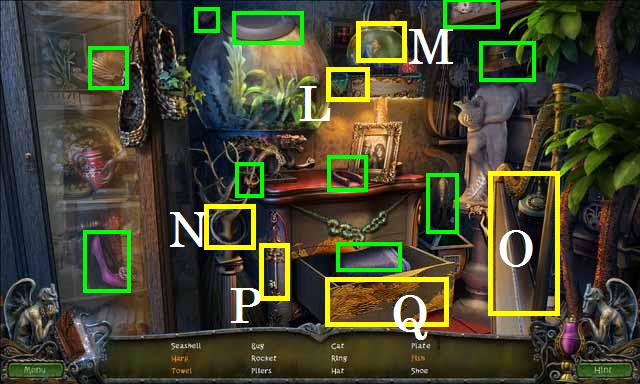
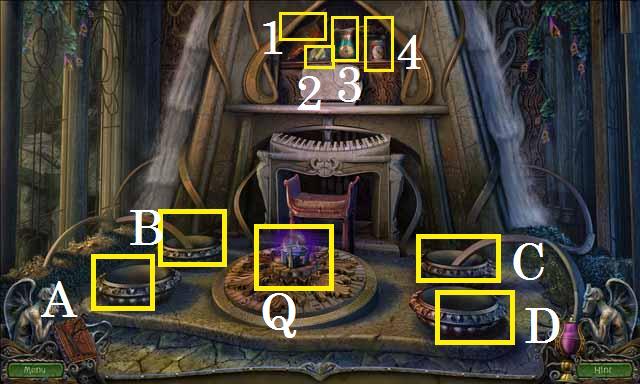
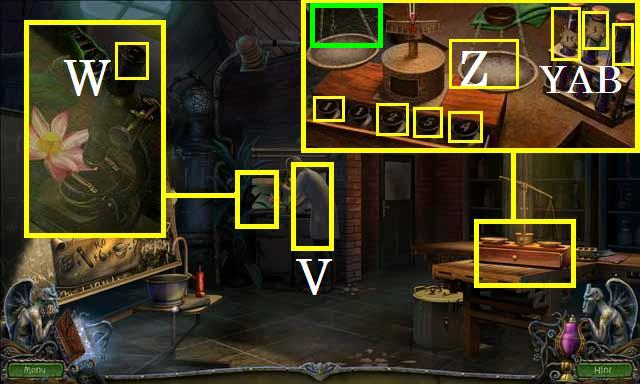 • Tap the Professor (V) to receive the last GENETIC MATERIAL.
• Zoom into the microscope; and then the lens (W). • Zoom into
the table; place all three GENETIC MATERIAL in the holder. •
Hang the CHAIN (green). • Place the first GENETIC MATERIAL (Y)
on one side of the scale (Z) and the (5), (4) and (2) weights
on the other side. • Place the second GENETIC MATERIAL (A) on
the scale along with the (2) and (1) weights. • Place the
third GENETIC MATERIAL (B) on the scale along with the (5),
(4), and (1) weights. • Receive the 10 GRAMS OF GENETIC
MATERIAL. • Exit back to the garden.
• Tap the Professor (V) to receive the last GENETIC MATERIAL.
• Zoom into the microscope; and then the lens (W). • Zoom into
the table; place all three GENETIC MATERIAL in the holder. •
Hang the CHAIN (green). • Place the first GENETIC MATERIAL (Y)
on one side of the scale (Z) and the (5), (4) and (2) weights
on the other side. • Place the second GENETIC MATERIAL (A) on
the scale along with the (2) and (1) weights. • Place the
third GENETIC MATERIAL (B) on the scale along with the (5),
(4), and (1) weights. • Receive the 10 GRAMS OF GENETIC
MATERIAL. • Exit back to the garden.
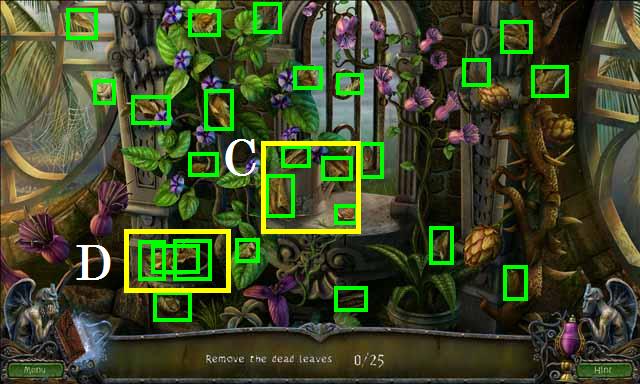 • Zoom into the sparkles to play a HOS. • After you have
collected all of the dead leaves, pour the water can (C) over
the dirt (D). • Receive the DRAGONUIM MUTANA. • Return to the
lab.
• Zoom into the sparkles to play a HOS. • After you have
collected all of the dead leaves, pour the water can (C) over
the dirt (D). • Receive the DRAGONUIM MUTANA. • Return to the
lab.
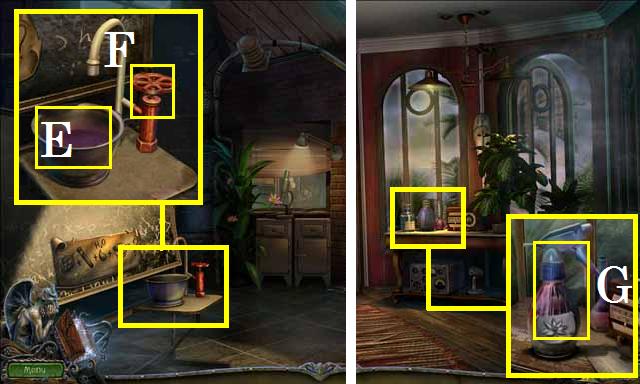 • Zoom into the chalkboard; place the DRAGONUIM MUTANA in to
the mortar (E) followed by the 10 GRAMS OF GENETIC MATERIAL. •
Place the VALVE HANDLE on the spigot (F) and spin it. • Pick
up the EXPERIMENTAL SOLUTION (E). • Exit back one room. • Zoom
into the table; pour the EXPERIMENTAL SOLUTION into the bottle
(G) and place the SPRAY BOTTLE NOZZLE on top. • Pick up the
SPRAY BOTTLE WITH SOLUTION. • Return to the lab.
• Zoom into the chalkboard; place the DRAGONUIM MUTANA in to
the mortar (E) followed by the 10 GRAMS OF GENETIC MATERIAL. •
Place the VALVE HANDLE on the spigot (F) and spin it. • Pick
up the EXPERIMENTAL SOLUTION (E). • Exit back one room. • Zoom
into the table; pour the EXPERIMENTAL SOLUTION into the bottle
(G) and place the SPRAY BOTTLE NOZZLE on top. • Pick up the
SPRAY BOTTLE WITH SOLUTION. • Return to the lab.
 • Zoom into the microscope; spray the plant (H) with the SPRAY
BOTTLE WITH SOLUTION then zoom into the telescope. • Receive
the MICROSCOPE CASE KEY from the Professor. • Enter the
storage room. • Zoom into the shelf; place the MICROSCOPE CASE
KEY in the lock (I) and open the case. • Pick up the LENS (J).
• Zoom into the microscope; spray the plant (H) with the SPRAY
BOTTLE WITH SOLUTION then zoom into the telescope. • Receive
the MICROSCOPE CASE KEY from the Professor. • Enter the
storage room. • Zoom into the shelf; place the MICROSCOPE CASE
KEY in the lock (I) and open the case. • Pick up the LENS (J).
Chapter 1: Shipwrecked
 • Pick up the note (K). • Move up the ramp (L) to the bridge.
• Try to pick up the hatchet (M). • Exit back to the shore. •
Zoom into the rock; pick up the ROCK (N) and then the HARPOON
TIP (O). • Zoom into the handle; remove the NAIL (P) with the
ROCK. • Place the HARPOON TIP on the handle followed by the
NAIL (Q). • Hammer the NAIL in with the ROCK and pick up the
completed HARPOON. • Zoom into net; use the HARPOON to free
the corner (R). • Move forward to the dock.
• Pick up the note (K). • Move up the ramp (L) to the bridge.
• Try to pick up the hatchet (M). • Exit back to the shore. •
Zoom into the rock; pick up the ROCK (N) and then the HARPOON
TIP (O). • Zoom into the handle; remove the NAIL (P) with the
ROCK. • Place the HARPOON TIP on the handle followed by the
NAIL (Q). • Hammer the NAIL in with the ROCK and pick up the
completed HARPOON. • Zoom into net; use the HARPOON to free
the corner (R). • Move forward to the dock.
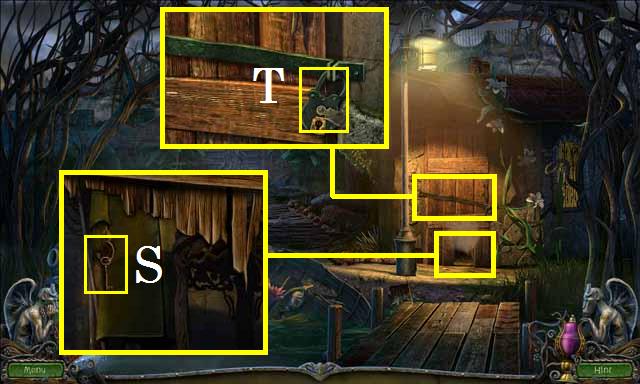 • Zoom into the door base; use the HARPOON to get the CABIN
KEY (S). • Zoom into the door handle; open the lock (T) with
the CABIN KEY and enter the cabin.
• Zoom into the door base; use the HARPOON to get the CABIN
KEY (S). • Zoom into the door handle; open the lock (T) with
the CABIN KEY and enter the cabin.
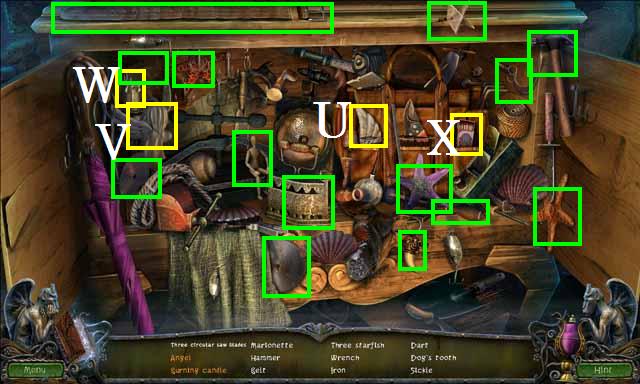 • Zoom into the sparkles to play a HOS. • Place the wing (U)
on the eagle (V). • Light the candle (W) with the matches (X).
• Receive the MATCHES.
• Zoom into the sparkles to play a HOS. • Place the wing (U)
on the eagle (V). • Light the candle (W) with the matches (X).
• Receive the MATCHES.
 • Zoom into the table; pick up the TWEEZERS (Y) and the
CORKSCREW (Z).
• Zoom into the table; pick up the TWEEZERS (Y) and the
CORKSCREW (Z).
 • Zoom into the shelf; open the bottle (A) with the CORKSCREW.
• Remove the PHOTO PIECE with the TWEEZERS. • Pick up the
remaining twelve PHOTO PIECES (red).
• Zoom into the shelf; open the bottle (A) with the CORKSCREW.
• Remove the PHOTO PIECE with the TWEEZERS. • Pick up the
remaining twelve PHOTO PIECES (red).
 • Zoom back into the table; drop the PHOTO PIECES on the table
and assemble the photo as shown in the screenshot (B). • Exit
back outside.
• Zoom back into the table; drop the PHOTO PIECES on the table
and assemble the photo as shown in the screenshot (B). • Exit
back outside.
 • Zoom into the sparkles to play a HOS. • Use the hatchet (C)
to loosen the plank (D). • Place the reel (E) on the fishing
poll (F). • Receive the PLANKS.
• Zoom into the sparkles to play a HOS. • Use the hatchet (C)
to loosen the plank (D). • Place the reel (E) on the fishing
poll (F). • Receive the PLANKS.
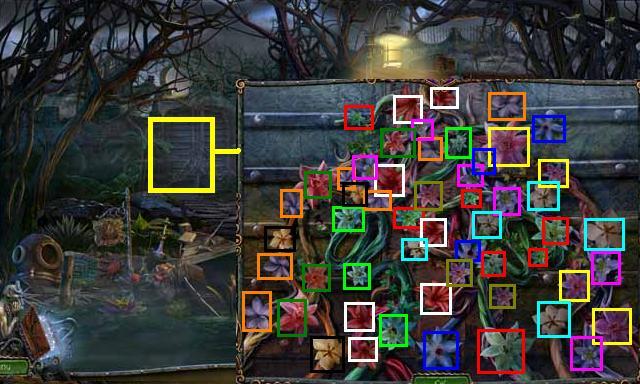 • Zoom into the gate; see the screenshot for color coded
pairs. • Move forward through the gate to the outside stairs.
• Zoom into the gate; see the screenshot for color coded
pairs. • Move forward through the gate to the outside stairs.
 • Zoom into the tree; pick up the HAY (G). • Place the HAY on
the fire (H) and light it with the MATCHES. • Place the PLANKS
over the hole (I) and move forward to the courtyard.
• Zoom into the tree; pick up the HAY (G). • Place the HAY on
the fire (H) and light it with the MATCHES. • Place the PLANKS
over the hole (I) and move forward to the courtyard.
 • Pick up the GLASS BELL DOME (J). • Zoom into the cabinet;
pick up the note (K) and the BIRDCAGE (L). • Tap the frame (M)
until it falls away completely. • Try to take a right through
the arch; remove all of the vines (Hint: it will not let you
remove the wrong one). • Catch the owl (N) with the BIRDCAGE
to gain the CAGED BABY OWL. • Move through the archway to the
statue garden. • Shake Carrie (blue).
• Pick up the GLASS BELL DOME (J). • Zoom into the cabinet;
pick up the note (K) and the BIRDCAGE (L). • Tap the frame (M)
until it falls away completely. • Try to take a right through
the arch; remove all of the vines (Hint: it will not let you
remove the wrong one). • Catch the owl (N) with the BIRDCAGE
to gain the CAGED BABY OWL. • Move through the archway to the
statue garden. • Shake Carrie (blue).
 • Zoom into the sparkles to play a HOS. • Place the bow (O) on
the violin (P). • Place the clock face (Q) on the clock (R). •
Receive the SMELLING SALTS.
• Zoom into the sparkles to play a HOS. • Place the bow (O) on
the violin (P). • Place the clock face (Q) on the clock (R). •
Receive the SMELLING SALTS.
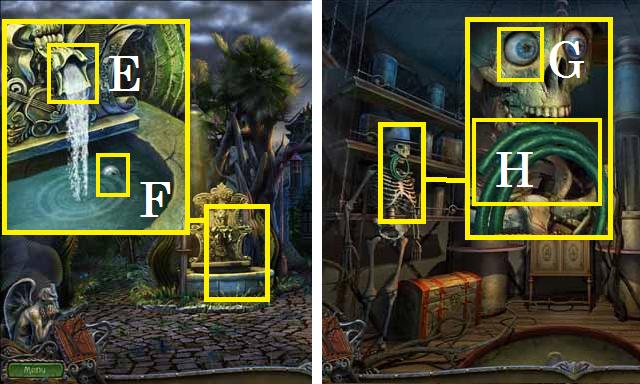
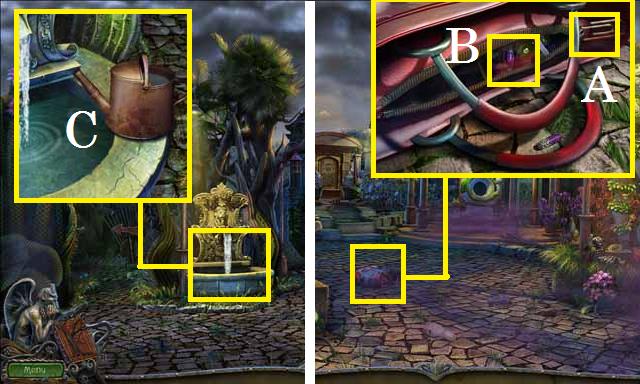
 • Zoom into the fountain; tap the faucet (S) to start the
water. • Place the EMPTY GLASS (T) under the water to get the
GLASS OF WATER. • Zoom into Carrie (U); place the SMELLING
SALTS under her nose. • When she sits up give her the GLASS OF
WATER. • Receive the GLASS EYE. • Back up one scene then
return to the statue garden. • Zoom into the purse; pick up
the OILER (V). • Return to the dock.
• Zoom into the fountain; tap the faucet (S) to start the
water. • Place the EMPTY GLASS (T) under the water to get the
GLASS OF WATER. • Zoom into Carrie (U); place the SMELLING
SALTS under her nose. • When she sits up give her the GLASS OF
WATER. • Receive the GLASS EYE. • Back up one scene then
return to the statue garden. • Zoom into the purse; pick up
the OILER (V). • Return to the dock.
 • Zoom into the sparkles to play a HOS. • Spray the bottle (W)
over near the broom (X) for the rainbow. • Place the
drumsticks (Y) on the drum (Z). • Break the helmet (A) with
the hammer (B) and pick up the broken glass. • Receive the
EMPTY BAG.
• Zoom into the sparkles to play a HOS. • Spray the bottle (W)
over near the broom (X) for the rainbow. • Place the
drumsticks (Y) on the drum (Z). • Break the helmet (A) with
the hammer (B) and pick up the broken glass. • Receive the
EMPTY BAG.
 • Enter the cabin. • Zoom into the sand; place the EMPTY BAG
(C) to receive the BAG OF SAND.
• Enter the cabin. • Zoom into the sand; place the EMPTY BAG
(C) to receive the BAG OF SAND.
 • Zoom into the sparkle to play a HOS. • Open the three shells
(yellow) with the knife (D) to reveal the pearls. • Receive
the SLEDGEHAMMER. • Exit the cabin and move forward to the
outside stairs.
• Zoom into the sparkle to play a HOS. • Open the three shells
(yellow) with the knife (D) to reveal the pearls. • Receive
the SLEDGEHAMMER. • Exit the cabin and move forward to the
outside stairs.
 • Zoom into the hole; pour the BAG OF SAND over the coals,
smash them with the SLEDGEHAMMER and pick up the CHISEL (E). •
Zoom into the tree; remove the bark with the CHISEL and pick
up the CRYSTAL FLOWER (F). • Return to the Bridge.
• Zoom into the hole; pour the BAG OF SAND over the coals,
smash them with the SLEDGEHAMMER and pick up the CHISEL (E). •
Zoom into the tree; remove the bark with the CHISEL and pick
up the CRYSTAL FLOWER (F). • Return to the Bridge.
 • Zoom into the statue; place the CRYSTAL FLOWER in the lock
(G). • Pick up the AXE (H). • Return to the courtyard. • Zoom
into the gate; remove the vines (I) with the AXE. • Oil the
hinges (J). • Move forward through the gate to the fountain.
• Zoom into the statue; place the CRYSTAL FLOWER in the lock
(G). • Pick up the AXE (H). • Return to the courtyard. • Zoom
into the gate; remove the vines (I) with the AXE. • Oil the
hinges (J). • Move forward through the gate to the fountain.
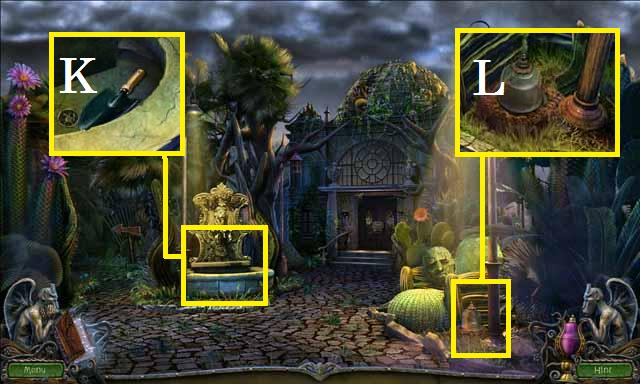 • Zoom into the fountain; pick up the SHOVEL (K). • Zoom into
the cactus. • Dig up the GLASS BELL DOME (L) with the SHOVEL,
then pick it up. • Follow the wooden arrow, to the left, to
the river.
• Zoom into the fountain; pick up the SHOVEL (K). • Zoom into
the cactus. • Dig up the GLASS BELL DOME (L) with the SHOVEL,
then pick it up. • Follow the wooden arrow, to the left, to
the river.
 • Zoom into the gargoyle; place the GLASS EYE (M) and pick up
the LADDER (N). • Exit back two scenes. • Place the LADDER
under the archway (O). • Zoom into the nest; release the CAGED
BABY OWL into the nest. • Pick up the STONE BLOSSOM (P). •
Return to the fountain.
• Zoom into the gargoyle; place the GLASS EYE (M) and pick up
the LADDER (N). • Exit back two scenes. • Place the LADDER
under the archway (O). • Zoom into the nest; release the CAGED
BABY OWL into the nest. • Pick up the STONE BLOSSOM (P). •
Return to the fountain.
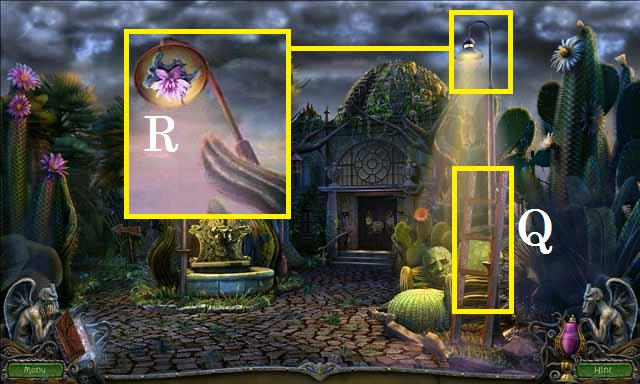 • Place the ladder under the lamp (Q). • Zoom into the lamp;
pick up the CRYSTAL FLOWER (R). • Return to the statue garden.
• Place the ladder under the lamp (Q). • Zoom into the lamp;
pick up the CRYSTAL FLOWER (R). • Return to the statue garden.
 • Zoom into the sparkles to play a HOS. • Place the hat (S) on
the doll (T). • Place the cup (U) on the saucer (V). • Open
the bottle (W) with the corkscrew (X) to receive the cork. •
Receive the GAS MASK FILTER. • Exit back one scene.
• Zoom into the sparkles to play a HOS. • Place the hat (S) on
the doll (T). • Place the cup (U) on the saucer (V). • Open
the bottle (W) with the corkscrew (X) to receive the cork. •
Receive the GAS MASK FILTER. • Exit back one scene.
 • Zoom into the cabinet; place the GAS MASK FILTER on the GAS
MASK (Y) and pick it up. • Return to the statue garden. • Drop
the GAS MASK over the pink gas (Z). • Place the two GLASS BELL
DOMES over the plants (blue).
• Zoom into the cabinet; place the GAS MASK FILTER on the GAS
MASK (Y) and pick it up. • Return to the statue garden. • Drop
the GAS MASK over the pink gas (Z). • Place the two GLASS BELL
DOMES over the plants (blue).
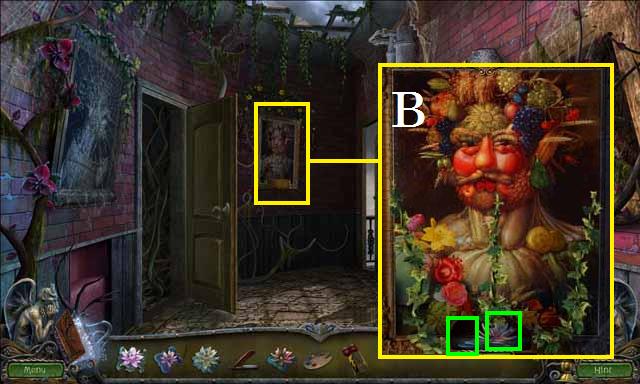
 • Zoom into the back wall. See the screenshot for the final
arrangement (B). • Pick up the STONEPHALANX (C). • Zoom into
the hand; place the STONEPHALANX (D) and pick up the SCISSORS
(E). • Return to the fountain.
• Zoom into the back wall. See the screenshot for the final
arrangement (B). • Pick up the STONEPHALANX (C). • Zoom into
the hand; place the STONEPHALANX (D) and pick up the SCISSORS
(E). • Return to the fountain.
 • Zoom into the cactus; cut the cactus with the SCISSORS and
zoom into the note (F). • Pick up the STONE BLOSSOM (G). •
Zoom into the door; place the two STONE BLOSSOMS on the
puzzle. The beginning positions of the tiles may differ. See
the screenshot for the final image (W).
• Zoom into the cactus; cut the cactus with the SCISSORS and
zoom into the note (F). • Pick up the STONE BLOSSOM (G). •
Zoom into the door; place the two STONE BLOSSOMS on the
puzzle. The beginning positions of the tiles may differ. See
the screenshot for the final image (W).
Chapter 2: The House
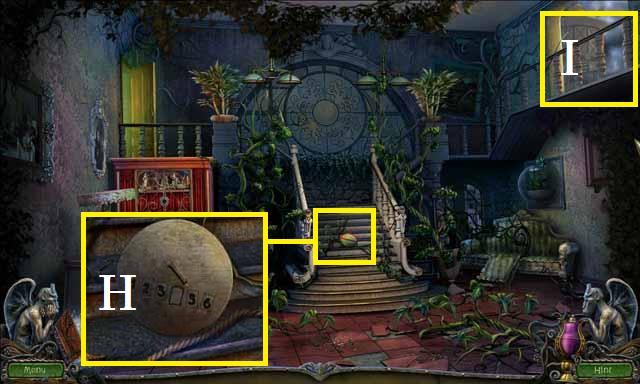 • Enter the house to the main entryway. • Zoom into the
stairs; flip the sign (H). • Move through the upstairs arch
(I) to the terrace. • Move forward down the hole to the back
room.
• Enter the house to the main entryway. • Zoom into the
stairs; flip the sign (H). • Move through the upstairs arch
(I) to the terrace. • Move forward down the hole to the back
room.
 • Zoom into the plant holder; pick up the WEIGHT (J). • Zoom
into the table; pick up the WEIGHT (K). • Move forward to the
lab.
• Zoom into the plant holder; pick up the WEIGHT (J). • Zoom
into the table; pick up the WEIGHT (K). • Move forward to the
lab.
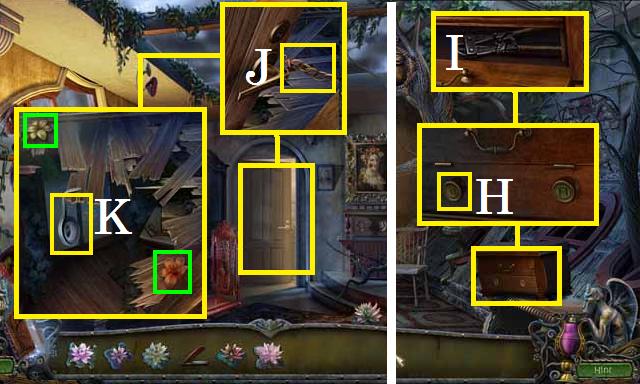
 • Zoom into the scale; pick up the GARDENING GLOVES (L). •
Zoom into the chalkboard; pick up the WEIGHT (M). • Zoom into
the microscope; pick up the WEIGHT (N) and the RAG (O). •
Enter the storage room.
• Zoom into the scale; pick up the GARDENING GLOVES (L). •
Zoom into the chalkboard; pick up the WEIGHT (M). • Zoom into
the microscope; pick up the WEIGHT (N) and the RAG (O). •
Enter the storage room.
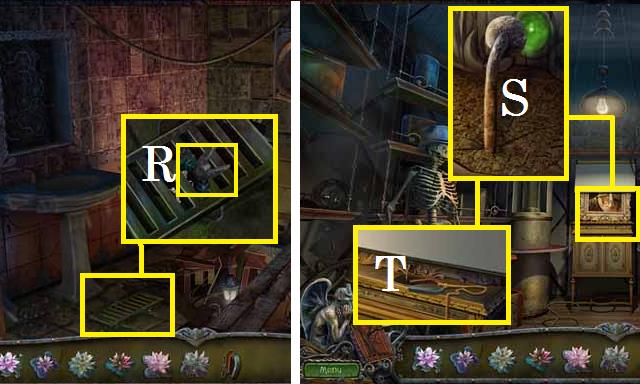
 • Zoom into the skeleton; pick up the RING (P) and the
MICROSCOPE LENS (Q). • Zoom into the shelf; pick up the PESTLE
(R). • Zoom into the barrel; pick up the WEIGHT (S). • Exit
back to the lab.
• Zoom into the skeleton; pick up the RING (P) and the
MICROSCOPE LENS (Q). • Zoom into the shelf; pick up the PESTLE
(R). • Zoom into the barrel; pick up the WEIGHT (S). • Exit
back to the lab.
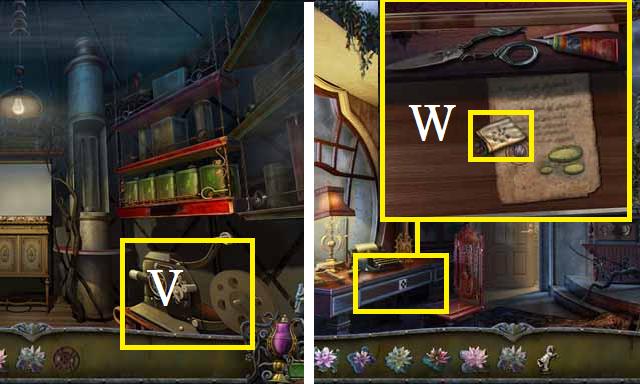
 • Zoom into the microscope; place the MICROSCOPE LENS (T). •
Zoom into the glass (U) and clean it with the RAG. • Pick up
the LIGHT BULB (V). • Return to the storage room. • Zoom into
the circuit panel; place the LIGHT BULB and follow the path
shown in the screenshot (W) to turn on all of the light bulbs.
• Zoom into the microscope; place the MICROSCOPE LENS (T). •
Zoom into the glass (U) and clean it with the RAG. • Pick up
the LIGHT BULB (V). • Return to the storage room. • Zoom into
the circuit panel; place the LIGHT BULB and follow the path
shown in the screenshot (W) to turn on all of the light bulbs.
 • Zoom into the sparkles to play a HOS. • Place the horn (X)
on the gramophone (Y). • Inflate the ball (Z) with the pump
(A). • Receive the FOUR TEST TUBES OF GROWTH POWDER. • Exit
back to the lab.
• Zoom into the sparkles to play a HOS. • Place the horn (X)
on the gramophone (Y). • Inflate the ball (Z) with the pump
(A). • Receive the FOUR TEST TUBES OF GROWTH POWDER. • Exit
back to the lab.
 • Zoom into the table; place the FOUR TEST TUBES OF GROWTH
POWDER and the WEIGHTS. • Use the (5), (6), and (2), weights
for the first one (B); the (5) and (2) weights for the second
one (C); and the (5) and (6) weights for the third one (D). •
Receive the 11 GRAMS OF GROWTH POWDER. • Zoom into the plant;
cut the EXOTIC FRUIT (E) with the SCISSORS and pick up the
CRYSTAL FLOWER (F).
• Zoom into the table; place the FOUR TEST TUBES OF GROWTH
POWDER and the WEIGHTS. • Use the (5), (6), and (2), weights
for the first one (B); the (5) and (2) weights for the second
one (C); and the (5) and (6) weights for the third one (D). •
Receive the 11 GRAMS OF GROWTH POWDER. • Zoom into the plant;
cut the EXOTIC FRUIT (E) with the SCISSORS and pick up the
CRYSTAL FLOWER (F).
 • Zoom back into the chalk board; turn the valve handle (G)
then place the EXOTIC FRUIT followed by the 11 GRAMS OF GROWTH
HORMONE, and the PESTLE in the mortar (H). • Pick up the
GROWTH ELIXIR (I). • Exit back on scene. • Zoom into the plant
holder; pour the GROWTH ELIXIR on the bamboo (J). • Climb the
plant to exit the back room.
• Zoom back into the chalk board; turn the valve handle (G)
then place the EXOTIC FRUIT followed by the 11 GRAMS OF GROWTH
HORMONE, and the PESTLE in the mortar (H). • Pick up the
GROWTH ELIXIR (I). • Exit back on scene. • Zoom into the plant
holder; pour the GROWTH ELIXIR on the bamboo (J). • Climb the
plant to exit the back room.
 • Zoom into the glass house door; remove the plant (K) with
the GARDENING GLOVES. • Exit back to the main entryway and
receive the SCREWDRIVER. • Move back to the terrace and take
the hole to the back room. • Zoom into the table; remove the
screws (orange) with the SCREWDRIVER.
• Zoom into the glass house door; remove the plant (K) with
the GARDENING GLOVES. • Exit back to the main entryway and
receive the SCREWDRIVER. • Move back to the terrace and take
the hole to the back room. • Zoom into the table; remove the
screws (orange) with the SCREWDRIVER.
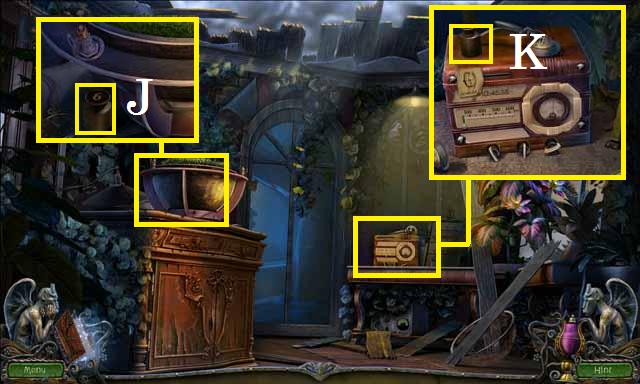
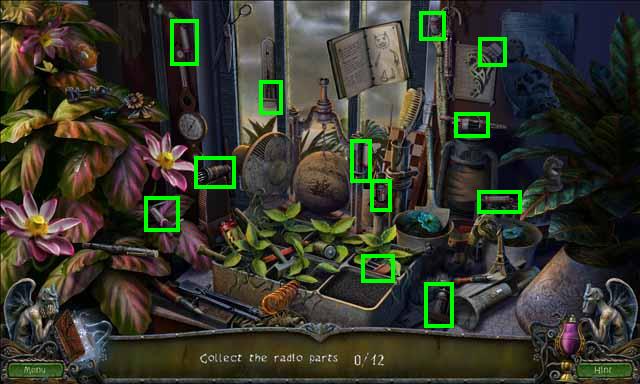 • Close the window and zoom into the sparkles to play a HOS. •
Receive the RADIO PARTS.
• Close the window and zoom into the sparkles to play a HOS. •
Receive the RADIO PARTS.
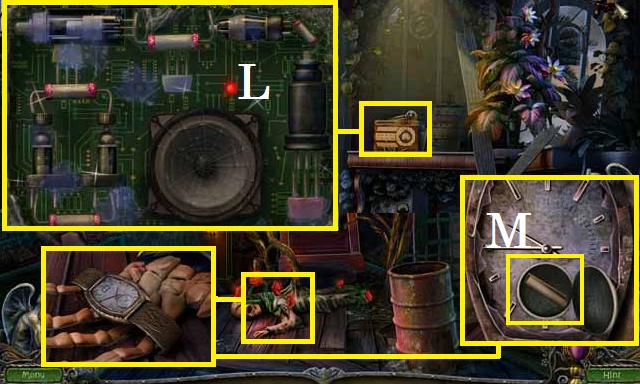 • Zoom back into the table, then the radio; drop the RADIO
PARTS and place them as shown in the screenshot (L). • Zoom
back into the radio to see the time. • Return to the storage
room. • Zoom into the skeleton and then his watch; set the
watch to 10:45:35 and pick up the paper (M). • Return to the
back room.
• Zoom back into the table, then the radio; drop the RADIO
PARTS and place them as shown in the screenshot (L). • Zoom
back into the radio to see the time. • Return to the storage
room. • Zoom into the skeleton and then his watch; set the
watch to 10:45:35 and pick up the paper (M). • Return to the
back room.
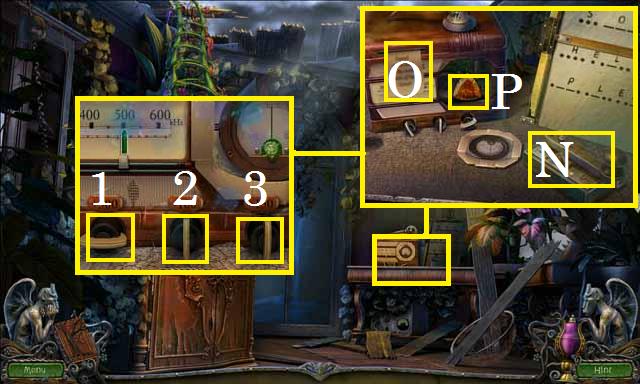 • Zoom into the table, then the radio; spin dial (1), (2),
(3), and (2) to set the frequency to 500. • Tap the
transmitter (N) for about a half second for the dots and a
second for the dashes until you have spelled out the full SOS.
• Zoom into the note (O). • Remove the cover; pick up the
CRYSTAL (P). • Return to the front entrance.
• Zoom into the table, then the radio; spin dial (1), (2),
(3), and (2) to set the frequency to 500. • Tap the
transmitter (N) for about a half second for the dots and a
second for the dashes until you have spelled out the full SOS.
• Zoom into the note (O). • Remove the cover; pick up the
CRYSTAL (P). • Return to the front entrance.
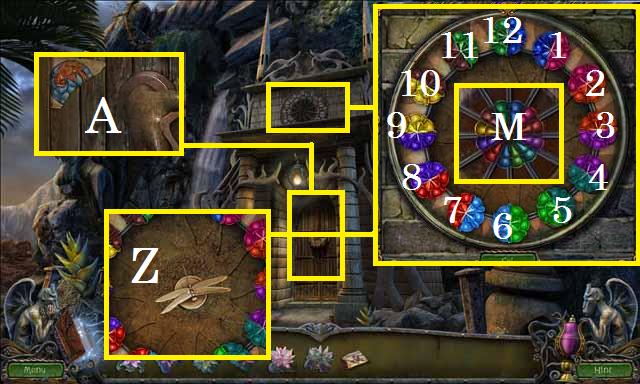
 • Zoom into the upstairs hallway door then the gem lock; place
the CRYSTAL in the lock and use the following sequence to
arrange the gems properly: 1, 2, 3, 6, 1, 2, 3, 4, 5, 6, 3, 4,
5, 6, 1, 2, 3, 4, 5, 6, 1, 2, 3, and 6. (Note: use the
stationary positions as marked, not the gems). • Enter the
upstairs hallway.
• Zoom into the upstairs hallway door then the gem lock; place
the CRYSTAL in the lock and use the following sequence to
arrange the gems properly: 1, 2, 3, 6, 1, 2, 3, 4, 5, 6, 3, 4,
5, 6, 1, 2, 3, 4, 5, 6, 1, 2, 3, and 6. (Note: use the
stationary positions as marked, not the gems). • Enter the
upstairs hallway.
 • Zoom into the light; pick up the NUMBER WHEEL (Q). • Enter
the bathroom on the right. • Zoom into the hole; pick up the
TONGS (R). • Exit back to the upstairs hallway.
• Zoom into the light; pick up the NUMBER WHEEL (Q). • Enter
the bathroom on the right. • Zoom into the hole; pick up the
TONGS (R). • Exit back to the upstairs hallway.
 • Zoom into the door on the left; remove the nails (blue) with
the TONGS. • Place the DOOR HANDLE (S) on the door (T). • Pick
up the SAW (U). • Return to the terrace.
• Zoom into the door on the left; remove the nails (blue) with
the TONGS. • Place the DOOR HANDLE (S) on the door (T). • Pick
up the SAW (U). • Return to the terrace.
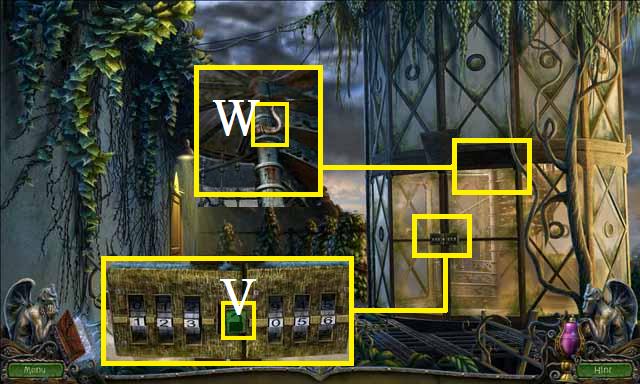 • Zoom into the door, then the lock; place the NUMBER WHEEL,
set the code 123056, as shown in the screenshot, and press the
button (V). • Zoom into the staircase; pick up the STONE HORN
(W). • Exit the house back to the fountain.
• Zoom into the door, then the lock; place the NUMBER WHEEL,
set the code 123056, as shown in the screenshot, and press the
button (V). • Zoom into the staircase; pick up the STONE HORN
(W). • Exit the house back to the fountain.
 • Zoom into the doorway, then the stone head; place the STONE
HORN (X) and pick up the GLASS CLEANER (Y). • Return to the
terrace and zoom into the glass room.
• Zoom into the doorway, then the stone head; place the STONE
HORN (X) and pick up the GLASS CLEANER (Y). • Return to the
terrace and zoom into the glass room.
 • Zoom into the staircase; spray the cover (Z) with the GLASS
CLEANER and enter the room. • Zoom into the painting; press
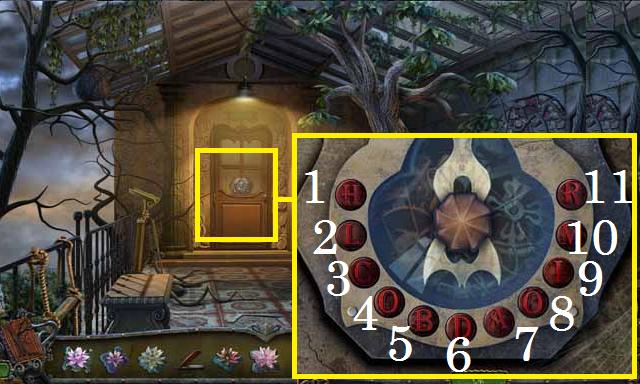
the buttons in the following sequence: 1, 2, and 3.
• Zoom into the staircase; spray the cover (Z) with the GLASS
CLEANER and enter the room. • Zoom into the painting; press
the buttons in the following sequence: 1, 2, and 3.
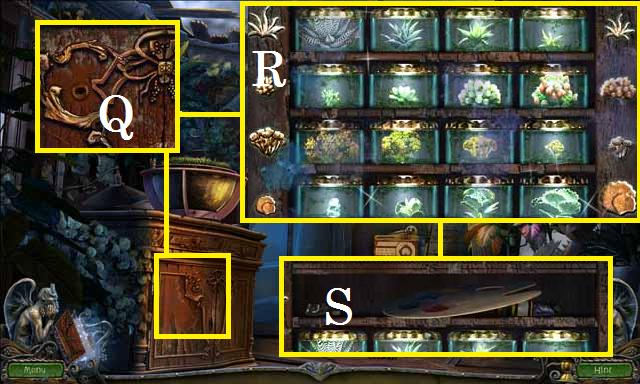
 • Pick up the note (A). • Zoom into the shelf; arrange the
jars as shown in the screenshot (B). • Pick up the PIPE
CLEANER (C). • Zoom into the projector; pick up the CRYSTAL
FLOWER (D). • Exit the house to the fountain.
• Pick up the note (A). • Zoom into the shelf; arrange the
jars as shown in the screenshot (B). • Pick up the PIPE
CLEANER (C). • Zoom into the projector; pick up the CRYSTAL
FLOWER (D). • Exit the house to the fountain.
 • Zoom into the fountain; clean the moss spigot (E) with the
PIPE CLEANER and pick up the EYE (F). • Return to the glass
room. • Zoom into the skeleton; place the EYE (G) and pick up
the HOSE (H). • Return to the lab.
• Zoom into the fountain; clean the moss spigot (E) with the
PIPE CLEANER and pick up the EYE (F). • Return to the glass
room. • Zoom into the skeleton; place the EYE (G) and pick up
the HOSE (H). • Return to the lab.
 • Zoom into the chalk board; place the HOSE (I). • Enter the
storage room. • Zoom into the barrel; place the HOSE in the
barrel and pick up the ANTIQUE KEY (J). • Return to the glass
room.
• Zoom into the chalk board; place the HOSE (I). • Enter the
storage room. • Zoom into the barrel; place the HOSE in the
barrel and pick up the ANTIQUE KEY (J). • Return to the glass
room.
 • Zoom into the chest; place the ANTIQUE KEY in the lock (K)
and pick up the EXTENSION CORD (L). • Return to the main
entryway. • Zoom into the upstairs hallway door; plug in the
EXTENSION CORD (M). • Zoom into the couch; plug in the
EXTENSION CORD (N). • Use the GARDENING GLOVES to remove the
DIAMOND-SHAPED KEY (O).
• Zoom into the chest; place the ANTIQUE KEY in the lock (K)
and pick up the EXTENSION CORD (L). • Return to the main
entryway. • Zoom into the upstairs hallway door; plug in the
EXTENSION CORD (M). • Zoom into the couch; plug in the
EXTENSION CORD (N). • Use the GARDENING GLOVES to remove the
DIAMOND-SHAPED KEY (O).
 • Zoom into the cabinet; place the DIAMONS-SHAPED KEY in the
lock (P). • Arrange the figurines (green) as shown in the
screenshot. • Pick up the CHOPSTICKS (Q) and place Adam (R)
with Eve (S). • Return to the Storage room.
• Zoom into the cabinet; place the DIAMONS-SHAPED KEY in the
lock (P). • Arrange the figurines (green) as shown in the
screenshot. • Pick up the CHOPSTICKS (Q) and place Adam (R)
with Eve (S). • Return to the Storage room.
 • Zoom into the shelf; remove the PORCELAIN SWAIN (T) with the
CHOPSTICKS.
• Zoom into the shelf; remove the PORCELAIN SWAIN (T) with the
CHOPSTICKS.
 • Zoom into the sparkles to play a HOS. • Receive the LIGHT
BULB. • Return to the main entryway.
• Zoom into the sparkles to play a HOS. • Receive the LIGHT
BULB. • Return to the main entryway.
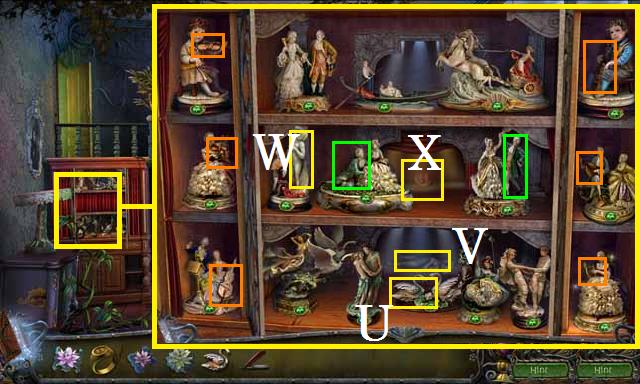 • Zoom into the cabinet; place the PORCELAIN SWAIN (U). •
Place the statue (V) with the artist (W). • Arrange the
figurines (green) as shown in the screenshot. • Place the
instruments (orange) as shown in the screenshot. • Pick up the
RED BUTTON WITH A LETTER (X). • Return to the bathroom.
• Zoom into the cabinet; place the PORCELAIN SWAIN (U). •
Place the statue (V) with the artist (W). • Arrange the
figurines (green) as shown in the screenshot. • Place the
instruments (orange) as shown in the screenshot. • Pick up the
RED BUTTON WITH A LETTER (X). • Return to the bathroom.
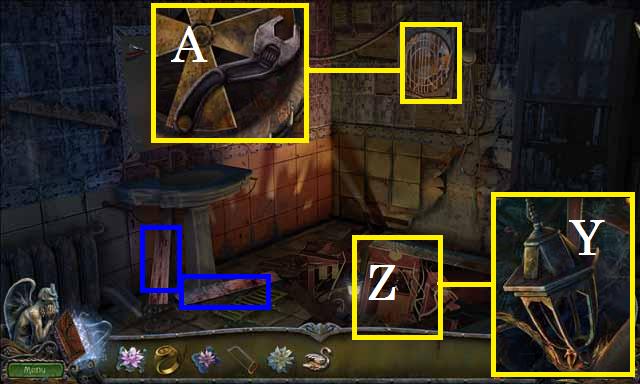 • Zoom into the hole; place the LIGHT BULB (Y). • Place the
two planks (blue) over the hole (Z). • Zoom into the fan;
remove the bars with the HACKSAW and pick up the WRENCH (A).
• Zoom into the hole; place the LIGHT BULB (Y). • Place the
two planks (blue) over the hole (Z). • Zoom into the fan;
remove the bars with the HACKSAW and pick up the WRENCH (A).
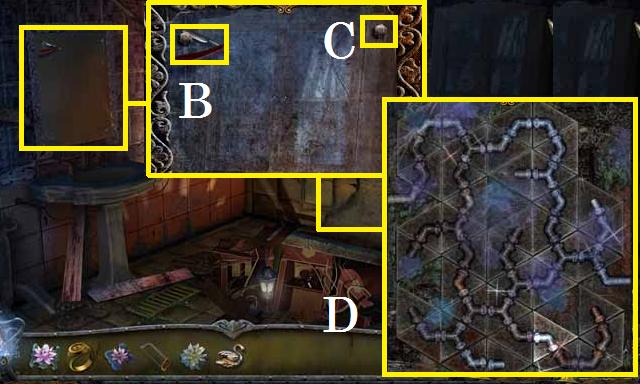 • Zoom into the mirror; pick up the RAZOR (B). • Remove the
bolts (C) with the WRENCH. • Zoom further into the mirror;
arrange the pipes as shown in the screenshot (D). • Exit back
to the upstairs hallway.
• Zoom into the mirror; pick up the RAZOR (B). • Remove the
bolts (C) with the WRENCH. • Zoom further into the mirror;
arrange the pipes as shown in the screenshot (D). • Exit back
to the upstairs hallway.
Chapter 3: The Balcony
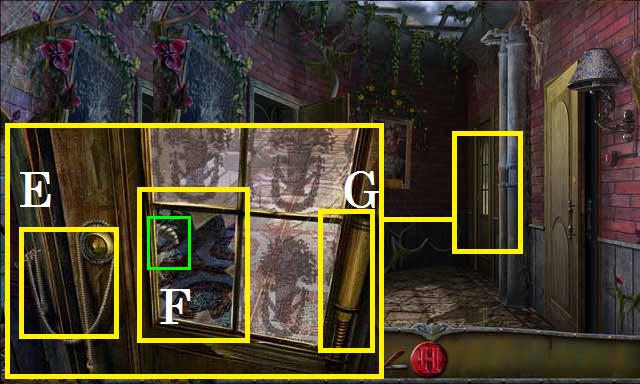 • Zoom into the balcony door; pick up the THIN ROPE (E). •
Break the window (F) with the bat (G) and pull the handle
(green). • Walk out onto the balcony.
• Zoom into the balcony door; pick up the THIN ROPE (E). •
Break the window (F) with the bat (G) and pull the handle
(green). • Walk out onto the balcony.
 • Zoom into the chest; pick up the GLUE (H) and place the RING
(I). • Zoom into the chair; squeeze some GLUE on the leg (J)
and tie the THIN ROPE around it. • Zoom into the railing; pick
up the SHADE (K). • Zoom into the rope ladder; pick up the
CRYSTAL FLOWER (L). • Zoom into the monkey (blue) then close
the pop up window. • Return to the terrace and take the hole
to the back room.
• Zoom into the chest; pick up the GLUE (H) and place the RING
(I). • Zoom into the chair; squeeze some GLUE on the leg (J)
and tie the THIN ROPE around it. • Zoom into the railing; pick
up the SHADE (K). • Zoom into the rope ladder; pick up the
CRYSTAL FLOWER (L). • Zoom into the monkey (blue) then close
the pop up window. • Return to the terrace and take the hole
to the back room.
 • Zoom into the sparkles to play a HOS. • Place the battery
(M) in the flashlight (N). • Dig the soil (O) with the shovel
(P) and pick it up. • Receive the WOODEN FLOWER.
• Zoom into the sparkles to play a HOS. • Place the battery
(M) in the flashlight (N). • Dig the soil (O) with the shovel
(P) and pick it up. • Receive the WOODEN FLOWER.
 • Zoom into the cabinet; place the WOODEN FLOWER (Q). • Zoom
back into the cabinet; arrange the flasks as shown in the
screenshot (R). • Pick up the PALETTE (S).
• Zoom into the cabinet; place the WOODEN FLOWER (Q). • Zoom
back into the cabinet; arrange the flasks as shown in the
screenshot (R). • Pick up the PALETTE (S).
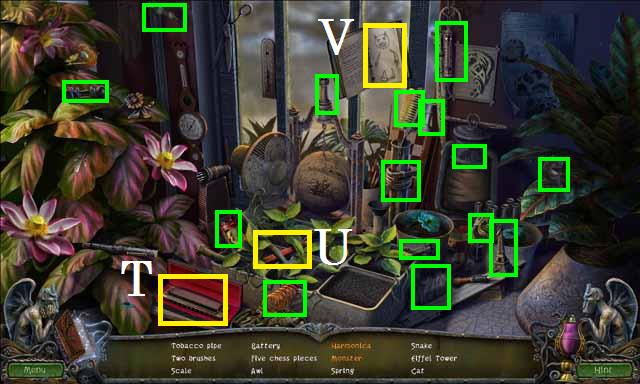 • Zoom back into the sparkles to play a HOS. • Open the case
(T) to find the harmonica. • Use the marker (U) to complete
the monster drawing (V). • Receive the BATTERY. • Enter the
lab.
• Zoom back into the sparkles to play a HOS. • Open the case
(T) to find the harmonica. • Use the marker (U) to complete
the monster drawing (V). • Receive the BATTERY. • Enter the
lab.
 • Zoom into the microscope; place the SHADE on the lamp (W)
and the MICROSCOPE LENS (blue). • Return to the upstairs
hallway and exit onto the balcony. • Zoom into the monkey;
place the BATTERY (X) and pick up the THICK ROPE (Y). • Zoom
into the rope ladder; hang the THICK ROPE over the edge (Z)
and pick up the BRUSH (A). • Return to the upstairs hallway.
• Zoom into the microscope; place the SHADE on the lamp (W)
and the MICROSCOPE LENS (blue). • Return to the upstairs
hallway and exit onto the balcony. • Zoom into the monkey;
place the BATTERY (X) and pick up the THICK ROPE (Y). • Zoom
into the rope ladder; hang the THICK ROPE over the edge (Z)
and pick up the BRUSH (A). • Return to the upstairs hallway.
 • Zoom into the painting; place the PALETTE and the BRUSH. See
the screenshot (B) for the final image. • Pick up the CRYSTAL
FLOWER (green) and the note (green). • Exit back to the
balcony.
• Zoom into the painting; place the PALETTE and the BRUSH. See
the screenshot (B) for the final image. • Pick up the CRYSTAL
FLOWER (green) and the note (green). • Exit back to the
balcony.
 • Zoom into the door; place the RED BUTTON WITH A LETTER on
the lock. The beginning arrangements may differ. From the
starting position shown in the screenshot the puzzle can be
completed by pressing the spaces in the following sequence: 1,
6, 9, 4, 8, 2, 10, 9, 8, and 7. • Enter the study.
• Zoom into the door; place the RED BUTTON WITH A LETTER on
the lock. The beginning arrangements may differ. From the
starting position shown in the screenshot the puzzle can be
completed by pressing the spaces in the following sequence: 1,
6, 9, 4, 8, 2, 10, 9, 8, and 7. • Enter the study.
 • Pick up the CRYSTAL FLOWER (E). • Zoom into the chair; cut
the pillow (F) with the RAZOR. • Pick up the RING (G) and the
three CANVAS FRAGMENTS (orange). • Zoom into the desk; pick up
the four CANVAS FRAGMENTS (blue) • Exit back to the balcony.
• Pick up the CRYSTAL FLOWER (E). • Zoom into the chair; cut
the pillow (F) with the RAZOR. • Pick up the RING (G) and the
three CANVAS FRAGMENTS (orange). • Zoom into the desk; pick up
the four CANVAS FRAGMENTS (blue) • Exit back to the balcony.
 • Zoom into the chest; place the RING (H) and pick up the WIRE
CUTTERS (I). • Enter the study again and zoom into the door;
cut the chain (J) with the WIRE CUTTERS. • Pick up the two
CANVAS FRAGMENTS (green) and the INSULATING TAPE (K). • Exit
back to the upstairs hallway.
• Zoom into the chest; place the RING (H) and pick up the WIRE
CUTTERS (I). • Enter the study again and zoom into the door;
cut the chain (J) with the WIRE CUTTERS. • Pick up the two
CANVAS FRAGMENTS (green) and the INSULATING TAPE (K). • Exit
back to the upstairs hallway.
 • Zoom into the light; fix the wire (L) with the INSULATING
TAPE, FLIP THE SWITCH (M) and pick up the CANVAS FRAGMENTS
(N). • Return to the study. • Zoom into the painting; drop the
FLOWERS over the painting and place them as shown in the
screenshot (O).
• Zoom into the light; fix the wire (L) with the INSULATING
TAPE, FLIP THE SWITCH (M) and pick up the CANVAS FRAGMENTS
(N). • Return to the study. • Zoom into the painting; drop the
FLOWERS over the painting and place them as shown in the
screenshot (O).
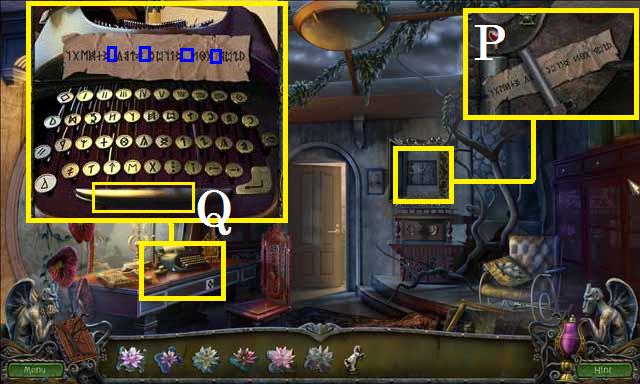 • Zoom into the safe; pick up the paper (P). • Zoom into the
desk then the typewriter; press the keys in the order shown on
the paper. When there is a space (blue) make sure to press the
space bar (Q). • Return to the bathroom.
• Zoom into the safe; pick up the paper (P). • Zoom into the
desk then the typewriter; press the keys in the order shown on
the paper. When there is a space (blue) make sure to press the
space bar (Q). • Return to the bathroom.
 • Zoom into the grate; pick up the PLIERS (R). • Return to the
glass room. • Zoom into the screen then the nail; bend the
nail (S) with the PLIERS and close the window. • Pick up the
MAGNET (T). • Return to the bathroom. • Zoom into the grate;
drop the MAGNET down the grate to receive the KNIGHT. • Return
to the study.
• Zoom into the grate; pick up the PLIERS (R). • Return to the
glass room. • Zoom into the screen then the nail; bend the
nail (S) with the PLIERS and close the window. • Pick up the
MAGNET (T). • Return to the bathroom. • Zoom into the grate;
drop the MAGNET down the grate to receive the KNIGHT. • Return
to the study.
 • Zoom into the desk, then the drawer; place the KNIGHT and
use the following sequence: Move the knight in position 9 to
position 2 then move the knight in position 3 to 6 and from 6
to 9. Continue with 1 to 8, 7 to 6 then 1, 8 to 3 then 4, 1 to
8 then 3, 2 to 7 then 6 and 1, 9 to 2 then 7, and finish with
4 to 9. • Zoom into the open drawer; pick up the FULL REEL
(U). • Return to glass room.
• Zoom into the desk, then the drawer; place the KNIGHT and
use the following sequence: Move the knight in position 9 to
position 2 then move the knight in position 3 to 6 and from 6
to 9. Continue with 1 to 8, 7 to 6 then 1, 8 to 3 then 4, 1 to
8 then 3, 2 to 7 then 6 and 1, 9 to 2 then 7, and finish with
4 to 9. • Zoom into the open drawer; pick up the FULL REEL
(U). • Return to glass room.
 • Zoom into the projector and place the FULL REEL (V). •
Return to the study. • Zoom into the desk, then the open
drawer; remove the false bottom and pick up the VARIOUS SEEDS
(W). • Return to the lab.
• Zoom into the projector and place the FULL REEL (V). •
Return to the study. • Zoom into the desk, then the open
drawer; remove the false bottom and pick up the VARIOUS SEEDS
(W). • Return to the lab.
 • Zoom into the microscope; place the VARIOUS SEEDS under the
lens (X). • As the two types of seeds (blue) rise to the top
pick them up until you have collected enough and you receive
the PLANTA LUMINOSUS SEEDS and the LILIUM AQUA REGIA SEEDS. •
Exit the house and move to the river. • Pour the LILIUM AQUA
REGIA in the water (Y). • Move to the other side of the river.
• Zoom into the microscope; place the VARIOUS SEEDS under the
lens (X). • As the two types of seeds (blue) rise to the top
pick them up until you have collected enough and you receive
the PLANTA LUMINOSUS SEEDS and the LILIUM AQUA REGIA SEEDS. •
Exit the house and move to the river. • Pour the LILIUM AQUA
REGIA in the water (Y). • Move to the other side of the river.
Chapter 4: The Chapel
 • Zoom into the window you can use the following sequence to
rearrange the blossoms; 10, 11, 12, 1, 2, M; 8, 9, 10, 11, M;
12, 11, M, 9, 10, 11, M; 5, 6, 7, 8, 9, M; 7, 6, 5, 4, 3, M;
6, 5, 4, M; 8, 7, 6, 5, M; and 6, 7, M. • Pick up the
DRAGONFLY FIGURINE (Z). • Zoom into the door; pick up the
paper (A). • Move to the left to the waterfall entrance.
• Zoom into the window you can use the following sequence to
rearrange the blossoms; 10, 11, 12, 1, 2, M; 8, 9, 10, 11, M;
12, 11, M, 9, 10, 11, M; 5, 6, 7, 8, 9, M; 7, 6, 5, 4, 3, M;
6, 5, 4, M; 8, 7, 6, 5, M; and 6, 7, M. • Pick up the
DRAGONFLY FIGURINE (Z). • Zoom into the door; pick up the
paper (A). • Move to the left to the waterfall entrance.
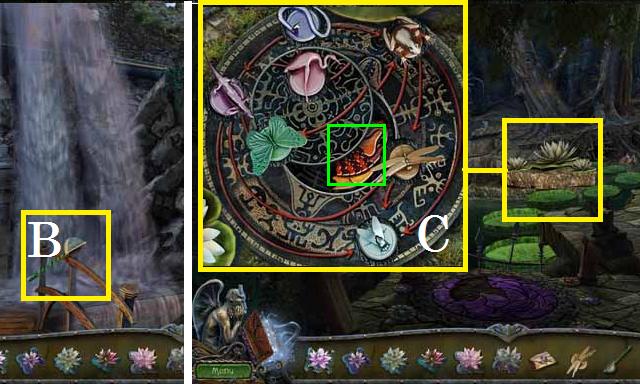 • Pick up the BUTTERFLY NET (B). • Exit back two scenes to the
river. • Zoom into the lilies; place the DRAGONFLY FIGURINE on
the pad and arrange the figurines as shown in the screenshot
(C). • Pick up the PIECE OF THE MOSAIC (green).
• Pick up the BUTTERFLY NET (B). • Exit back two scenes to the
river. • Zoom into the lilies; place the DRAGONFLY FIGURINE on
the pad and arrange the figurines as shown in the screenshot
(C). • Pick up the PIECE OF THE MOSAIC (green).
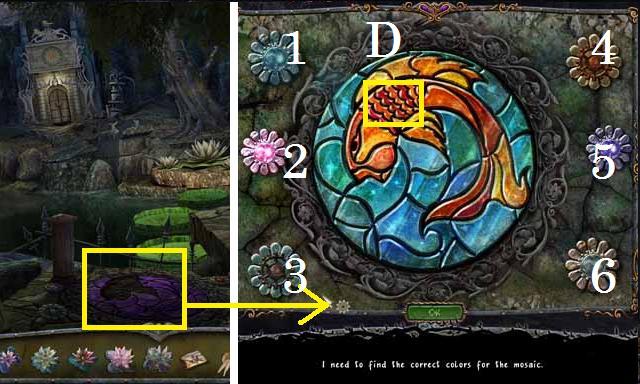 • Zoom into the mosaic; place the PIECE OF THE MOSAIC (D) then
use the following sequence: 1, 1, 1, 2, 2, 2, 4, 4, 4, 5, 5,
and 6.
• Zoom into the mosaic; place the PIECE OF THE MOSAIC (D) then
use the following sequence: 1, 1, 1, 2, 2, 2, 4, 4, 4, 5, 5,
and 6.
 • Zoom into the fish tank stand; open the drawer and pick up
the CRYSTAL FLOWER (green) and the DRIED FROG (green). • Zoom
into the tank; drop the DRIED FROG in the tank followed by the
BUTTERFLY NET. Use the following sequence to move the tower: 1
to (F), 2 to (G), 1 to (G), 3 to (F), 1 to (E), 2 to (F), 1 to
(F), 4 to (G), 1 to (G), 2 to (E), 1 to (E), 3 to (G), 1 to
(F), 2 to (G), 1 to (G), 5 to (F), 1 to (F), 2 to (E), 1 to
(G), 2 to (F), 1 to (F), 3 to (E), 1 to (G), 2 to (E), 1 to
(E), 4 to (F), 1 to (F), 2 to (G), 1 to (G), 3 to (F), 1 to
(E), 2 to (F) and 1 to (F). • Pick up the GREEN CRYSTAL (H). •
Cross the river again.
• Zoom into the fish tank stand; open the drawer and pick up
the CRYSTAL FLOWER (green) and the DRIED FROG (green). • Zoom
into the tank; drop the DRIED FROG in the tank followed by the
BUTTERFLY NET. Use the following sequence to move the tower: 1
to (F), 2 to (G), 1 to (G), 3 to (F), 1 to (E), 2 to (F), 1 to
(F), 4 to (G), 1 to (G), 2 to (E), 1 to (E), 3 to (G), 1 to
(F), 2 to (G), 1 to (G), 5 to (F), 1 to (F), 2 to (E), 1 to
(G), 2 to (F), 1 to (F), 3 to (E), 1 to (G), 2 to (E), 1 to
(E), 4 to (F), 1 to (F), 2 to (G), 1 to (G), 3 to (F), 1 to
(E), 2 to (F) and 1 to (F). • Pick up the GREEN CRYSTAL (H). •
Cross the river again.
 • Zoom into the door; place the GREEN CRYSTAL in the lock (I).
• Enter the chapel. • Pick up the CRYSTAL FLOWER (J). • Zoom
into the crank; pick up DANIEL’S ANKH (K) • Move forward to
the altar.
• Zoom into the door; place the GREEN CRYSTAL in the lock (I).
• Enter the chapel. • Pick up the CRYSTAL FLOWER (J). • Zoom
into the crank; pick up DANIEL’S ANKH (K) • Move forward to
the altar.
 • Pick up the SNAKE CLAMP (L). • Exit the chapel. • Spin the
three stones (orange) on the column as shown in the
screenshot. • Zoom into the middle stone; remove the snake (M)
with the SNAKE CLAMP and pick up the STONE PALM (N). • Exit
back three scenes and take a right to the statue garden.
• Pick up the SNAKE CLAMP (L). • Exit the chapel. • Spin the
three stones (orange) on the column as shown in the
screenshot. • Zoom into the middle stone; remove the snake (M)
with the SNAKE CLAMP and pick up the STONE PALM (N). • Exit
back three scenes and take a right to the statue garden.
 • Zoom into the hand statue; place the STONE PALM (O). • Pick
up the PART OF STONE MUSIC TABLET (P). • Return to the chapel
and move forward to the altar. • Zoom into the organ; place
the PART OF STONE MUSIC TABLET (Q). Repeat the notes in the
same sequence they are played. If you need to review a
sequence press the music button (D). • Return to the
waterfall.
• Zoom into the hand statue; place the STONE PALM (O). • Pick
up the PART OF STONE MUSIC TABLET (P). • Return to the chapel
and move forward to the altar. • Zoom into the organ; place
the PART OF STONE MUSIC TABLET (Q). Repeat the notes in the
same sequence they are played. If you need to review a
sequence press the music button (D). • Return to the
waterfall.
 • Zoom into the sparkles to play a HOS. • Receive the
STAINED-GLASS WINDOW FRAGMENTS.
• Zoom into the sparkles to play a HOS. • Receive the
STAINED-GLASS WINDOW FRAGMENTS.
 • Zoom into the door; pick up the HANDLE (R). • Return to the
temple. • Zoom into the crank; place the HANDLE (S) and spin
the crank. • Zoom into the window; drop the STAINED-GLASS
WINDOW FRAGMENTS over the window, the ROUND GEM will be added
to your inventory if you didn’t already pick it up. See the
screenshot for the final image.
• Zoom into the door; pick up the HANDLE (R). • Return to the
temple. • Zoom into the crank; place the HANDLE (S) and spin
the crank. • Zoom into the window; drop the STAINED-GLASS
WINDOW FRAGMENTS over the window, the ROUND GEM will be added
to your inventory if you didn’t already pick it up. See the
screenshot for the final image.
 • Zoom into the statue; place the ROUND GEM in the middle
(green) and use the following sequence: 1, 2, 1, 3, 4, 5, and
4. • Zoom into the wall (U) and close the window. • Return to
the waterfall.
• Zoom into the statue; place the ROUND GEM in the middle
(green) and use the following sequence: 1, 2, 1, 3, 4, 5, and
4. • Zoom into the wall (U) and close the window. • Return to
the waterfall.
 • Zoom into the sparkles to play a HOS. • Drag the half mask
(V) to the other half (W). • Drag the roster (X) over to the
panel to reveal the bracelet (Y). • Receive the PUTTY KNIFE. •
Return to the chapel.
• Zoom into the sparkles to play a HOS. • Drag the half mask
(V) to the other half (W). • Drag the roster (X) over to the
panel to reveal the bracelet (Y). • Receive the PUTTY KNIFE. •
Return to the chapel.
 • Zoom into the wall; use the PUTTY KNIFE to remove the moss
and place DANIEL’S ANKH in the space (Z). • Pick up the GEARS
(A). • Return to the waterfall.
• Zoom into the wall; use the PUTTY KNIFE to remove the moss
and place DANIEL’S ANKH in the space (Z). • Pick up the GEARS
(A). • Return to the waterfall.
 • Zoom into the door, then the panel; place the GEARS and
arrange them as shown in the screenshot (B). • Enter the
elevator.
• Zoom into the door, then the panel; place the GEARS and
arrange them as shown in the screenshot (B). • Enter the
elevator.
 • Zoom into the sparkles to play a HOS. • Pour the red paint
(C) over the truck (D). • Place the receiver (E) on the phone
base (F). • Receive the CRYSTAL FLOWER.
• Zoom into the sparkles to play a HOS. • Pour the red paint
(C) over the truck (D). • Place the receiver (E) on the phone
base (F). • Receive the CRYSTAL FLOWER.
 • Zoom into the floor; remove the boards (green) and pick up
the note (G). • Zoom into the elevator buttons; pull the note
(H) out of the slot. • Pick up the note (I). • Return to the
study.
• Zoom into the floor; remove the boards (green) and pick up
the note (G). • Zoom into the elevator buttons; pull the note
(H) out of the slot. • Pick up the note (I). • Return to the
study.
 • Zoom into the wall safe; use the following sequence: 2, 4,
6, 3, 5, and 1. • Pick up the SPYGLASS (J). • Exit out to the
balcony. • Zoom into the railing; place the SPYGLASS on the
stand (K) and zoom in. • Move the scene down and to the left
as shown in the screenshot (L).
• Zoom into the wall safe; use the following sequence: 2, 4,
6, 3, 5, and 1. • Pick up the SPYGLASS (J). • Exit out to the
balcony. • Zoom into the railing; place the SPYGLASS on the
stand (K) and zoom in. • Move the scene down and to the left
as shown in the screenshot (L).
 • Enter the study and zoom back into the wall safe then the
box; hit the buttons in the following order: 1835. • Pick up
the PROFESSOR’S STAMP and the PROFESSOR’S PHOTO (M). • Zoom
into the desk then the open drawer; place the PROFESSOR’S
Photo in the open drawer and cut with the scissors (N). Pour
the glue (O) on the access card (P) followed by the photo (Q).
• Place the PROFESSOR’S STAMP in the drawer and stamp the
card. Use the pen (R) to write on the access card. • Pick up
the completed NEW ACCESS CARD.
• Enter the study and zoom back into the wall safe then the
box; hit the buttons in the following order: 1835. • Pick up
the PROFESSOR’S STAMP and the PROFESSOR’S PHOTO (M). • Zoom
into the desk then the open drawer; place the PROFESSOR’S
Photo in the open drawer and cut with the scissors (N). Pour
the glue (O) on the access card (P) followed by the photo (Q).
• Place the PROFESSOR’S STAMP in the drawer and stamp the
card. Use the pen (R) to write on the access card. • Pick up
the completed NEW ACCESS CARD.
 • Return to the waterfall and enter the elevator. • Zoom into
the elevator buttons and place the NEW ACCESS CARD in the slot
(S).
• Return to the waterfall and enter the elevator. • Zoom into
the elevator buttons and place the NEW ACCESS CARD in the slot
(S).
 • Zoom into the sparkles to play a HOS. • Mix the blue and
yellow paint (T). • Light the fire (U) with the matches (V). •
Receive the PAPER CLIP.
• Zoom into the sparkles to play a HOS. • Mix the blue and
yellow paint (T). • Light the fire (U) with the matches (V). •
Receive the PAPER CLIP.
 • Zoom into the elevator buttons and press level 2 (W). • Zoom
into the level; pick up the WATERING CAN (X). • Take the
elevator to level 4.
• Zoom into the elevator buttons and press level 2 (W). • Zoom
into the level; pick up the WATERING CAN (X). • Take the
elevator to level 4.
 • Zoom into the level then the planter; plant the PLANTA
LUMINOSUS SEEDS in the soil (Y). • Zoom into the ledge; pick
up the CRYSTAL FLOWER (Z). • Return to the statue garden.
• Zoom into the level then the planter; plant the PLANTA
LUMINOSUS SEEDS in the soil (Y). • Zoom into the ledge; pick
up the CRYSTAL FLOWER (Z). • Return to the statue garden.
 • Zoom into the purse; place the PAPERCLIP on the zipper (A),
open the purse and pick up the SLEEPING PILLS (B). • Return to
the fountain. • Zoom into the fountain; place the WATERING CAN
in the water then pour the SLEEPING PILLS in the WATERING CAN.
• Pick up the WATERING CAN WITH SLEEPING PILLS (C).
• Zoom into the purse; place the PAPERCLIP on the zipper (A),
open the purse and pick up the SLEEPING PILLS (B). • Return to
the fountain. • Zoom into the fountain; place the WATERING CAN
in the water then pour the SLEEPING PILLS in the WATERING CAN.
• Pick up the WATERING CAN WITH SLEEPING PILLS (C).
 • Return to the elevator and move to level 2. • Zoom into the
level; pour the WATERING CAN WITH SLEEPING PILLS into the root
(D). • Take the elevator to level 3. • Zoom into the level;
pick up the HARPOON (E). • Return to level 1.
• Return to the elevator and move to level 2. • Zoom into the
level; pour the WATERING CAN WITH SLEEPING PILLS into the root
(D). • Take the elevator to level 3. • Zoom into the level;
pick up the HARPOON (E). • Return to level 1.
 • Zoom into the floor; shoot the HARPOON into the hole and
open the folder (F). • Drag the tape (green) to the tape
player (G) and pick up the TAPE WITH STINER’S VOICE. • Exit
the elevator.
• Zoom into the floor; shoot the HARPOON into the hole and
open the folder (F). • Drag the tape (green) to the tape
player (G) and pick up the TAPE WITH STINER’S VOICE. • Exit
the elevator.
 • Zoom into the sparkles to play a HOS. • Place the feather
(I) on the fan (J). • Receive the PICKAXE.
• Zoom into the sparkles to play a HOS. • Place the feather
(I) on the fan (J). • Receive the PICKAXE.
 • Zoom into the stone wall; break away the stone with the
PICKAXE and pick up the GEAR (L). • Take the elevator to level
4. • Zoom into the level and then the ledge; place the GEAR
(M) and pick up the CROWN (N). • Return to level 1 and exit
the elevator. • Zoom into the lion; place the CROWN (O) and
pick up the GLASS SPHERE (P). • Return to the chapel and move
forward to the altar.
• Zoom into the stone wall; break away the stone with the
PICKAXE and pick up the GEAR (L). • Take the elevator to level
4. • Zoom into the level and then the ledge; place the GEAR
(M) and pick up the CROWN (N). • Return to level 1 and exit
the elevator. • Zoom into the lion; place the CROWN (O) and
pick up the GLASS SPHERE (P). • Return to the chapel and move
forward to the altar.
 • Place the GLASS SPHERE on the stand (Q). • Place item (1) in
bowl (A), (2) in (C), (3) in (D), and (4) in (B).
• Place the GLASS SPHERE on the stand (Q). • Place item (1) in
bowl (A), (2) in (C), (3) in (D), and (4) in (B).
 • Zoom into the ground. • After the dialogue, pick up the
CRYSTAL FLOWER (R). • Exit all the way back to the dock.
• Zoom into the ground. • After the dialogue, pick up the
CRYSTAL FLOWER (R). • Exit all the way back to the dock.
 • Zoom into the sparkles to play a HOS. • Place the bird (S)
on the clock (T). • Drag the iron (U) across the lamp (V). •
Remove the cobwebs (W) with the broom (X) to reveal Lisa’s
face. • Receive the CARABINER.
• Zoom into the sparkles to play a HOS. • Place the bird (S)
on the clock (T). • Drag the iron (U) across the lamp (V). •
Remove the cobwebs (W) with the broom (X) to reveal Lisa’s
face. • Receive the CARABINER.
Chapter 5: The Dome
 • Exit back to the shore and move to the bridge. • Zoom into
the statue; place all eleven CRYSTAL FLOWERS on the statue
(Y). • Move forward to the dome. • Zoom into the stone; pick
up KEVIN’S DEFLATED BALL (Z) and fix the chain (A) with the
CARABINER.
• Exit back to the shore and move to the bridge. • Zoom into
the statue; place all eleven CRYSTAL FLOWERS on the statue
(Y). • Move forward to the dome. • Zoom into the stone; pick
up KEVIN’S DEFLATED BALL (Z) and fix the chain (A) with the
CARABINER.
 • Zoom into the wall; pick up the pump (B) and remove the
pairs, see the screenshot for a few examples (color coded). •
Open the crate; pick up the GILDED AXE (C) and the GILDED
SHIELD (D). • Zoom into the stone; place KEVIN’S DEFLATED BALL
under the rock (E) followed by the PUMP then pull the handle
(F).
• Zoom into the wall; pick up the pump (B) and remove the
pairs, see the screenshot for a few examples (color coded). •
Open the crate; pick up the GILDED AXE (C) and the GILDED
SHIELD (D). • Zoom into the stone; place KEVIN’S DEFLATED BALL
under the rock (E) followed by the PUMP then pull the handle
(F).
 • Zoom into the doorway; place the GILDED AXE and GILDED SHELD
as shown in the screenshot (G). • Zoom into the lock; play the
TAPE WITH STEINER’S VOICE over the speaker (H). • Enter the
dome.
• Zoom into the doorway; place the GILDED AXE and GILDED SHELD
as shown in the screenshot (G). • Zoom into the lock; play the
TAPE WITH STEINER’S VOICE over the speaker (H). • Enter the
dome.
 • Pick up the note (I). • Move forward and zoom into the tree;
pick up the note (J). • Zoom out then into the eye (K) to see
where the next mutation neutralizer is located. • Return to
the house and enter the main entryway.
• Pick up the note (I). • Move forward and zoom into the tree;
pick up the note (J). • Zoom out then into the eye (K) to see
where the next mutation neutralizer is located. • Return to
the house and enter the main entryway.
 • Zoom into the upstairs hallway door; close the door slightly
and remove the cobwebs to pick up the first MUTATION
NEUTRALIZER (K). • Return to the dome. Enter the dome and move
forward.
• Zoom into the upstairs hallway door; close the door slightly
and remove the cobwebs to pick up the first MUTATION
NEUTRALIZER (K). • Return to the dome. Enter the dome and move
forward.
 • Zoom into the tree; place the MUTATION NEUTRALIZER (L). •
Zoom into the suitcase; open the case and pick up the SHARP
KNIFE (M) and FISHING ROD (N). • Zoom into the eye. • Return
to the Chapel.
• Zoom into the tree; place the MUTATION NEUTRALIZER (L). •
Zoom into the suitcase; open the case and pick up the SHARP
KNIFE (M) and FISHING ROD (N). • Zoom into the eye. • Return
to the Chapel.
 • Zoom into the crank; remove the stone (P) with the SHARP
KNIFE and pick up the MUTATION NEUTRALIZER (green). • Return
to the dome and zoom into the tree; place the MUTATION
NEUTRALIZER (O). • Zoom into the eye. • Return to the Chapel
and move forward to the altar.
• Zoom into the crank; remove the stone (P) with the SHARP
KNIFE and pick up the MUTATION NEUTRALIZER (green). • Return
to the dome and zoom into the tree; place the MUTATION
NEUTRALIZER (O). • Zoom into the eye. • Return to the Chapel
and move forward to the altar.
 • Zoom into the ground; after the dialogue pick up the two
MUTATION NEUTRALIZERS (blue). • Return to the dome and zoom
into the tree; place the MUTATION NEUTRALIZERS (Q and R). •
Zoom into the eye. • Return to the waterfall.
• Zoom into the ground; after the dialogue pick up the two
MUTATION NEUTRALIZERS (blue). • Return to the dome and zoom
into the tree; place the MUTATION NEUTRALIZERS (Q and R). •
Zoom into the eye. • Return to the waterfall.
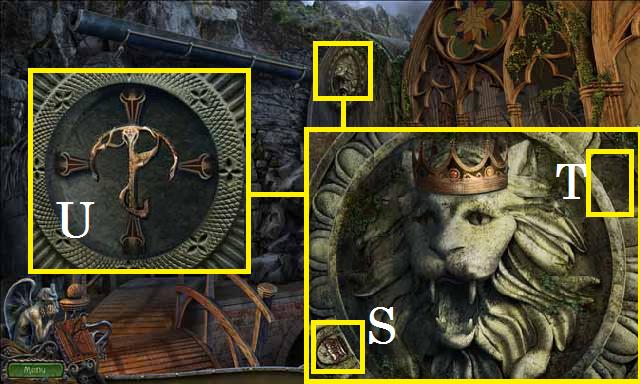 • Zoom into the lion; place the STONE ELEMENT (S) in the space
(T). • Pick up the MUTATION NEUTRALIZER (U).
• Zoom into the lion; place the STONE ELEMENT (S) in the space
(T). • Pick up the MUTATION NEUTRALIZER (U).
 • Return to the dome and zoom into the tree; place the
MUTATION NEUTRALIZERS (V). • Zoom into the eye. • Return to
the outside stairs, just past the dock. • Zoom into the gap;
use the FISHING ROD to pick up the last MUTATION NEUTRALIZER
(W). • Return to the dome and zoom into the tree; place the
MUTATION NEUTRALIZERS (X). • Congratulations, you have saved
your friends and escaped the island!
• Return to the dome and zoom into the tree; place the
MUTATION NEUTRALIZERS (V). • Zoom into the eye. • Return to
the outside stairs, just past the dock. • Zoom into the gap;
use the FISHING ROD to pick up the last MUTATION NEUTRALIZER
(W). • Return to the dome and zoom into the tree; place the
MUTATION NEUTRALIZERS (X). • Congratulations, you have saved
your friends and escaped the island!
Created at: 2012-02-25