

Walkthrough Menu
- General Tips
- Chapter 1: Guard Room
- Chapter 2: Guest WIng
- Chapter 3: Study
- Chapter 4: Apartment
- Chapter 5: Garden
- Chapter 6: Lagoon
- Chapter 7: Balcony
General Tips
- This is the official guide for Path of Sin: Greed.
- This guide won't tell you when to zoom into a location; the screenshots show each zoom scene.
- Hidden-object puzzles are referred to as HOPs. Only the locations of the HOPs will be shown.
- Use the Map to fast travel to a location.
Chapter 1: Guard Room
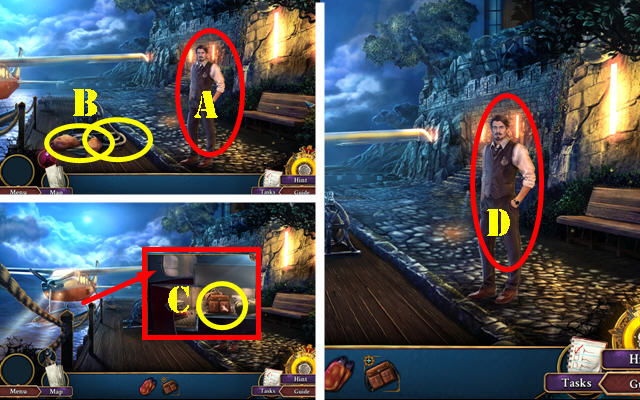
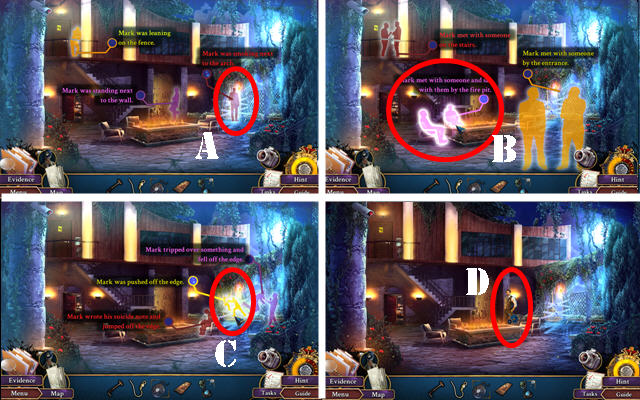
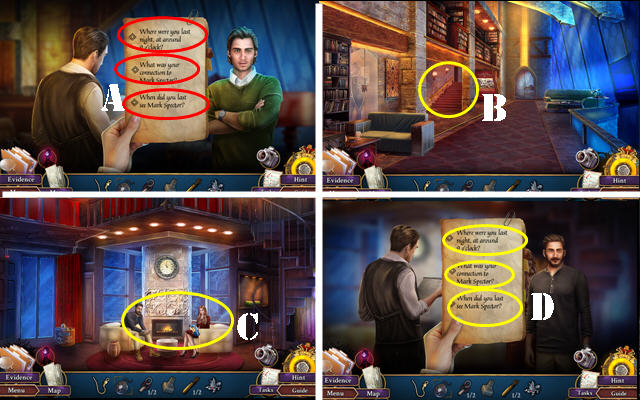
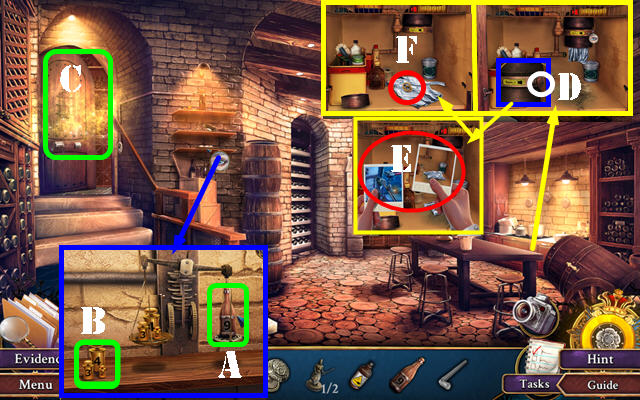
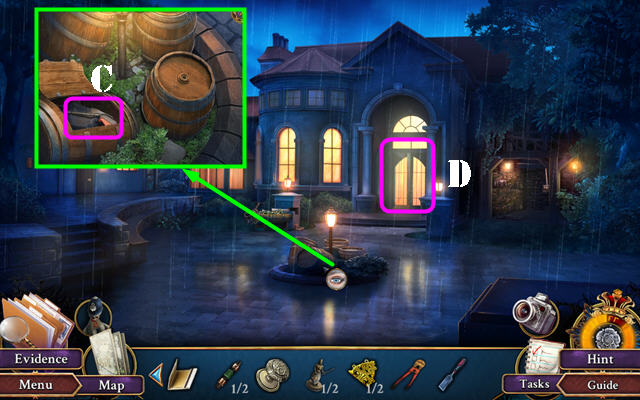
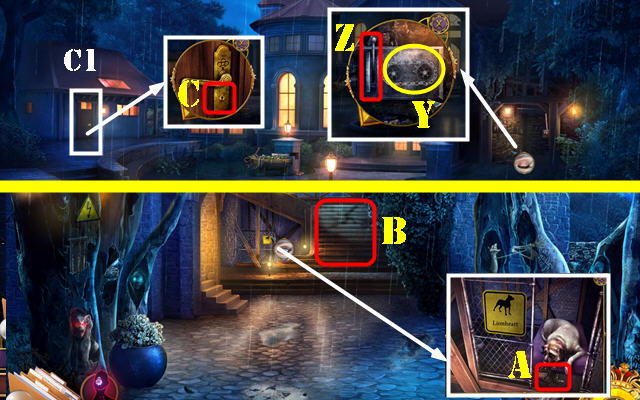
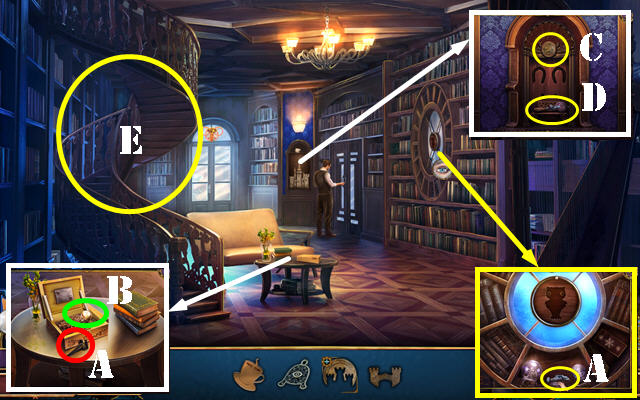
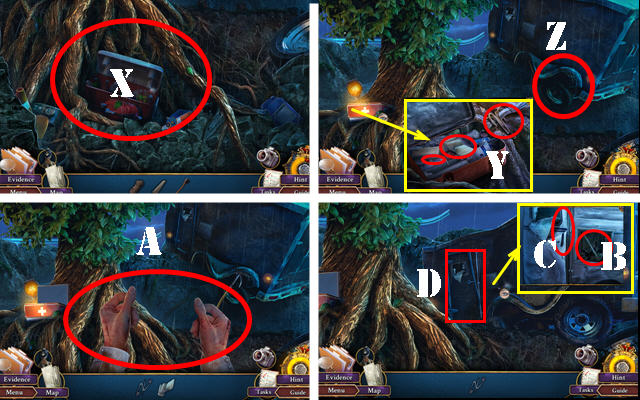
- Talk (A).
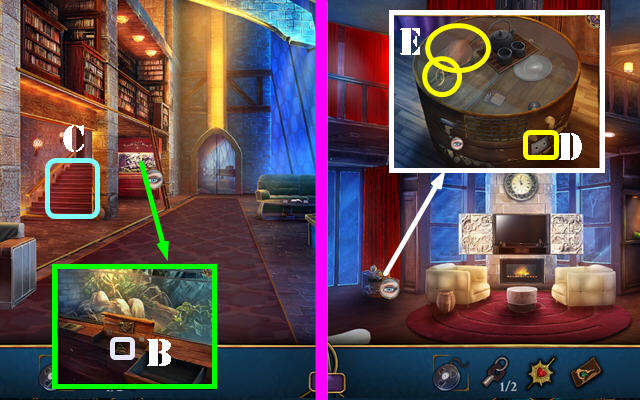
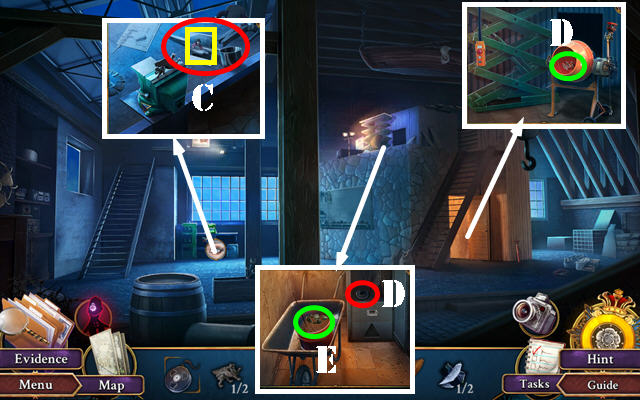
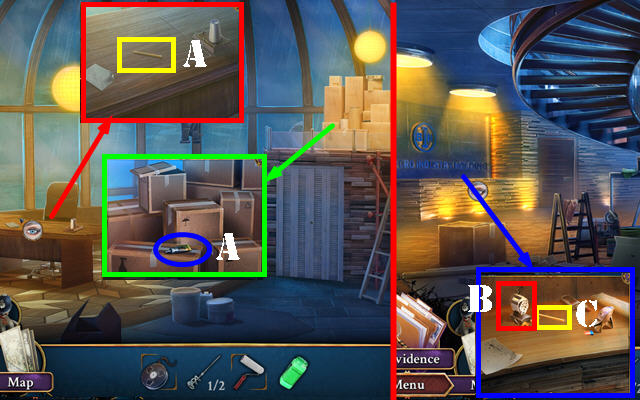
- Take INFLATABLE BUOY and ROPE (B).
- Use ROPE and pull handle; take SHOULDER BAG (C).
- Select SHOULDER BAG; take POINTED PLIERS. Select again; take CASE FILES.
- Give CASE FILES (D).
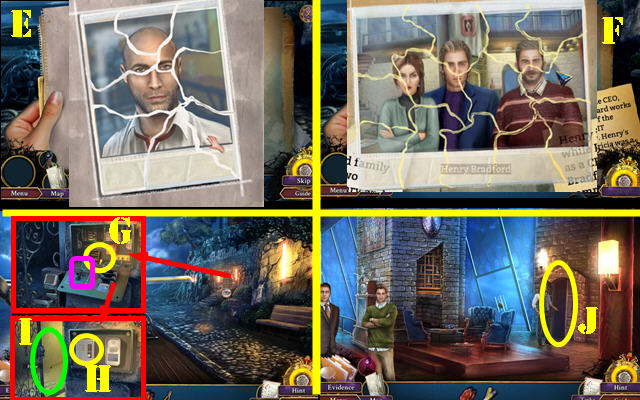
- Solution one (E).
- Solution two (F).
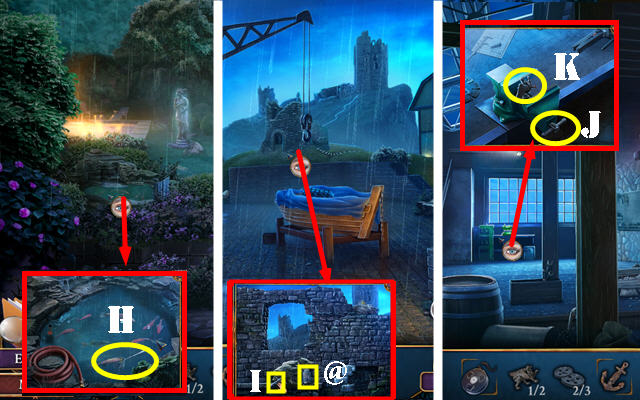
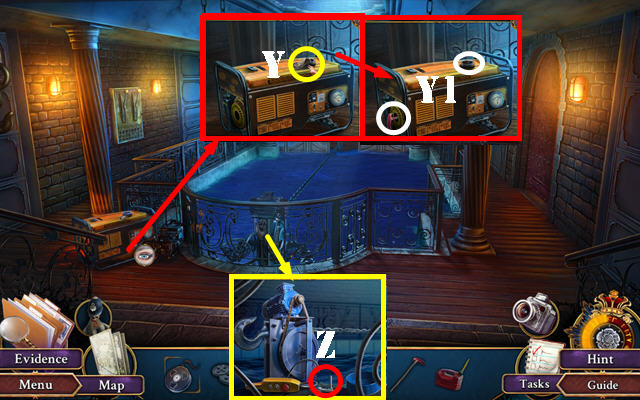
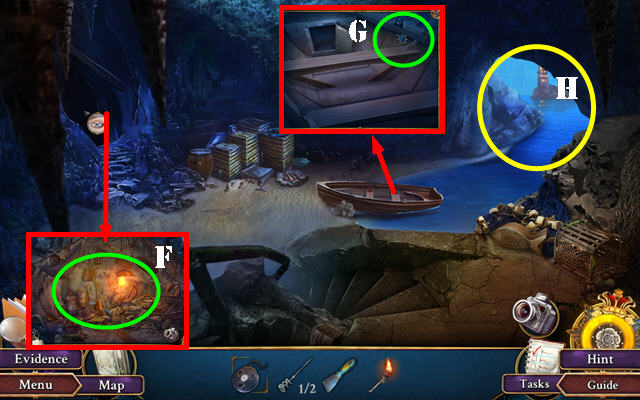
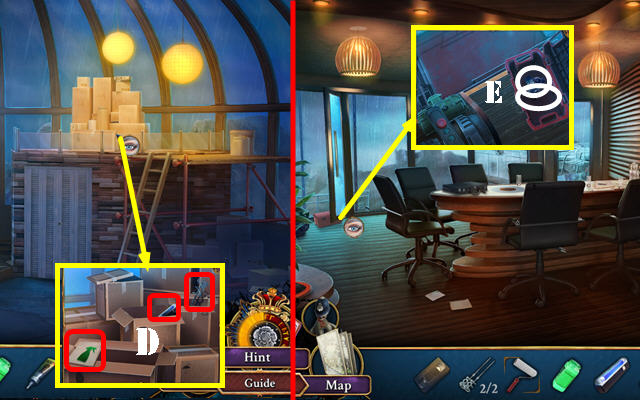
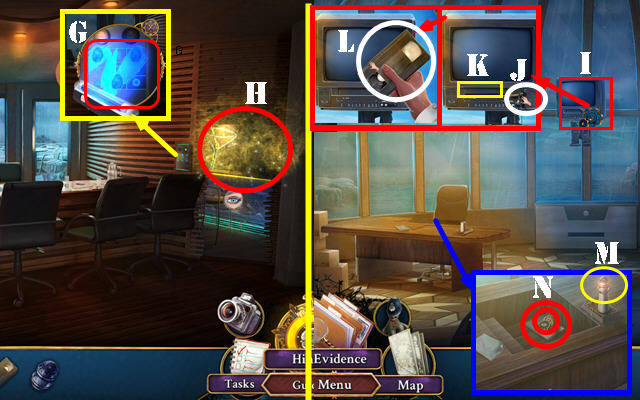
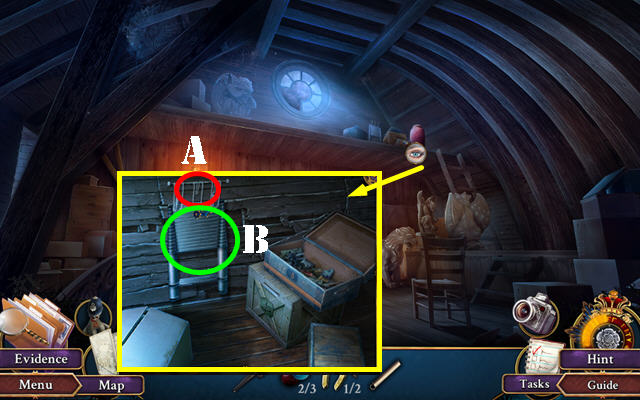
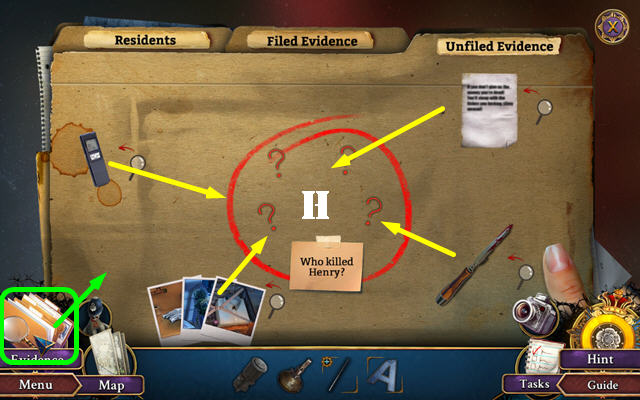
- Use POINTED PLIERS; take BATTERIES (G). Select wire (purple). Select area (H).
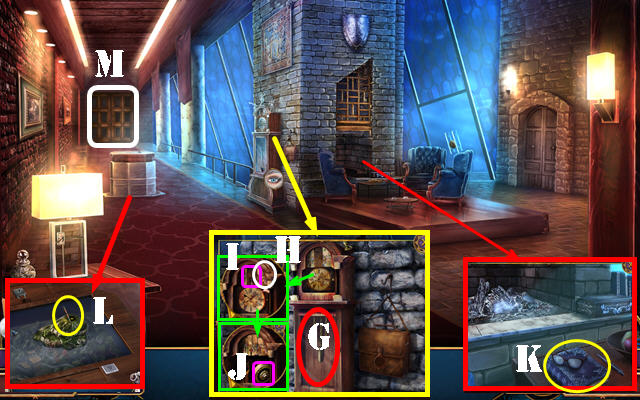
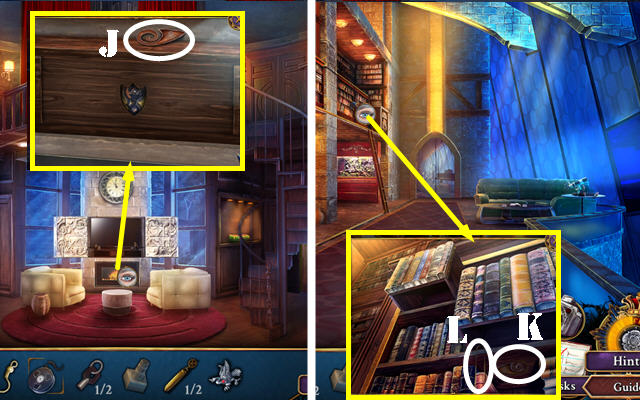
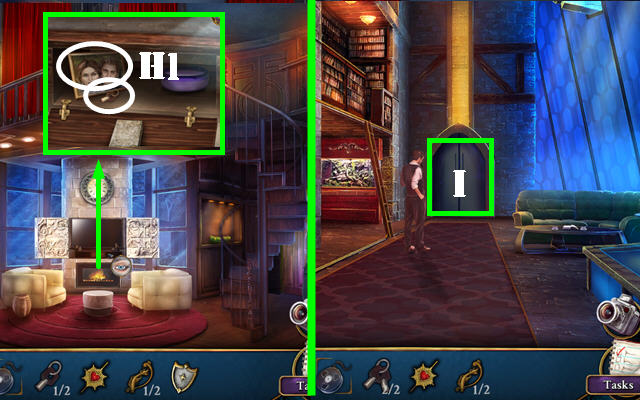
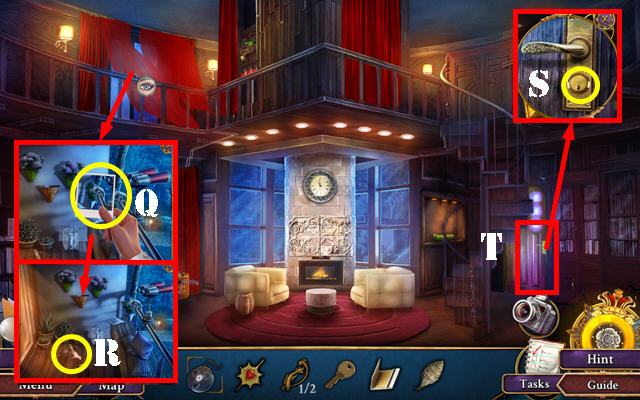
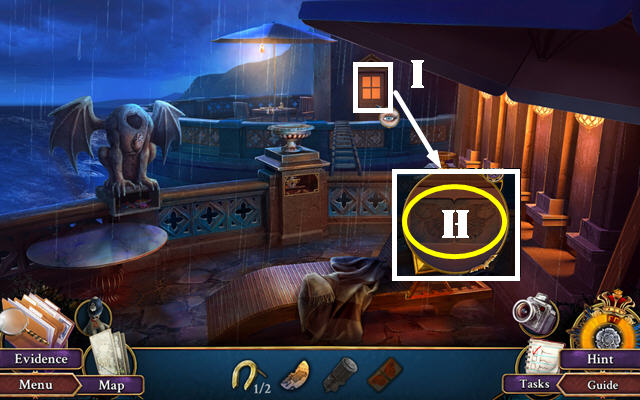
- Go to Foyer (I) and then Backyard (J).
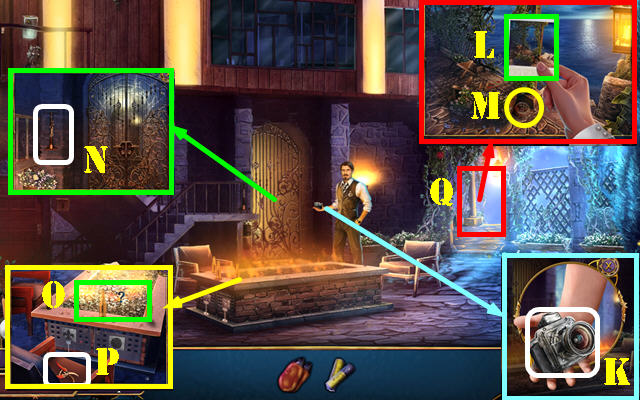
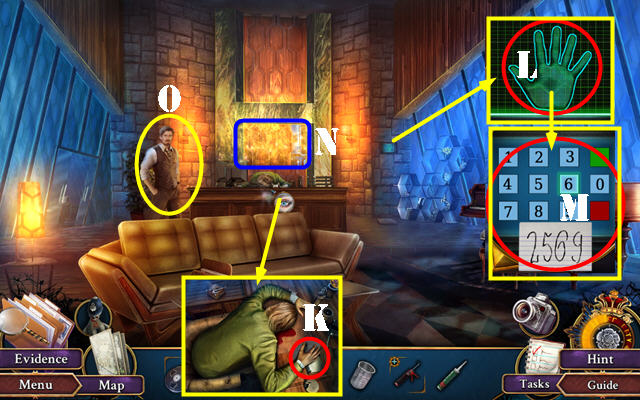
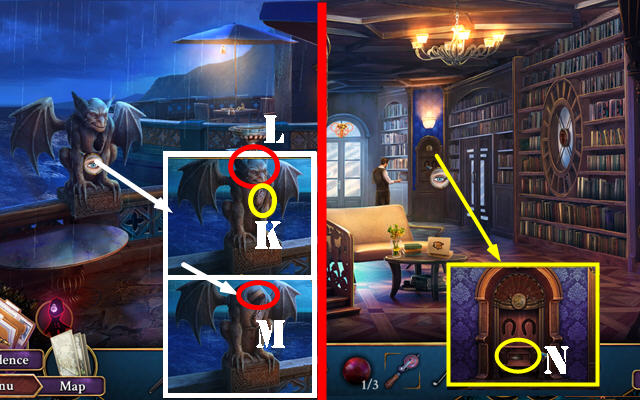
- Take Instant Camera (K).
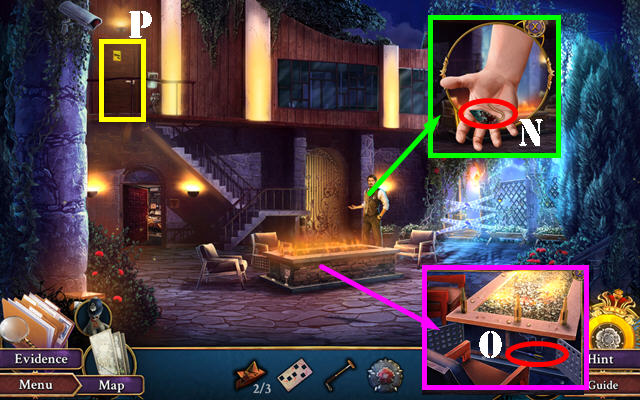
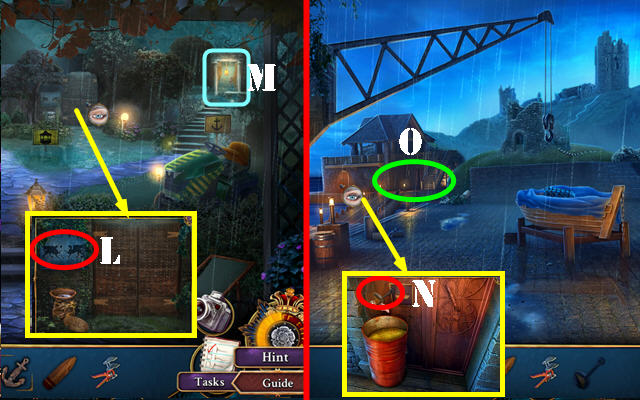
- Use Camera; take Evidence (L). Select ashtray (M).
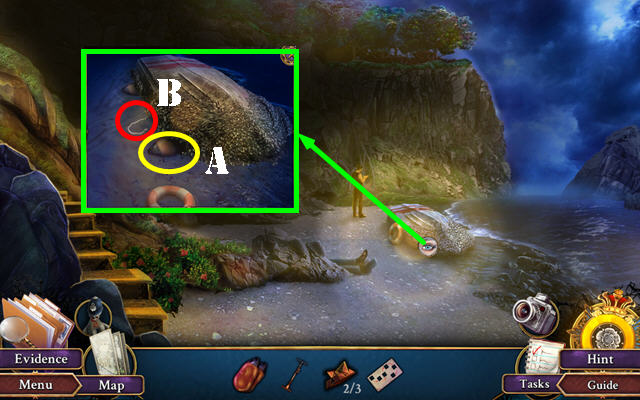
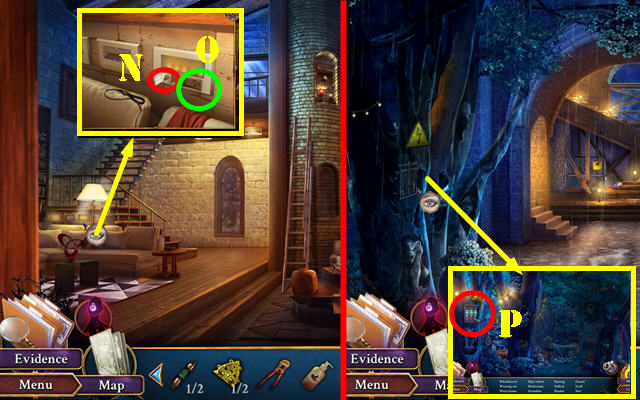
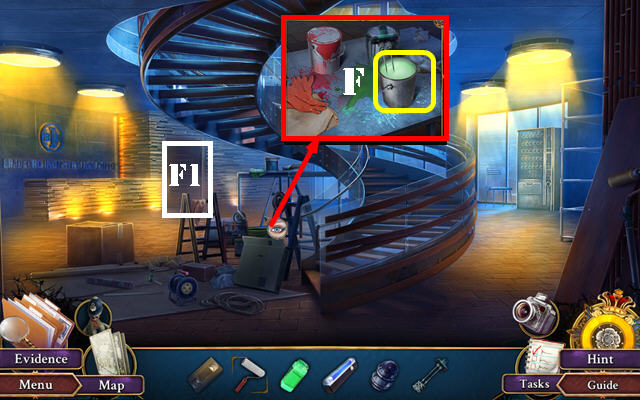
- Take AIR PUMP (N).
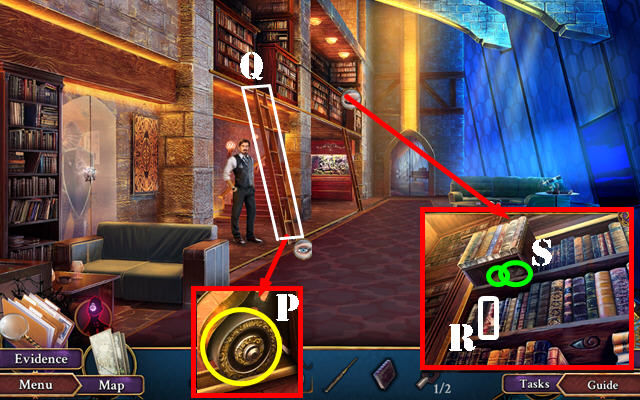
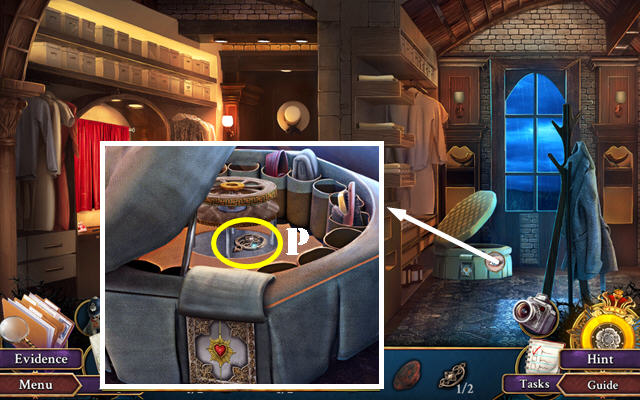
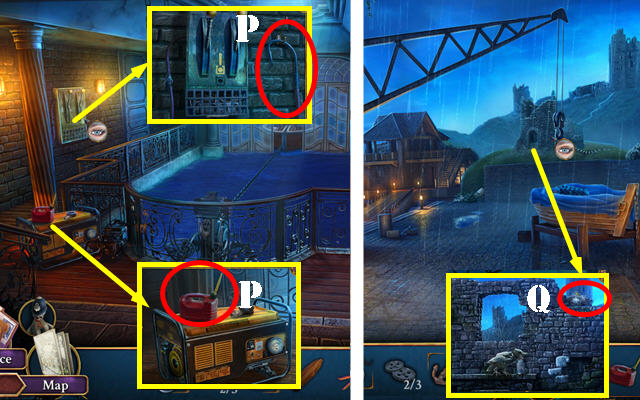
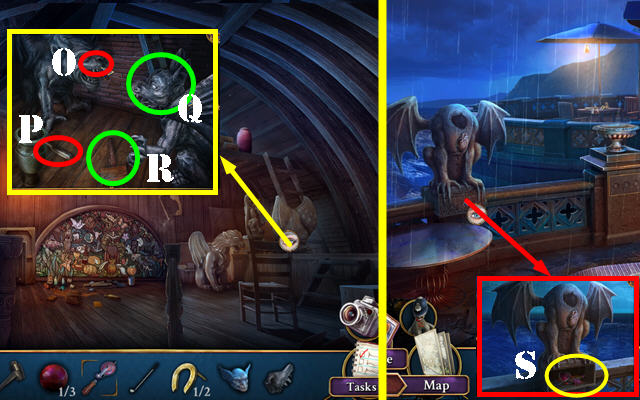
- Select (O); take PRUNING SHEARS (P).
- Go (Q).
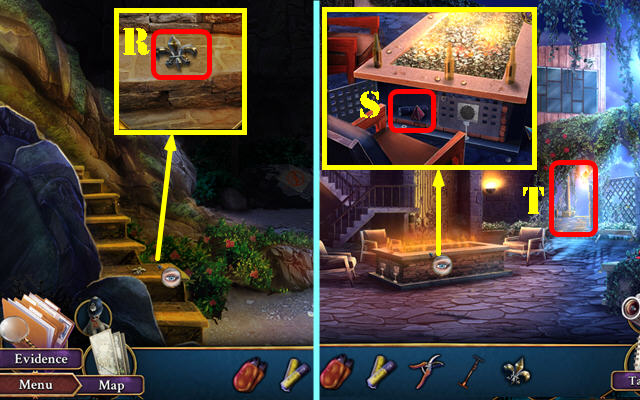
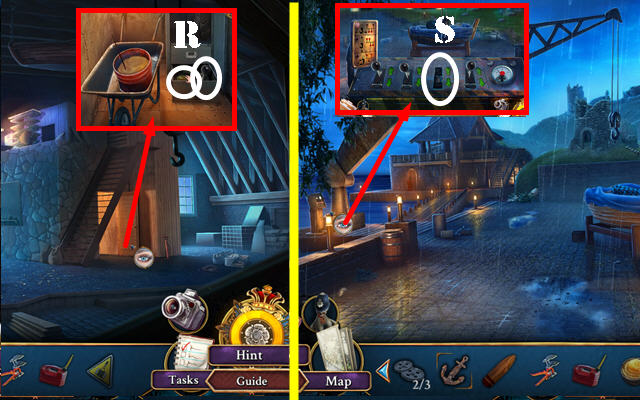
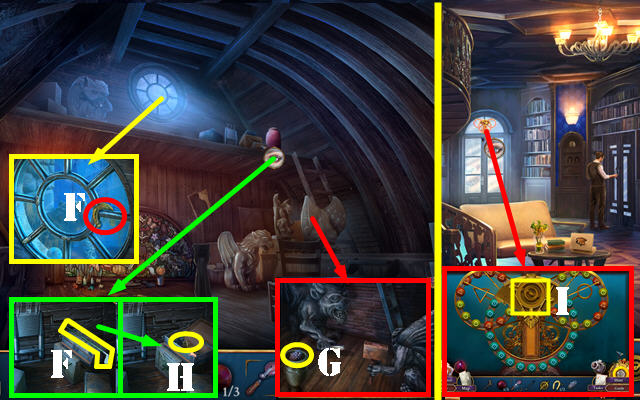
- Take LILY TOKEN (R).
- Go back.
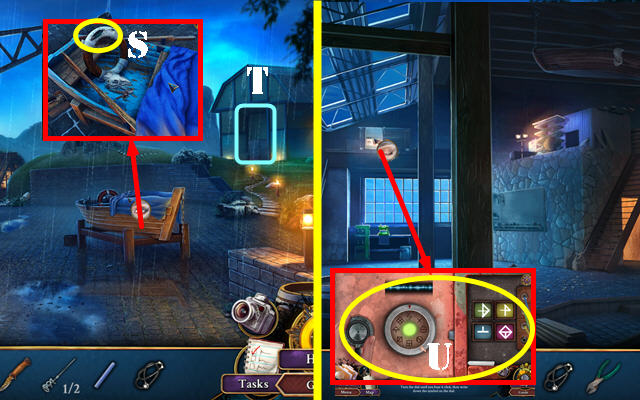
- Place LILY TOKEN; take PYRAMID PIECE 1/3 and FLASHLIGHT (S).
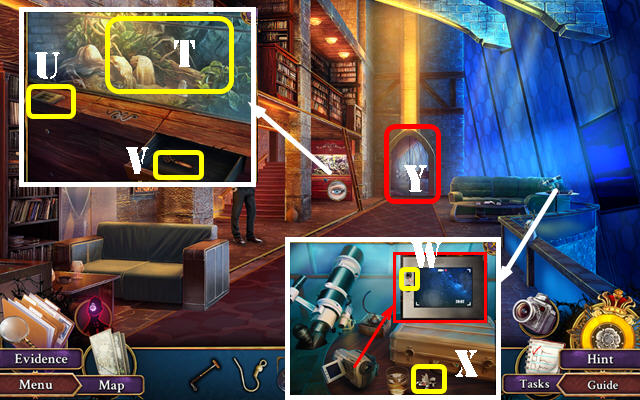
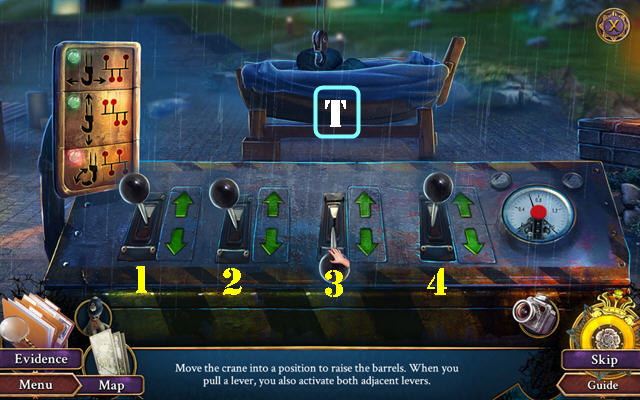
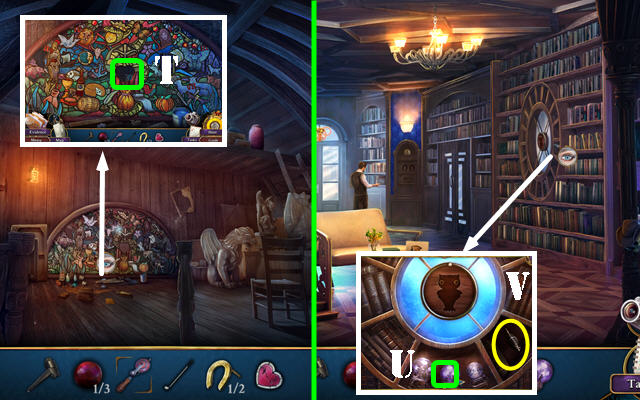
- Go (T).

- Select FLASHLIGHT; insert BATTERIES and close.
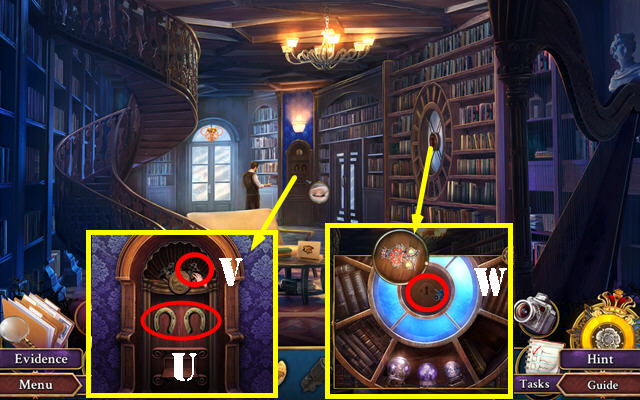
- Give FLASHLIGHT (U).
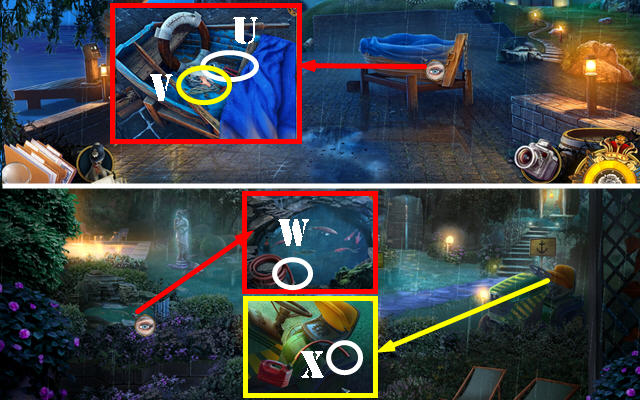
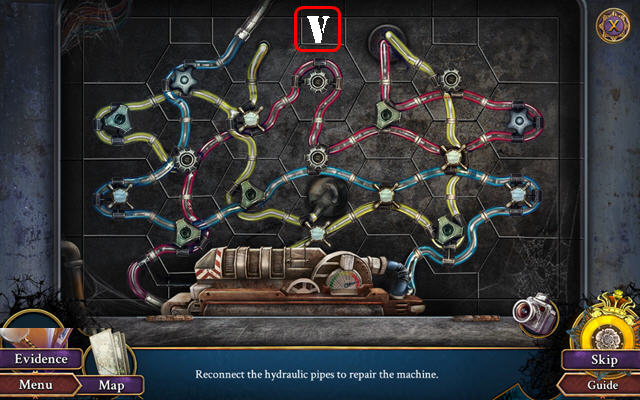
- Use PRUNING SHEARS; take PYRAMID PIECES 2/3 (V).
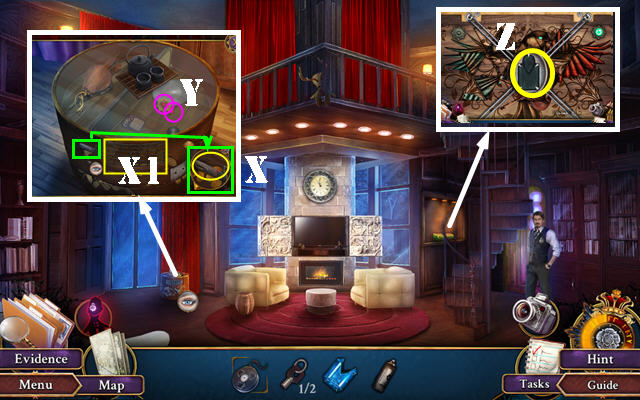
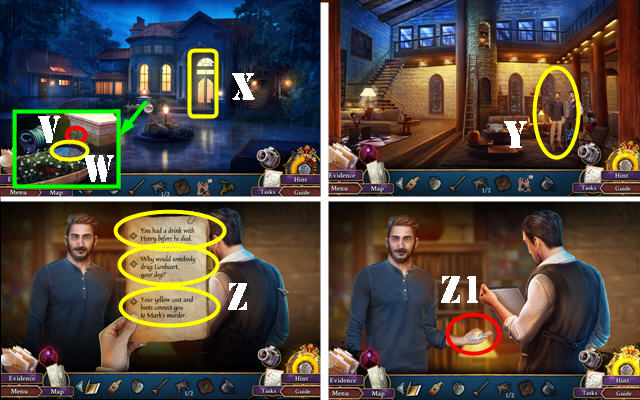
- Use Camera; take Evidence (W).
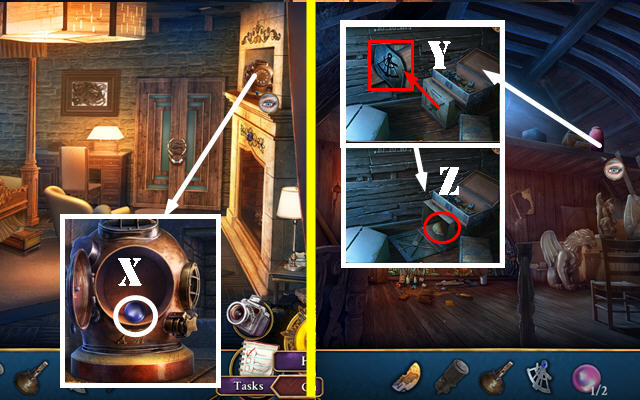
- Lift jacket; use Camera; take Evidence (X).
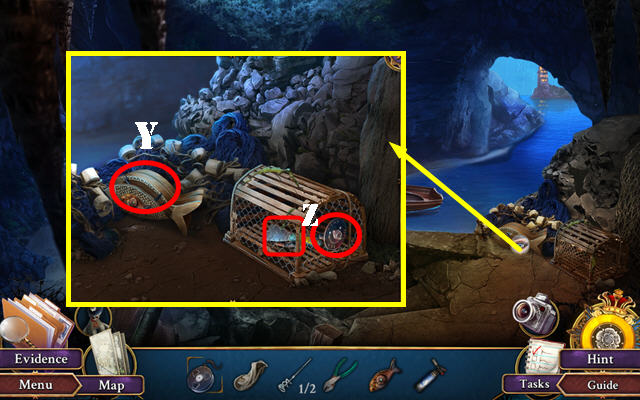
- Take Evidence (Y).
- Open vest; select case twice; take CODE PATTERN (Z).
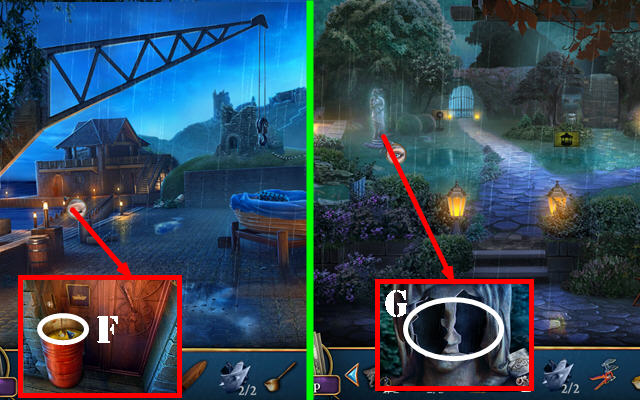
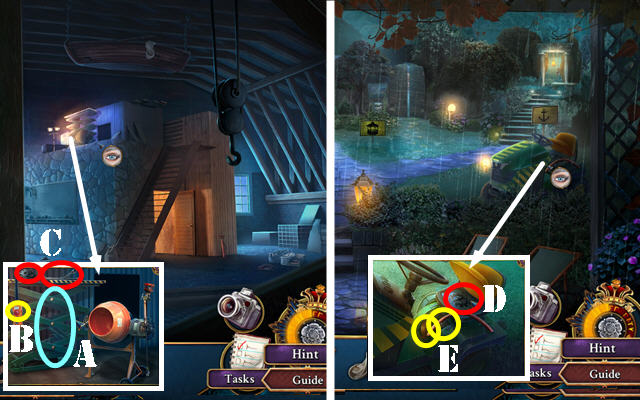
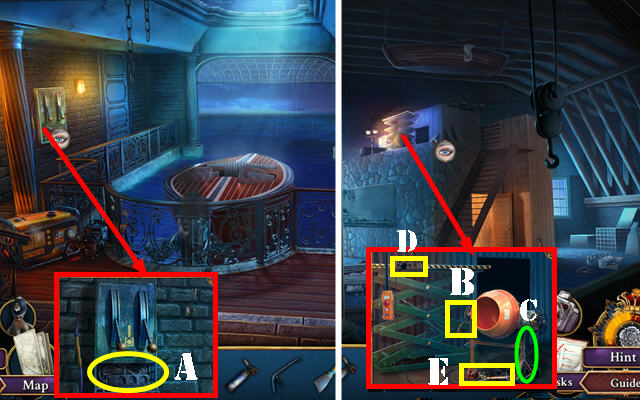
- Remove life ring; use INFLATABLE BUOY and AIR PUMP (A).
- Select twice (B); take WALLET.
- Take Evidence and CARD from WALLET.
- Go back.
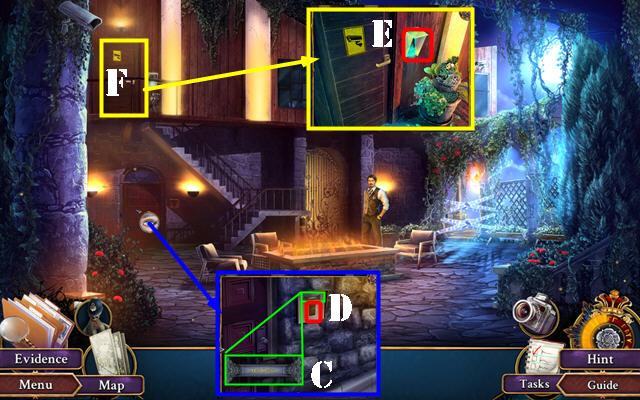
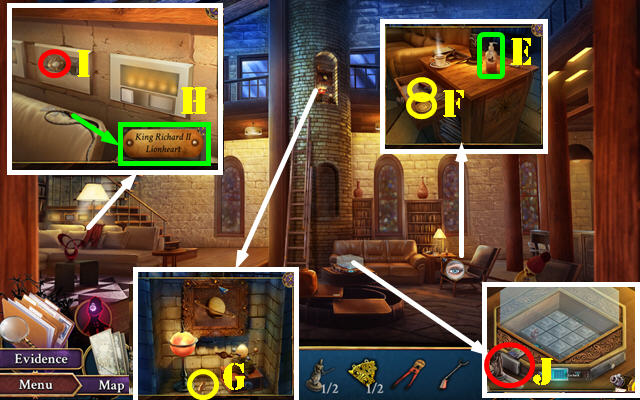
- Look at plaque (C).
- Use CARD (D). Play HOP; receive MEDAL.
- Use CARD (E).
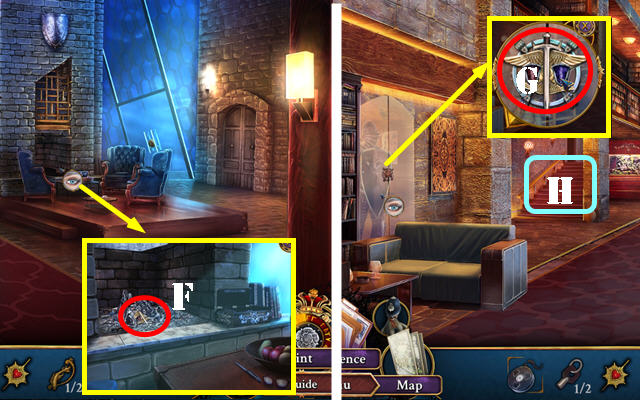
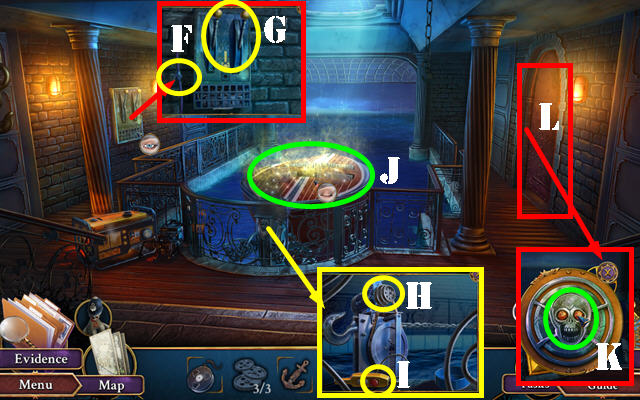
- Enter (F).
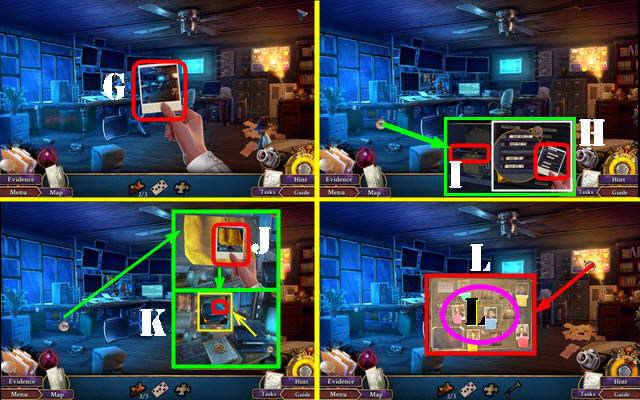
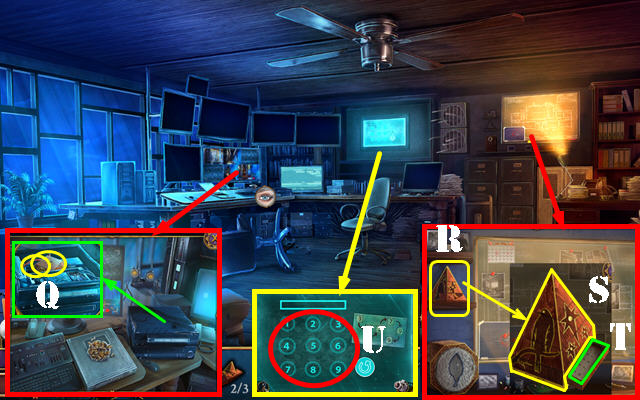
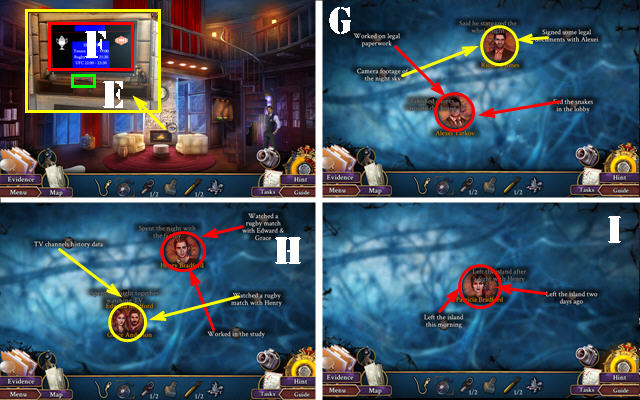
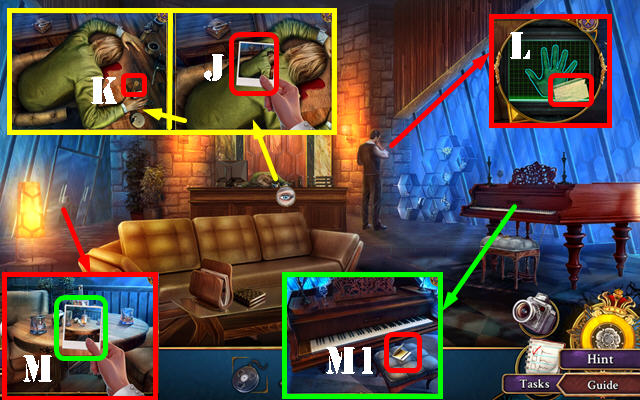
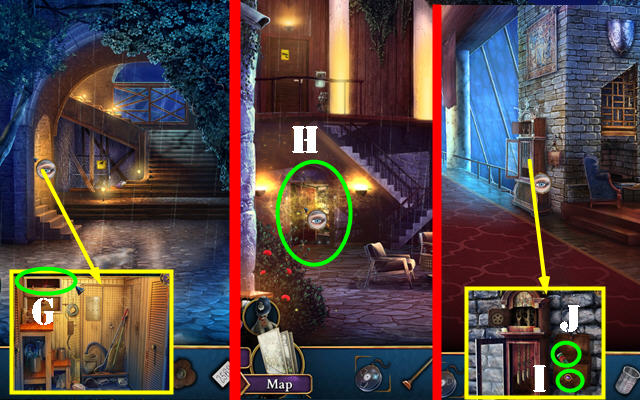
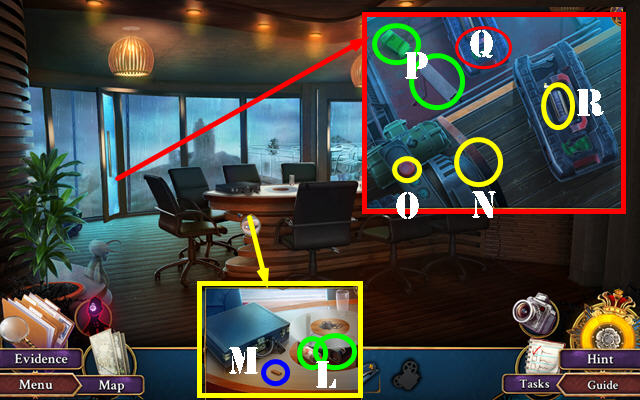
- Use Camera; take Evidence (G).
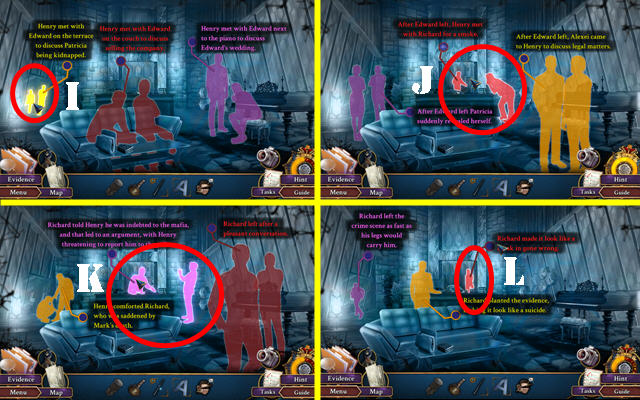
- Open door; select tapes and use Camera; take Evidence (H).
- Take POLO MALLET (I).
- Select monitor; use Camera and take Evidence (J).
- Remove pin (K).
- Select board (L); receive Evidence.
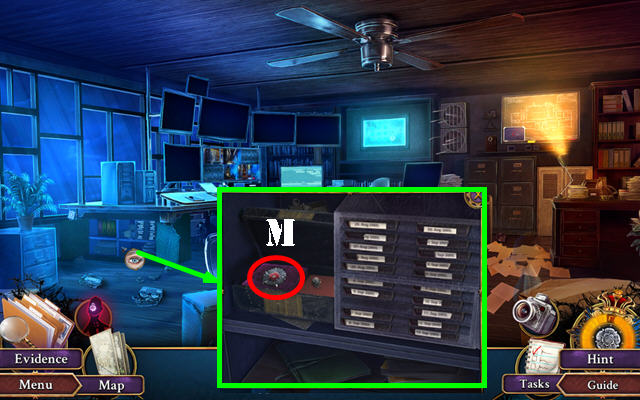
- Select MEDAL; look at note.
- Place MEDAL; take ROSE TOKEN (M).
- Go back.
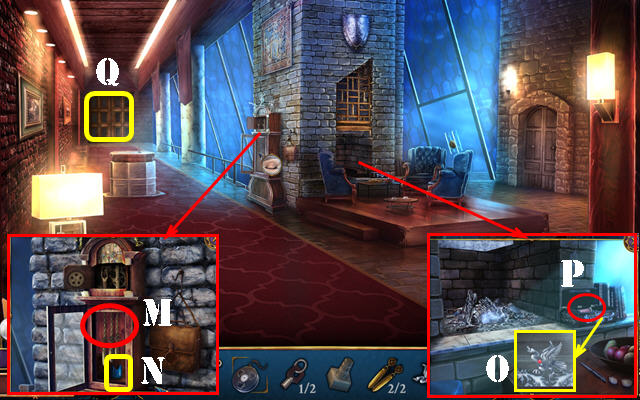
- Take Evidence and HOOK PIN (N).
- Place ROSE TOKEN; take SCREWDRIVER (O).
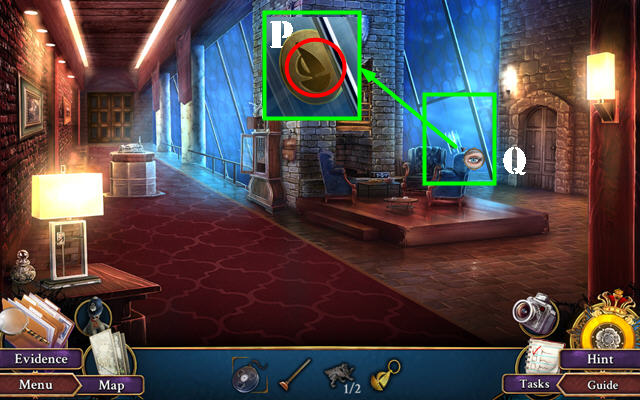
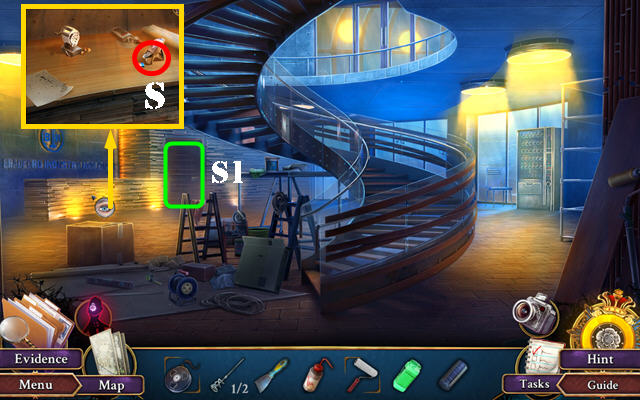
- Go (P).
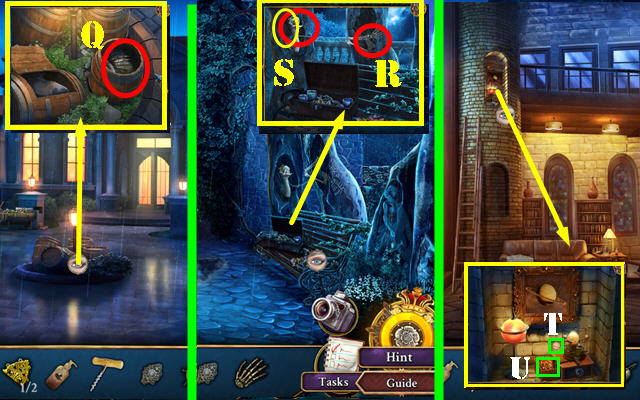
- Use SCREWDRIVER; take TAPE REEL and PYRAMID PIECES 3/3 (Q).
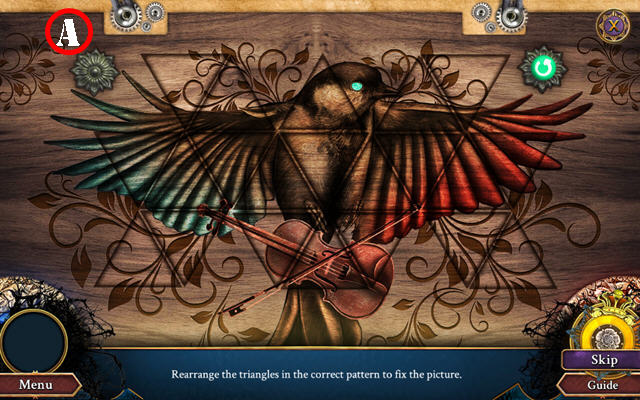
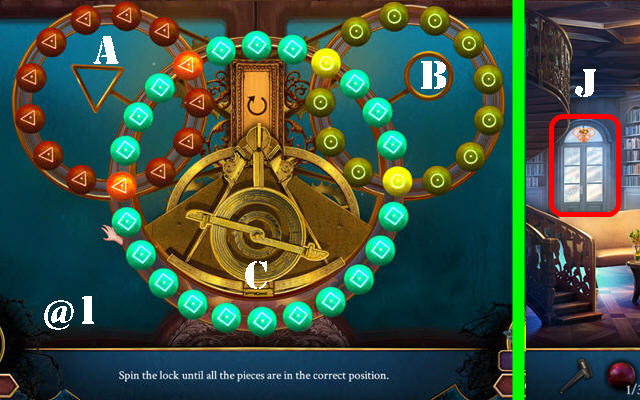
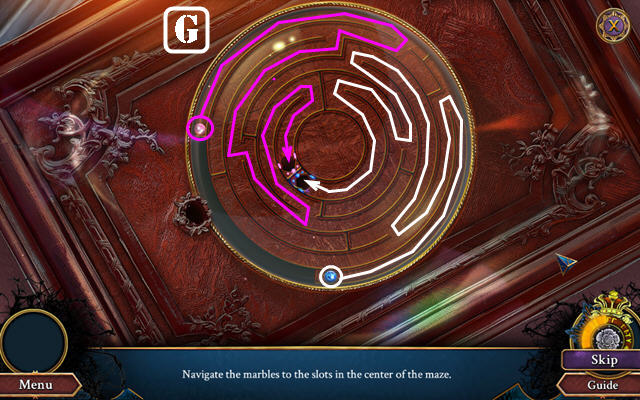
- Place PYRAMID PIECES 3/3 (R); arrange as shown (S); take CODE DECRYPTION (T).
- CODE PATTERN on CODE DECRYPTION; receive ARCHIVE LOGIN.
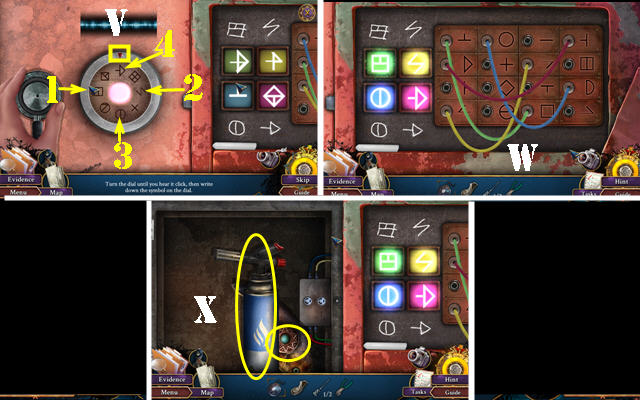
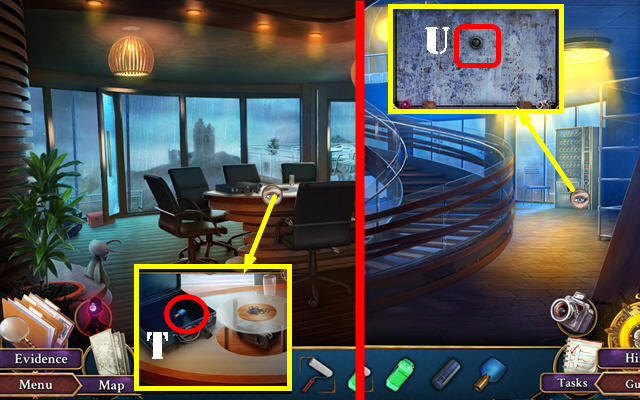
- Use ARCHIVE LOGIN; enter 392799 (U).
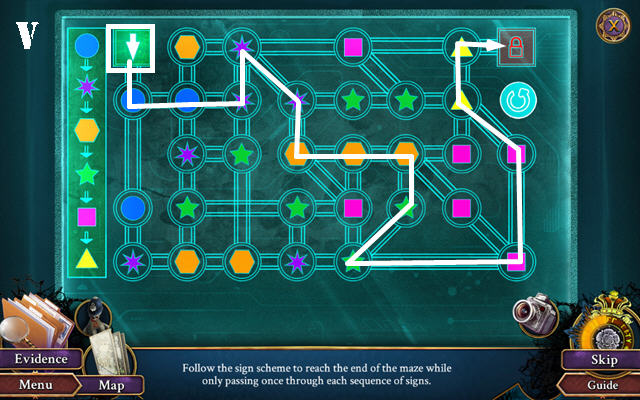
- Solution (V).
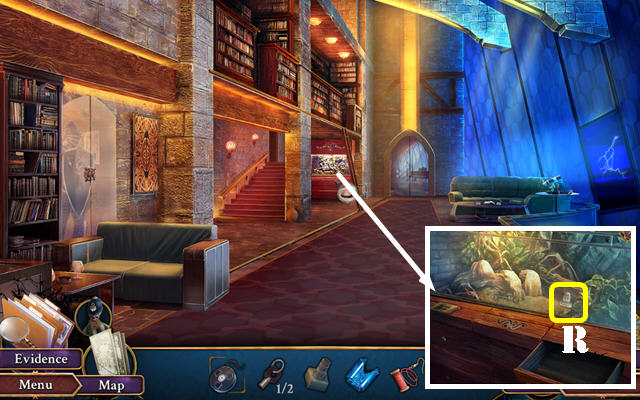
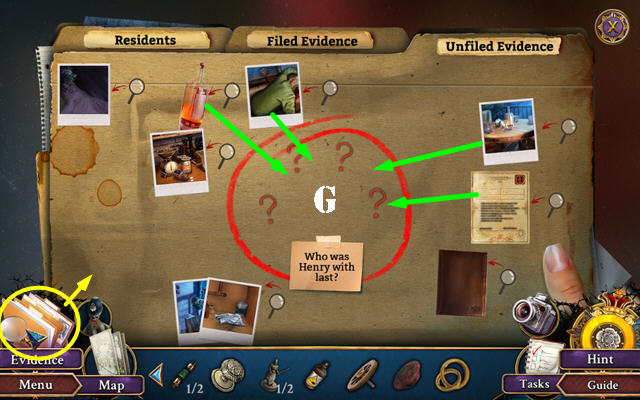
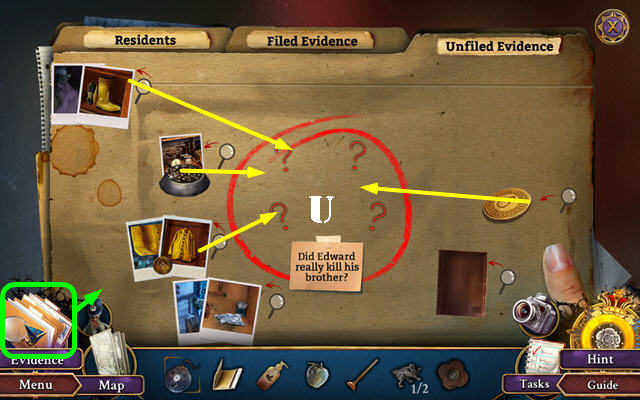
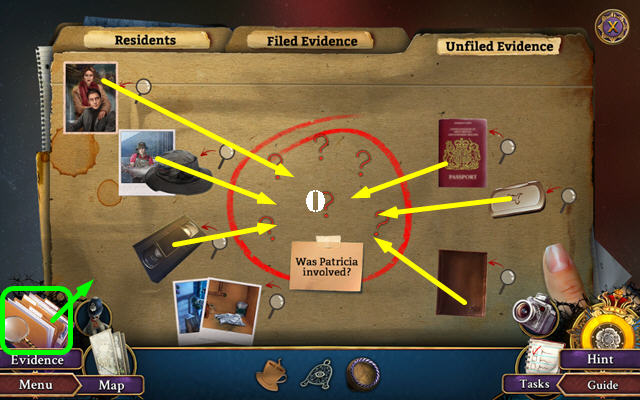
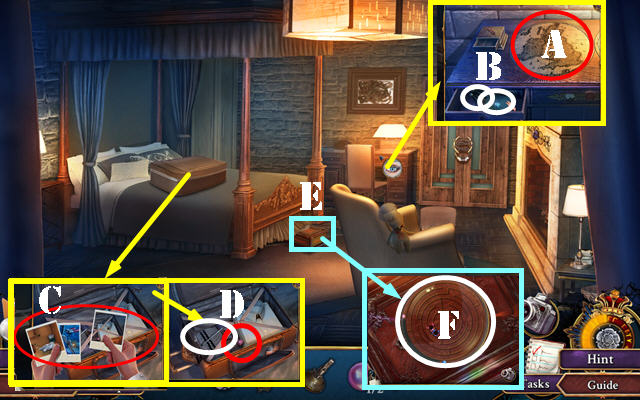
- Take CLOCK ORNAMENT and Evidence.
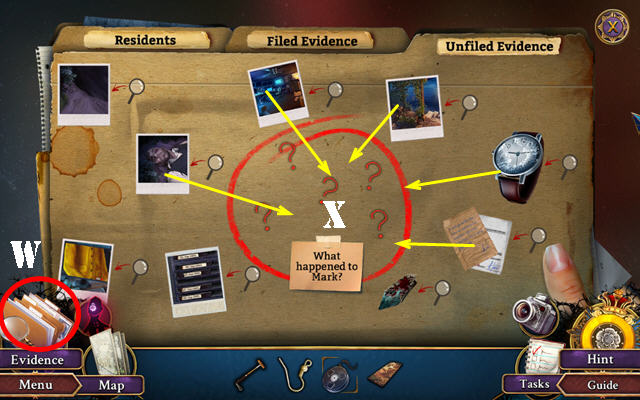
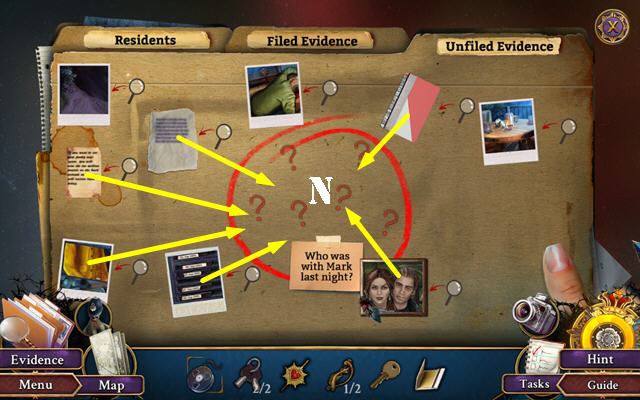
- Select folder (W). Drag Evidence into center (X).
- Take TIME OF DEATH.
- Go back.
Chapter 2: Guest Wing
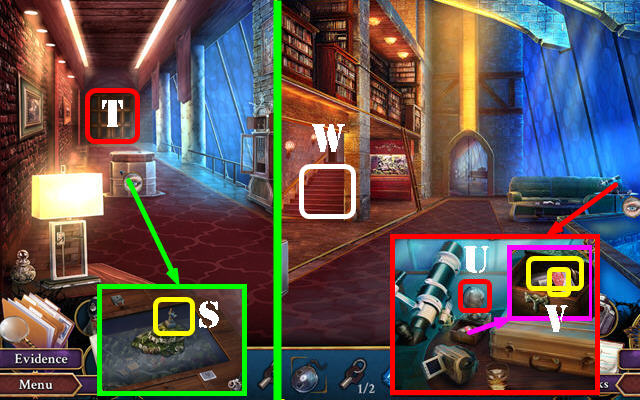
- Select (A-B-C).
- Give TIME OF DEATH (D).
- Go back.
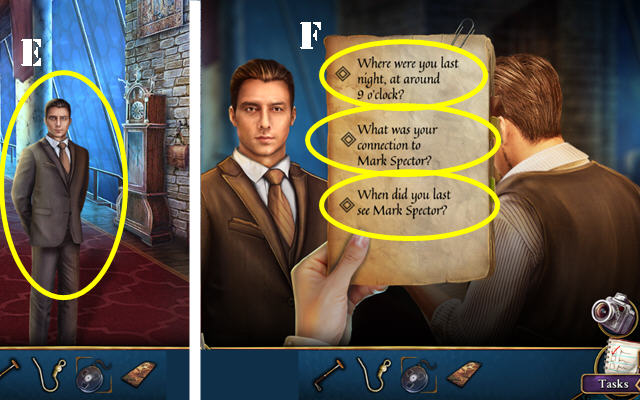
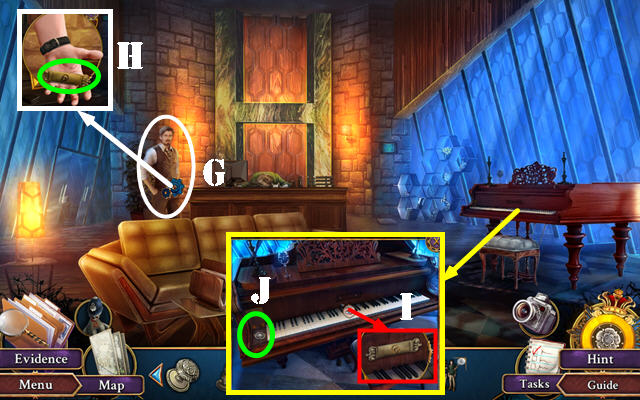
- Talk (E).
- Select all three questions (F).
- Open glass; (G).
- Take OVERRIDE KEY 1/2 (H).
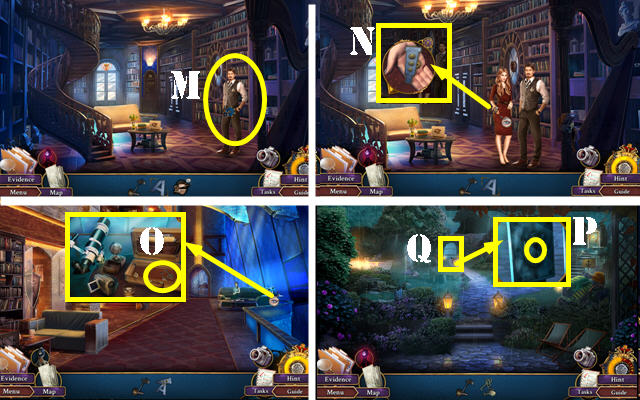
- Place CLOCK ORNAMENT (I); take LADDER WHEEL (J).
- Remove glasses; take BOOK (K).
- Take PIN VICE (L).
- Go (M).
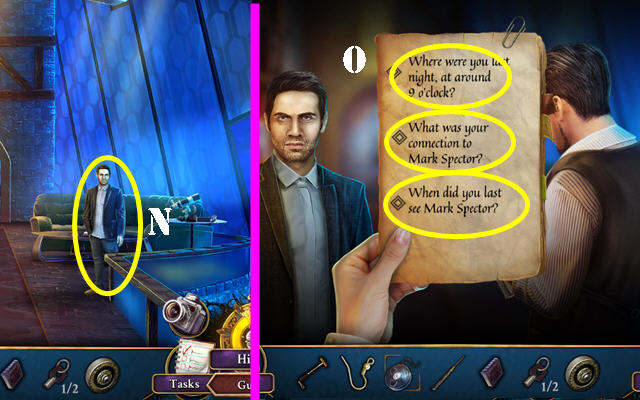
- Talk (N).
- Select all three questions (O).
- Place LADDER WHEEL (P); select ladder (Q).
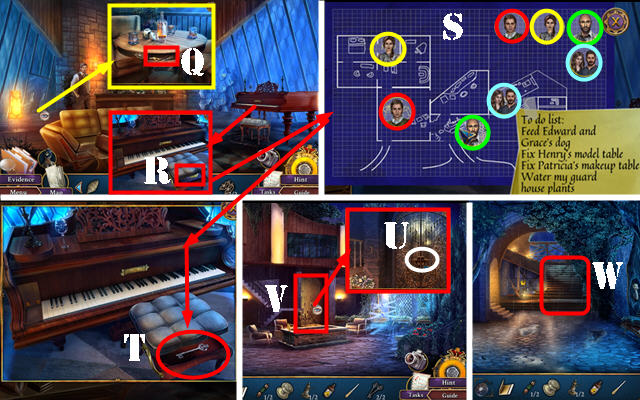
- Place BOOK (R); take Evidence and LIGHTHOUSE BASE (S).
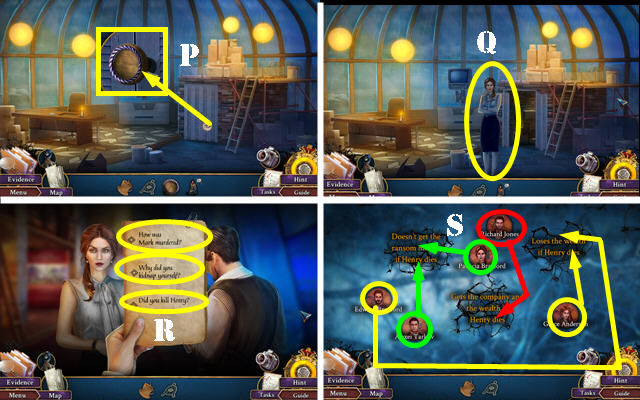
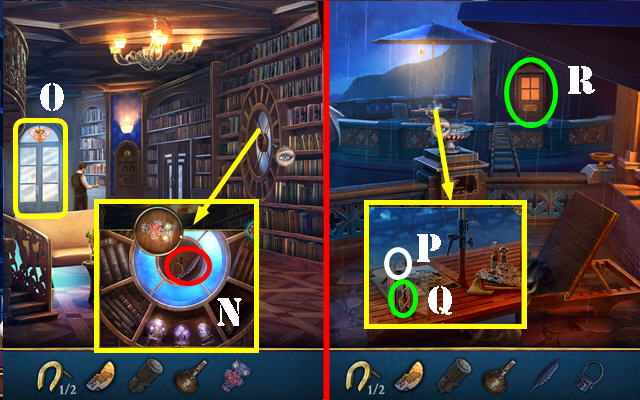
- Select aquarium (T); look at plaque (U).
- Use PIN VICE and POLO MALLET; take CLOCK WEIGHT 1/2 (V).
- Press play (W). Take DECORATIVE PIECE (X).
- Go (Y).
- Select each question (A).
- Go (B).
- Talk (C).
- Select each question (D).
- Use remote (E) on screen (F); select screen.
- Match alibis with facts (G-H-I).
- Take ARROW HEAD (J).
- Go back.
- Place ARROW HEAD (K); take CLOCK WEIGHTS 2/2 (L).
- Go back.
- Place CLOCK WEIGHTS 2/2 (M); take BLUE GEM (N).
- Place DECORATIVE PIECE (O); take THREAD (P).
- Go (Q).
- HOOK PIN on THREAD; receive HOOK LINE.
- Use HOOK LINE (R); receive LIGHTHOUSE TOP.
- Go back.
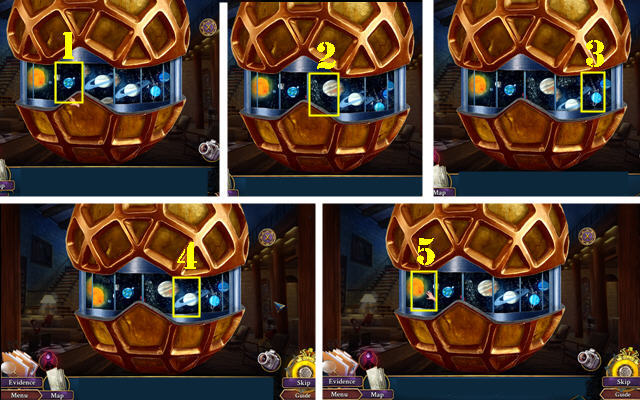
- Place LIGHTHOUSE BASE and LIGHTHOUSE TOP (S). Play HOP; receive ASTROLOGY GLOBE.
- Go (T).
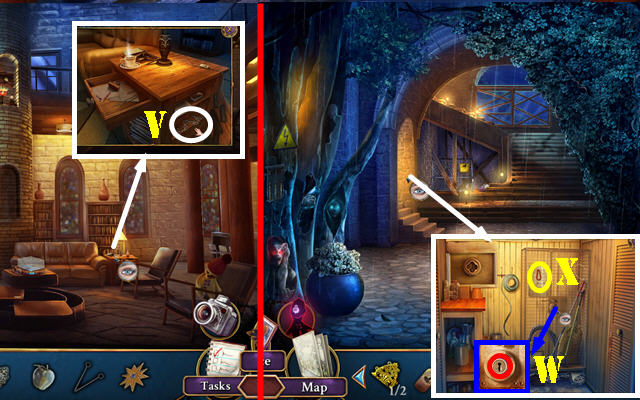
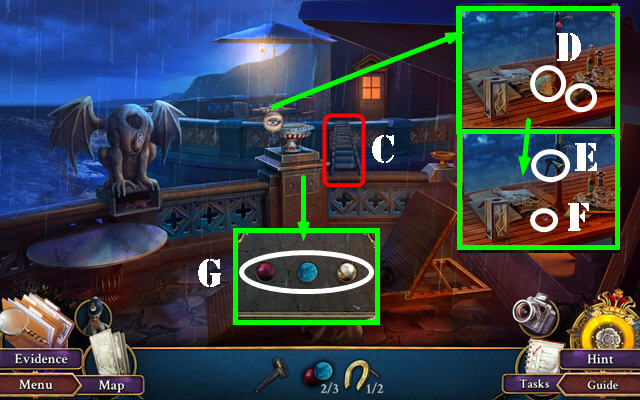
- Place ASTROLOGY GLOBE (U); take Evidence and OIL CAN (V).
- Go (W).
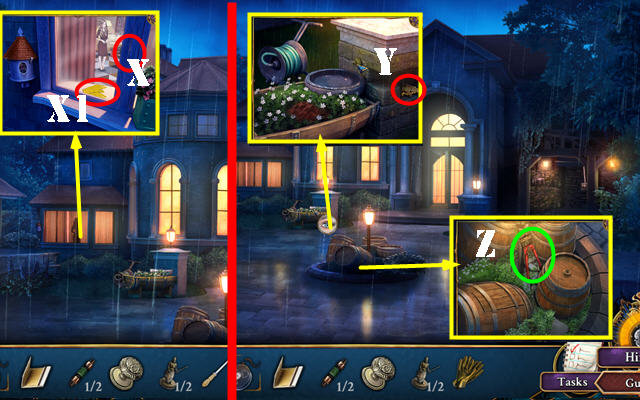
- Use OIL CAN and select (X); open door (X1); take HEART LOCKET and RED GEM (Y).
- Place BLUE GEM and RED GEM (Z).
- Solution is random. Solved image (A).
- Move note; take SNAKE ORNAMENT.
- Go back.
- Place SNAKE ORNAMENT; take MURAL PIECE (B).
- Go (C).
- Place MURAL PIECE (D); take BRASS TOKEN 1/2 and BELLOWS (E).
- Go back twice.
- Use BELLOWS; take SWORD SEAL (F).
- Go to Lobby.
- Place SWORD SEAL (G). Play HOP; receive SHIELD EMBLEM.
- Go (H).
- Place SHIELD EMBLEM; take OVERRIDE KEYS 2/2 and Evidence (H1).
- Go back; enter (I).
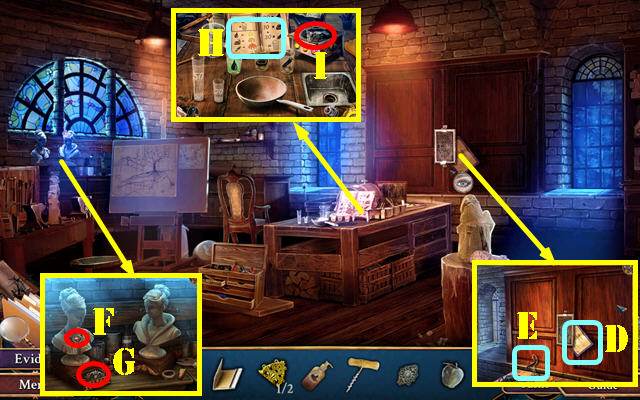
Chapter 3: Study
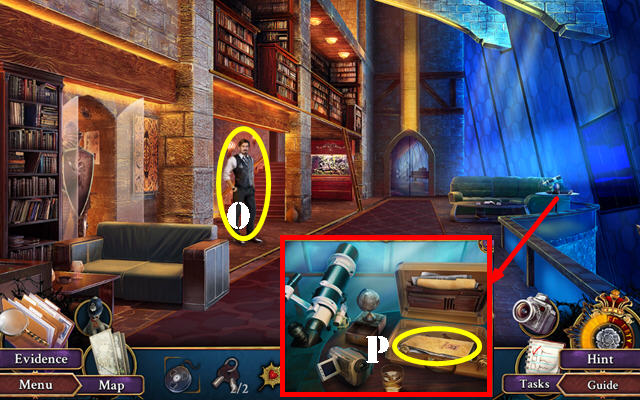
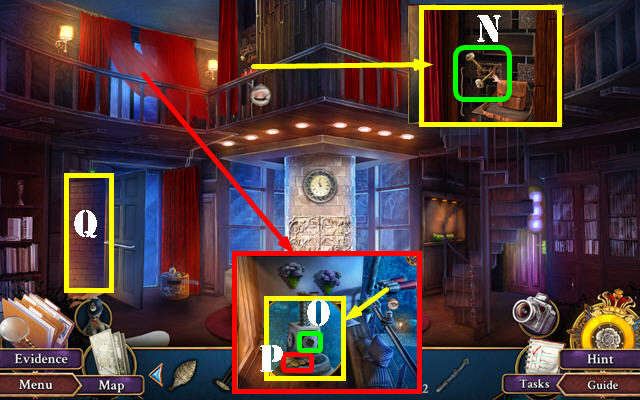
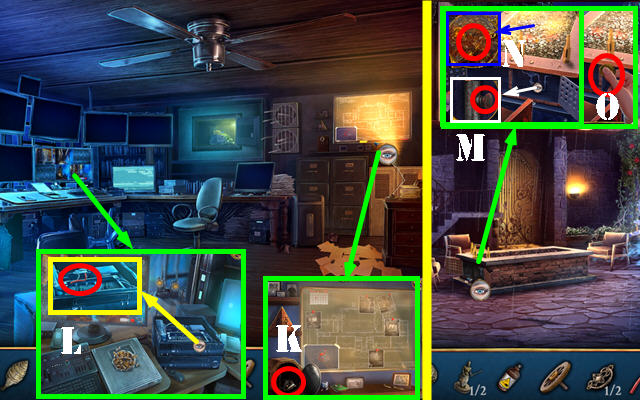
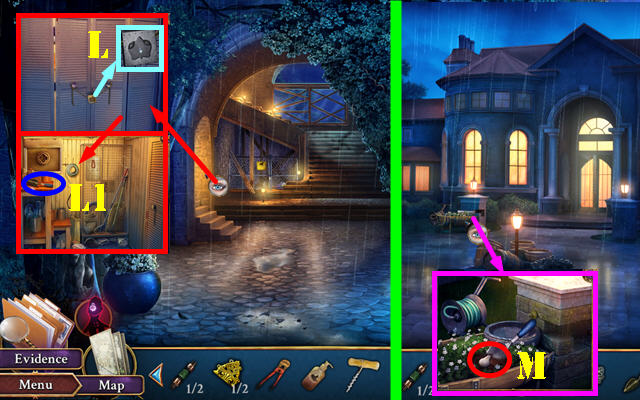
- Select victim; use Camera and take Evidence (J). Move hand; take BEDROOM KEY (K).
- Take Evidence (L).
- Use Camera; take Evidence (M).
- Take MATCHBOX (M1).
- Place all Evidence (N). Take WITNESS.
- Go back.
- Give WITNESS (O).
- Use OVERRIDE KEYS 2/2; take Evidence and TOBACCO LEAF (P).
- Go to Guest wing.
- Use Camera; take Evidence (Q).
- Take SCALE PAN (R).
- Use BEDROOM KEY (S).
- Enter (T).
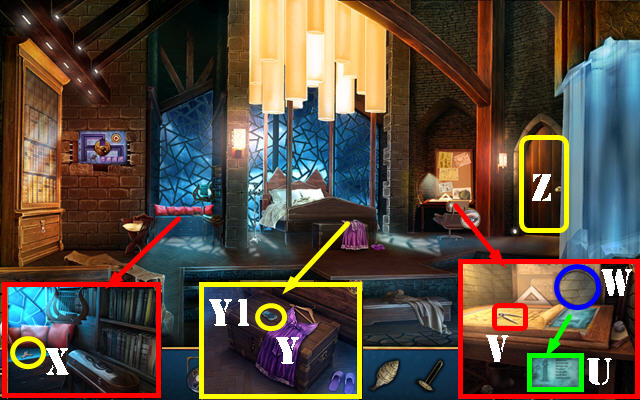
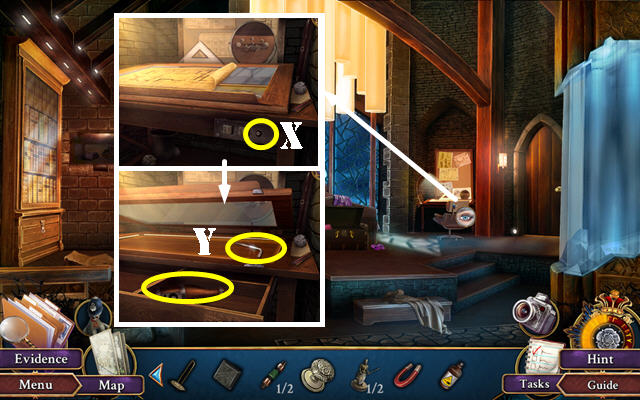
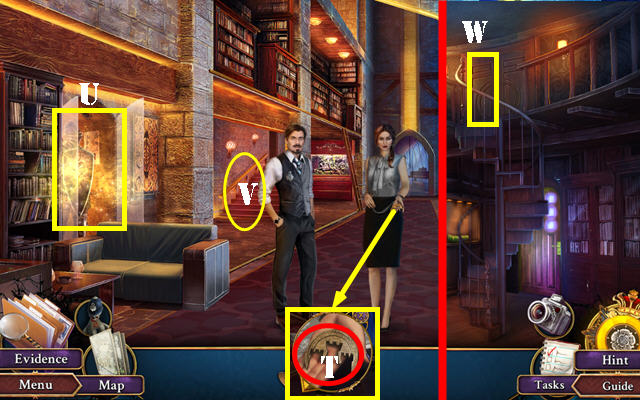
- Look at note (U); take DIVIDER (V) and select mirror (W).
- Take BIRD INSIGNIA (X).
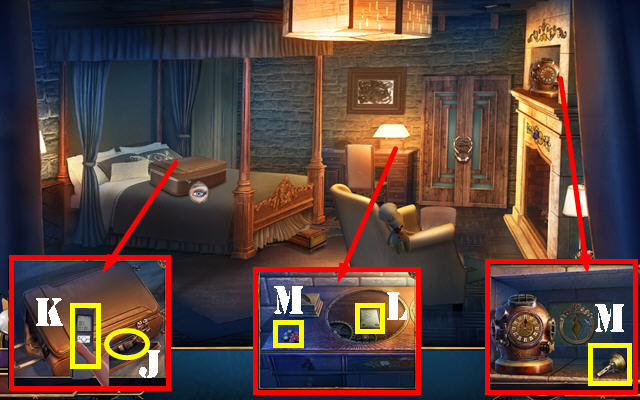
- Move dress (Y); take SUITCASE REMOTE (Y1).
- Go (Z).
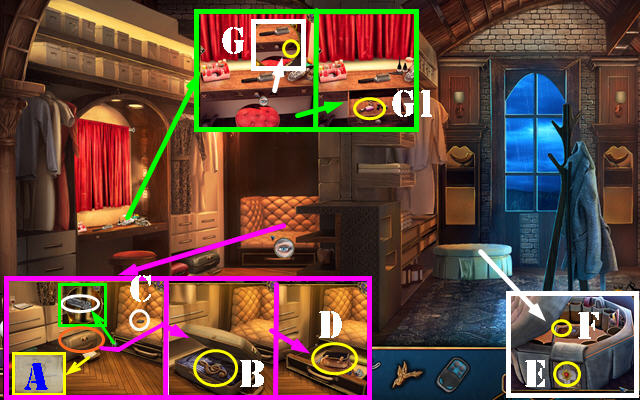
- Look at note (A).
- Use SUITCASE REMOTE (orange). Look at books; take CLEF BUCKLE (B).
- Take SWITCH BUTTON (C).
- Use DIVIDER; take LEATHER BAG (D).
- Lift cloth; place HEART LOCKET (E). Take Evidence (F).
- Place BIRD INSIGNIA (G); take NAIL CLIPPER (G1).
- Go back.
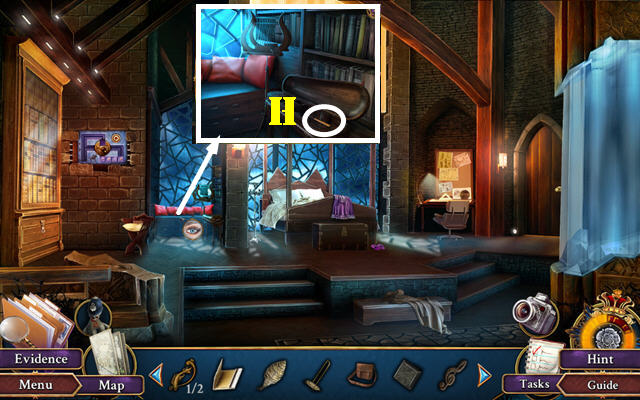
- Place CLEF BUCKLE and look at note; take TUNING WRENCH (H).
- Go back.

- Use LEATHER BAG (I); take NIGHT BADGE (I1).
- Go (J).
- Place KNIGHT BADGE (K).
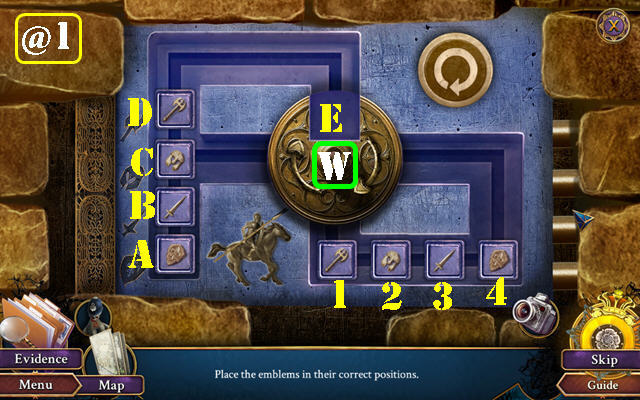
- Solution (@1): (W)-(4-E)-(Wx2)-(E-D)-(W)-(D-E)-(Wx3)-(E-D)-(W)-(D-E)-(Wx3)-(E-A).
- (Wx2)-(3-E)-(Wx2)-(E-D)-(W)-(D-E)-(Wx3)-(E-D)-(W)-(D-E)-(Wx3)-(E-B).
- (Wx3)-(1-E)-(W)-(E-D)-(W)-(D-E)-(Wx3)-(E-D).
- (Wx3)-(2-E)-(Wx3)-(E-1)-(W)-(1-E)-(W)-(E-C).
- Take ORNAMENTED LEVER.
- Go to Dressing room.

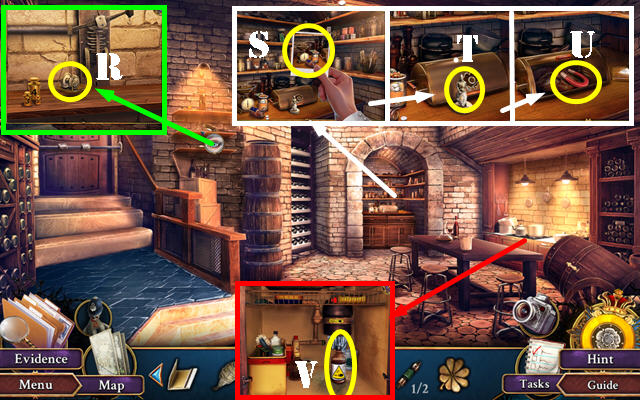
- Use TUNING WRENCH and look at note; take FUSE 1/2 and BRASS TOKENS 2/2 (L).
- Go back.
- Place BRASS TOKENS 2/2; take HANDLE TOOL (M).
- Go back.
- Place ORNAMENTED LEVER; select (N).
- Use HANDLE TOOL (O); take IRON CLOVER (P).
- Go (Q).
- Take SILVER KNOB (R).
- Use Camera; take Evidence (S).
- Take KNIGHT FIGURINE 1/2 (T).
- Place IRON CLOVER and select; take MAGNETS (U).
- Use NAIL CLIPPER; take HYDROFLUORIC ACID (V).
- Return to Bedroom.
- Place SWITCH BUTTON and use MAGNETS (X); take FAKE BOTTLE and HEX KEY (Y).
- Return to Kitchen cellar.
- Place SCALE PAN (A) and select weights (B). Place FAKE BOTTLE (A).
- Play HOP (C); receive GIFT CASE.
- Take DECORATED WHEEL from GIFT CASE. Look at note and take Evidence.
- Use HEX KEY (D); receive VALVE.
- Use Camera; take Evidence (E).
- Select shirt; take WEDDING BANDS (F).
- Drag Evidence into center (G).
- Take BROTHERS MEETING.
- Go to Study.
- Give BROTHERS MEETING (G); take PLAQUE (H).
- Place PLAQUE and WEDDING BANDS; select (I).
- Take DRAWER TOKEN 1/2 (J).
- Return to Guard room.
- Place TOBACCO LEAF; take CIGAR CUTTER (K).
- Use CIGAR CUTTER; take WIRES (L).
- Go back.
- Place VALVE and select (M).
- Use WIRES (N); receive WROUGHT KEY 1/2.
- Take Evidence (O).
- Return to Dressing room.
- Place DECORATED WHEEL; take DRAWER TOKEN 2/2 (P).
- Return to Study.
- Place DRAWER TOKEN 2/2; take LETTER OPENER and STOOL LEVER (Q).
- Use STOOL LEVER (R). Place tokens as shown (S).
- Take WROUGHT KEYS 2/2 (T).
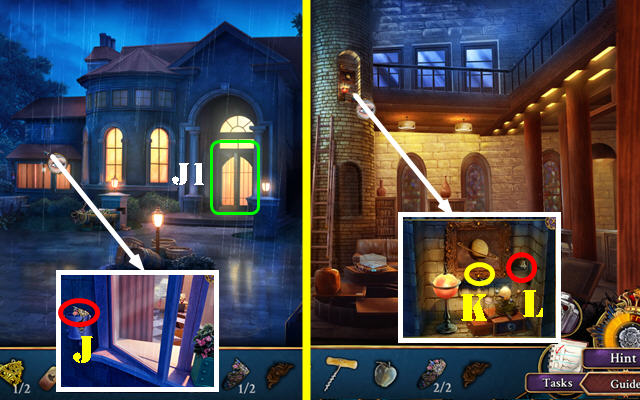
- Go to Backyard.
- Use WROUGHT KEYS 2/2 (U).
- Go to Stairs (V) and then Patio (W).
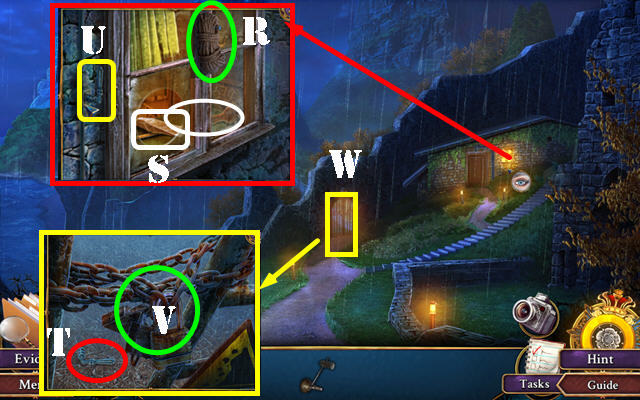
- Use LETTER OPENER (X); take RUBBER GLOVE (X1).
- Select brick; take DECORATIVE ORNAMENTS 1/2 (Y).
- Take BOLT CUTTERS (Z).
- Go back.
- Use HYDROFLUORIC ACID and RUBBER GLOVE; take SKEW CHISEL (A).
- Go (B).
- Use SKEW CHISEL; take REACHER GRABBER (C).
- Enter (D).
Chapter 4: Apartment
- Take HAND SANITIZER (E).
- Place SILVER KNOB; take Evidence and KNIGHT FIGURINES 2/2 (F).
- Take CORK SCREW (G).
- Look at plaque (H). Use REACHER GRABBER; receive BROOCH (I).
- Place KNIGHT FIGURINES 2/2 (J).
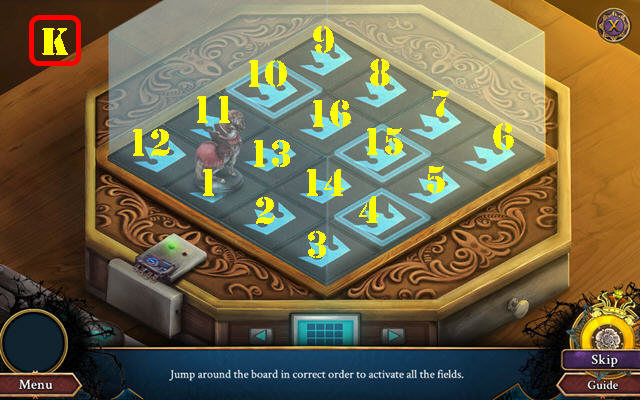
- Solution (K): 10-7-13-9-15-11-8-14-6-16-2-5-13-3-15-1-4-16-12.
- Take ORCHID BADGE.
- Go back twice.
- Place ORCHID BADGE (L); take TROWEL (L1).
- Go to Patio.
- Use TROWEL; take LIGHTBULB PIN (M).
- Go to Apartment.
- Select door; place LIGHTBULB PIN (N); take FUSES 2/2 (O).
- Go back twice.
- Place FUSES 2/2 (P). Play HOP; receive SHIP'S WHEEL.
- Go to Patio.
- Place SHIP'S WHEEL and select; take SKELETAL HAND (Q).
- Go back.
- Place SKELETAL HAND (R); take SILICONE APPLE and MINIATURE SATURN (S).
- Go to Apartment.
- Place MINIATURE SATURN (T); take SUN PUZZLE (U).
- Select SUN PUZZLE. Solution (1-5).
- Take STAR TOKEN and METAL PINS.
- Place STAR TOKEN; take MECHANISM CHAIN (V).
- Go back twice.
- Use METAL PINS (W); take WEBBING LINK (X).
- Go to Patio.
- Place MECHANISM CHAIN and WEBBING LINK (Y); pull lever (Z). Play HOP; receive DOG TOY.
- Go back.
- Use BOLT CUTTERS and DOG TOY; take Evidence and WORKSHOP KEY (A).
- Go to Patio (B).
- Use WORKSHOP KEY (C).
- Enter (C1).
- Look at diploma (D); take BIRD CARVING (E).
- Place BROOCH (F); take FRAME PART (G).
- Select book 3x (H). Take TIARA PARTS 1/2 (I).
- Go back.
- Place BIRD CARVING; take TIARA PARTS 2/2 (J).
- Go (J1).
- Place FRAME PART (K); take DECORATIVE ORNAMENTS 2/2 (L).
- Go to Workshop.
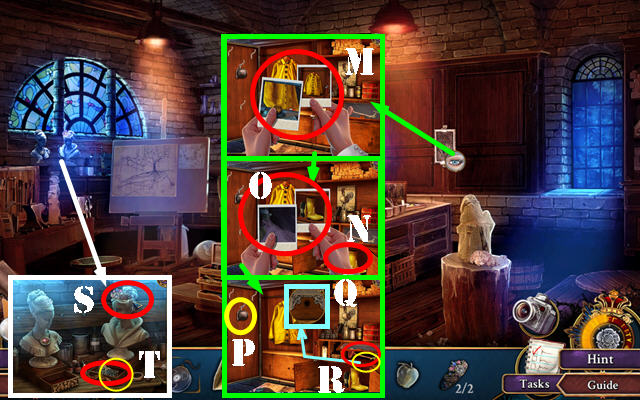
- Place DECORATIVE ORNAMENTS 2/2; use Camera and take Evidence (M).
- Open doors (N); use Camera and take Evidence (O).
- Take POT (P).
- Use CORKSCREW (Q); take PLUNGER and FAUCET (R).
- Place TIARA PARTS 2/2 (S); take GRYPHON SYMBOL 1/2 and WOODCARVING TOKEN (T).
- Place Evidence into center (U).
- Take FRAMED.
- Go back.
- Place FAUCET (V) and use POT (W); receive WATER.
- Go (X).
- Give FRAMED (Y).
- Select all three questions (Z).
- Take SAFE PASSWORD (Z1).
- Go to Workshop.

- Use HAND SANITIZER (Z2) and MATCHBOX (Z3).
- Place WATER and SILICONE APPLE; take LIQUID SILICONE (Z4).
- Place LIQUID SILICONE (Z5).
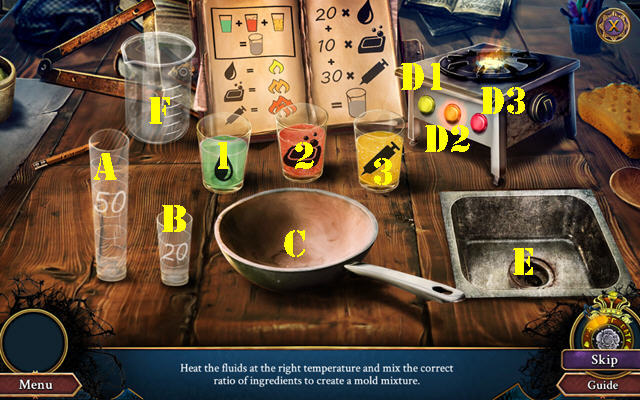
- Solution: (1-A): (A-B)-(B-C)- (select D1)-(C-D1)-(A-E).
- (2-A)-(A-B)-(B-E)-(A-B)-(A-C)-(select D2)-(C-D2)-(B-E).
- (3-A)-(A-B)-(A-C)-(select D3)-(C-D3).
- Take CASTING MOULD (F).
- Go back twice.
- Place WOODCARVING TOKEN; take SILICONE GUN (G).
- Go back.
- Play HOP (H); receive AMETHYST PENDANT.
- Go back.
- Place AMETHYST PENDANT (I); take QUICK-SET SILICONE (J).
- Go to Study.
- Use CASTING MOULD; take HANDPRINT MOULD (K).
- QUICK-SET SILICONE in SILICONE GUN. SILICONE GUN on HANDPRINT MOULD; receive HAND MOULD.
- Place HAND MOULD (L) and SAFE PASSWORD (M).
- Play HOP (N); receive BOAT KEYCHAIN.
- Select BOAT KEYCHAIN. Give BOAT KEYCHAIN (O); receive BOAT KEYCHAIN.
- Go back twice.
- Place BOAT KEYCHAIN (P).
- Go (Q).
Chapter 5: Garden
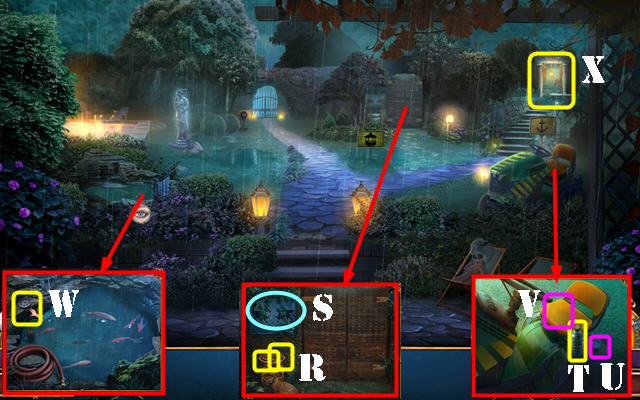
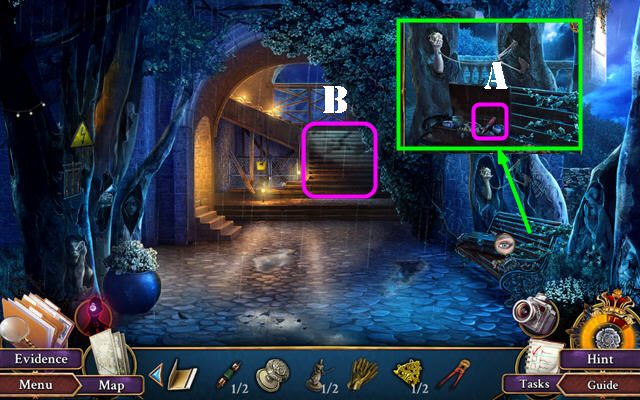
- Use PLUNGER; take RUSTY ANCHOR EMBLEM and IRON SPIKE (R).
- Select vines (S).
- Take WATER BOTTLE (T). Select cap (U) and seat (V).
- Take GEAR 1/3 (W).
- Go (X).
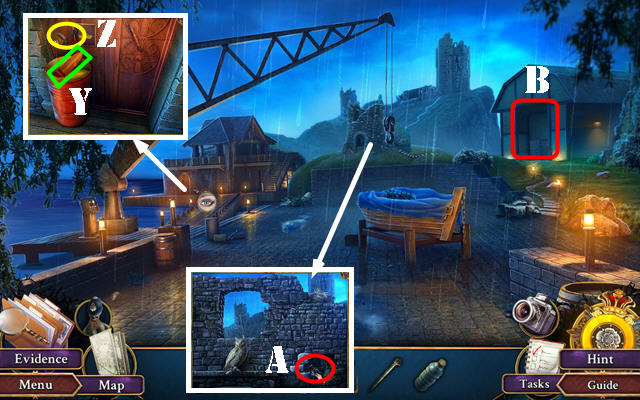
- Take BROKEN OAR (Y); select lever (Z).
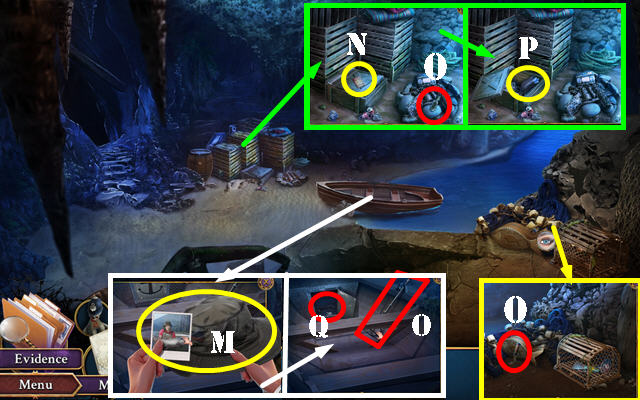
- Use IRON SPIKE; take STATUE CHUNK 1/2 (A).
- Go (B).
- Take Evidence and LADLE (C).
- Take SPREADING TOOL and GEARS 2/3 (D).
- Use WATER BOTTLE; take STATUE CHUNKS 2/2 (E).
- Go back.
- Use LADLE (F); receive FISH FOOD.
- Go back.
- Place STATUE PIECES 2/2 (G).

- Solution: (1-12).
- Take DECORATED JAR.
- Use FISH FOOD and DECORATED JAR (H); receive FISH IN JAR.
- Go to Docks.
- Place FISH IN JAR (@); take TOMMY BAR (I).
- Go to Warehouse.
- Place TOMMY BAR (J); take GRYPHON SYMBOLS 2/2 (K).
- Go back twice.
- Place GRYPHON SYMBOLS 2/2 (L). Play HOP; receive LEVER MECHANISM.
- Go (M).
- Place LEVER MECHANISM and select (N).
- Enter (O).
- Take JERRY CAN and HOOKPOLE (P).
- Go back.
- Use HOOKPOLE (Q); receive CRANE SYMBOL.
- Go to Warehouse.
- Place CRANE SYMBOL; take CRANE CONTROLLER and ENGINE GREASE (R).
- Go back.
- Place CRANE CONTROLLER (S).
- Solution (T): 1-4-3-2-3-2-1-4-2-1-3.
- Select tarp; take RATCHETING CUTTER (U).
- Use SPREADING TOOL; take PULL CORD (V).
- Go back.
- Use RATCHETING CUTTER (W); receive PIECE OF HOSE.
- Place PIECE OF HOSE and JERRY CAN (X); receive FUEL.
- Go to Boathouse.
- Use ENGINE GREASE; take FLAMMABLE CLOTH (Y).
- Use FUEL and PULL CORD (Y1). Select pull cord.
- Take IRON BOLTS (Z).
- Go to Warehouse.
- Place IRON BOLTS (A) and press button (B); take MAINTENANCE TOKEN and TAP WRENCH (C).
- Go back twice.
- Place MECHANISM TOKEN (D); take GEARS 3/3 and ELECTRICAL TAPE (E).
- Go to Boathouse.
- Use ELECTRICAL TAPE (F); pull lever (G).
- Place GEARS 3/3 and use TAP WRENCH (H). Press button (I).
- Play HOP (J); receive PHOTO ALBUM.
- Select PHOTO ALBUM; take SKELETON MARK and Evidence.
- Place SKELETON MARK (K).
- Go (L).
Chapter 6: Lagoon
- Select hat; take Evidence (M).
- Take Evidence (N).
- Take FISHERMAN KNIFE, PADDLE DRILL 1/2, and METAL BRUSH (O).
- Use BROKEN OAR; take CHALK (P).
- METAL BRUSH on RUSTY ANCHOR EMBLEM; receive ANCHOR EMBLEM.
- Place ANCHOR EMBLEM; take VINTAGE STETHOSCOPE (Q).
- Return to Docks.
- Use FISHERMAN KNIFE; take FENCE SNIPPERS (S).
- Go (T).
- Use VINTAGE STETHOSCOPE and CHALK (U).
- Solution: Set dial (V) to 1-2-3-4.
- Connect cables as shown (W).
- Take FISH SEAL and BLOW TORCH (X).
- Go to Lagoon.
- Place FISH SEAL; take HOOK REMOVER (Y).
- Use FENCE SNIPPERS; take BRICK TROWEL and MIXER HANDLE (Z).
- Go back.
- Use HOOK REMOVER; take EXTENSION CABLE (A).
- Return to Warehouse.
- Place MIXER HANDLE (B) and EXTENSION CABLE (C). Select plug (D) and then handle (B). Take PIPE (E).
- Return to Lagoon.
- FLAMMABLE CLOTH and BLOW TORCH on PIPE; receive IMPROVISED TORCH.
- Use IMPROVISED TORCH (F). Play HOP; receive OARS.
- Place OARS (G).
- Go (H).

- Take Evidence and EMPTY STAPLER (I).
- Take PROJECTOR INSIGNIA (J).
- Go (K).
- Place PROJECTOR INSIGNIA; take ACETONE and VHS CASSETTE FRAME (L).
- Take STAPLES (M).
- STAPLES in EMPTY STAPLER; receive STAPLER.
- Use STAPLER (N) and press button (O).
- Take PAINT ROLLER and PHOSPHORESCENT POWDER (P).
- Select toolbox (Q); take COINS (R).
- Go back.
- Use ACETONE; take PAPERCLIPS (S).
- Go (S1).
- Use PAPERCLIPS and look at note; take VENDING MACHINE KEY (T).
- Go back.
- Use VENDING MACHINE KEY (U).
- Solution (V).

- Insert COINS (W). Use BRICK TROWEL; take CARD (X).
- Use CARD (Y).
- Enter (Z).
- Take UNSHARPENED PENCIL and GLUE TUBE (A).
- Go back.
- Place UNSHARPENED PENCIL (B); take SHARPENED PENCIL (C).
- Go to Rock Office.
- Use SHARPENED PENCIL; take SPRAY BADGE, UV LAMP, and PADDLE DRILLS 2/2 (D).
- Go to Meeting room.
- Place SPRAY BADGE; take LIGHTHOUSE LIGHT and PADDLE MIXER (E).
- Go back.
- PADDLE DRILLS 2/2 on PADDLE MIXER.
- Use PHOSPHORESCENT POWDER and PADDLE MIXER; take LUMINESCENT PAINT (F).
- Go (F1).
- LUMINESCENT PAINT on PAINT ROLLER. Use PAINT ROLLER and UV LAMP (G).
- Play HOP (H); receive TV CONTROLLER.
- Go to Rock office.
- VHS CASSETTE FRAME and GLUE TUBE on TAPE REEL; receive VIDEO TAPE.
- Use TV CONTROLLER (I); take COFFEE EMBLEM (J).
- Insert VIDEO TAPE (K).
- Select monitor; take Evidence (L).
- Place LIGHTHOUSE LIGHT (M); take STONE EYE and WARDROBE KNOB (N).
- Place Evidence into center (0).
- Take ACCOMPLICES.
- Use WARDROBE KNOB (P).
- Give ACCOMPLICES (Q).
- Select all three questions (R).
- Place tokens (S).
- Take CASTLE MEDALLION 1/2 (T).
- Play HOP (U); receive CASTLE PIECE.
- Go (V-W).
- Take PARASOL HANDLE and VASE ORNAMENT (A).
- Place COFFEE EMBLEM; take PRECIOUS GEM 1/3 (B).
- CASTLE PIECE on CASTLE MEDALLION.
- Look at note; place CASTLE MEDALLION (C); take DRILL HANDLE (D).
- Go (E).
- Take DECORATED HORSESHOE 1/2 and GOLF CLUB (F).
- Place VASE ORNAMENT; take STONE HEART (G).
- Place STONE EYE; take COMPASS TOKEN (H).
- Go back.
- Place COMPASS TOKEN (I).
- (L) is for left turn/counterclockwise and (R) is for right turn/clockwise. The numbers are the amount of spaces to turn.
- Solution (@1): B4L-A2L-C8L-B7L-A1R-C8L-B1L-A1R-C4L-A4L-C4R.
- B5L-A3L-C4R-A4L-C4R-B6L-A4L-B4R-C4R-B4R-C4L.
- Go (J).
Chapter 7: Balcony
- Place STONE HEART (K); take GARGOYLE HEAD (L) and WOODEN SHELF (M).
- Go back.
- Place WOODEN SHELF; take GARGOYLE NOSE (N).
- Go to Attic.
- Place GARGOYLE NOSE (O); take IRON CHISEL (P).
- Place GARGOYLE HEAD (Q); take WOODEN HAMMER (R).
- Return to Balcony.
- Use IRON CHISEL and WOODEN HAMMER; take MURAL PART (S).
- Return to Attic.
- Place MURAL PART (T). Play HOP; receive SNOW GLOBE.
- Go back.
- Place SNOW GLOBE (U); take DRILL BIT (V).
- Return to Attic.

- DRILL BIT on DRILL HANDLE; receive SCREW DRILL.
- Use SCREW DRILL; take PRECIOUS GEMS 2/3 (W).
- Use GOLF CLUB (X); receive PLIERS.
- Go back.
- Use PLIERS (Y); take COIL SPRING (Z).
- Return to Attic.
- Use COIL SPRING (A); take RETRACTABLE LADDERS (B).
- Go to Balcony.
- Place RETRACTABLE LADDERS (C).
- Look at magazine; take EASTERN MAP PIECE and GLASS CUTTER BLADE (D).
- Place PARASOL HANDLE (E); take PRECIOUS GEMS 3/3 (F).
- Place PRECIOUS GEMS 3/3 (G).
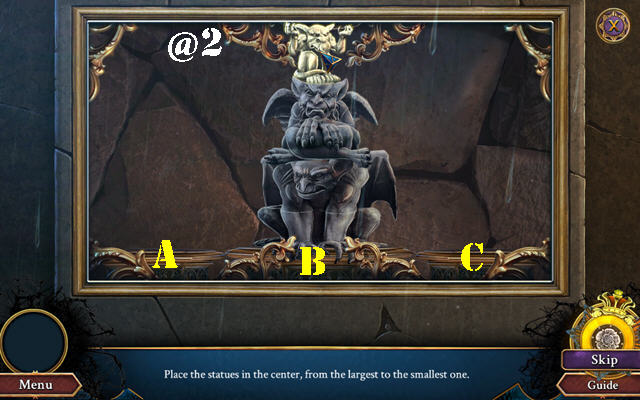
- Solution (@2): (B-C)-(A-C)-(A-B)-(C-B)-(C-A)-(B-A)-(C-B)-(A-C)-(A-B)-(C-B).
- Take WINGED BADGE.
- Place WINGED BADGE (H).
- Enter (I).
- Select suitcase and then recorder (J); take Evidence (K).
- Look at note (L).
- Take SUCTION CUP and OWL PIN (M).
- Go back twice.
- Place OWL PIN; take IRON QUILL and LANTERN HANDLE (N).
- Go (O).
- Place LANTERN HANDLE (P); take FLAME SIGIL (Q).
- Go (R).

- Place IRON QUILL; take CRYSTAL KEY (S).
- Place FLAME SIGIL; take DECORATED HORSESHOES 2/2 (T).
- Go back twice.
- Place DECORATED HORSESHOES 2/2 (U); take WINGED WINDER (V).
- Use CRYSTAL KEY (W). Play HOP; receive CRYSTAL BALL.
- Go to Guest room.
- WINGED WINDER on CRYSTAL BALL; take SEXTANT TOKEN and CLOCK HAND.
- Place CLOCK HAND; take MARBLE 1/2 (X).
- Return to Attic.
- Place SEXTANT TOKEN (Y); take WESTERN MAP PIECE (Z).
- Go to Guest room.
- Place EASTERN MAP PIECE and WESTERN MAP PIECE (A). Take Evidence and LIGHTER (B).
- Use LIGHTER and then Camera; take Evidence (C). Take GLASS CUTTER RAIL and MARBLES 2/2 (D).
- Pull out box (E); place MARBLES 2/2 (F).
- Solution (G).
- Take A SYMBOL and Evidence.
- Drag Evidence into center (H).
- Take GUILTY.
- Select (I-L).
- Go back twice.
- Give GUILTY (M).
- Take TELESCOPE TOKEN (N).
- Go to Lobby.
- TELESCOPE TOKEN on A SYMBOL; receive TELESCOPE SEAL.
- Place TELESCOPE SEAL; look at note and take HELIPAD KEY (O).
- Return to Garden.
- Use HELIPAD KEY (P).
- Go (Q).
- Take ROPE (R).
- GLASS CUTTER BLADE and SUCTION CUP on GLASS CUTTER RAIL; receive GLASS CUTTER.
- Use GLASS CUTTER; take SPLITTING WEDGE and SERPENTINE (S).
- Use SERPENTINE (T); receive SHED LEVER.
- Place SHED LEVER (U). Play HOP; receive HATCHET.
- Use HATCHET (V).
- Go (W).
- Use HATCHET (X).
- Use SPLITTING WEDGE; take SAFETY PINS, BANDAGES, and GRAPPLING HOOK (Y).
- ROPE on GRAPPLING HOOK; receive ROPE AND HOOK.
- Use ROPE AND HOOK (Z).
- Use BANDAGES (A).
- Use SAFETY PINS; take CROWBAR (B).
- Use CROWBAR (C).
- Enter (D).
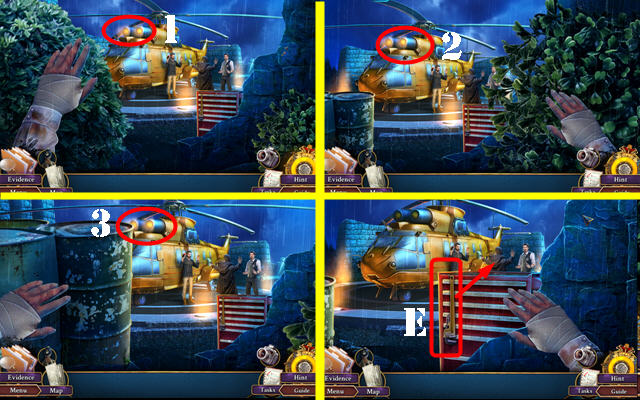
- Go forward once the helicopter lights flash (1-3).
- Take pipe wrench and use it (E).
- Congratulations, you've completed Path of Sin: Greed!
Created at: 2018-09-09