Walkthrough Menu
General Tips
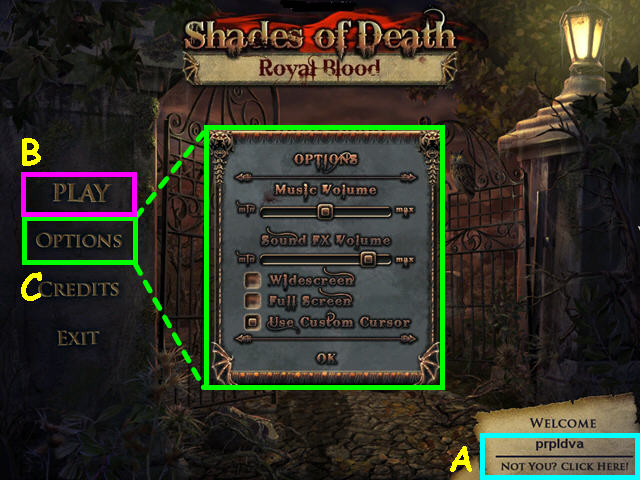
- Click on the profile panel on the main screen to add or delete player profiles (A).
- Select 'Play' to begin or continue your game (B).
- The first time you select 'Play', you will need to choose the level of difficulty.
- Casual mode has faster recharge times on the hint and skip buttons plus the active zones are highlighted with sparkles.
- Advanced mode has a slower recharge time and active zones are not highlighted.
- You may play this game in full screen or windowed mode by changing the settings in the Options menu (C) which is accessible from the main screen and in in-game menu.
- You may adjust the volume of effects and music in the Options menu. You may also revert to the system cursor from the Options menu.
- The best way to use this walkthrough is by clicking on the 'CTRL' and 'F' keys on your keyboard to simultaneously bring up a search box.
- Type the keyword into the search box at the bottom of your screen and click on 'NEXT' to find the section you need help with. Clicking 'NEXT' again will bring up all instances in which that keyword was mentioned in the guide.
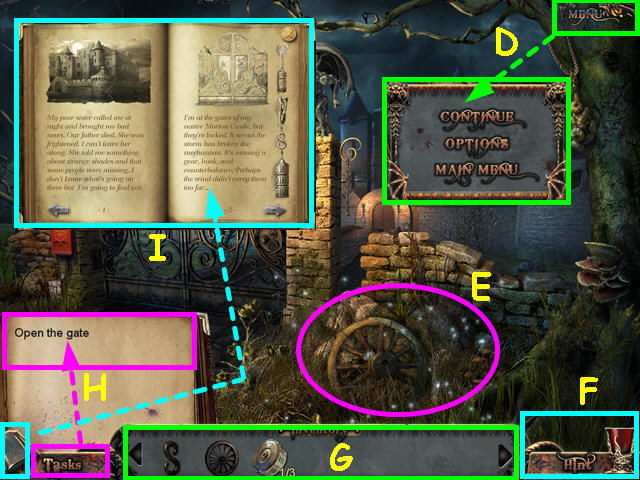
- Select the 'Menu'button to pause your game or to move to the Options or Main menus (D).
- This is an example of an area highlighted by sparkles (E).
- Select 'Hint' or the goblet for a hint (F).
- Hints are unlimited, but you must wait for the Goblet of Blood to refill.
- The items in Hidden Object Scenes are randomized.
- Move your cursor to the bottom of the screen to open your inventory (G).
- Your inventory will auto-hide when not in use.
- Use the arrows on the left and right to scroll through inventory items.
- Click on the 'Tasks' button to view your current objective (H).
- Select the journal in the lower left corner to read what you have done so far and see clues to puzzles and mini-games (I).
Chapter 1: Morton Castle
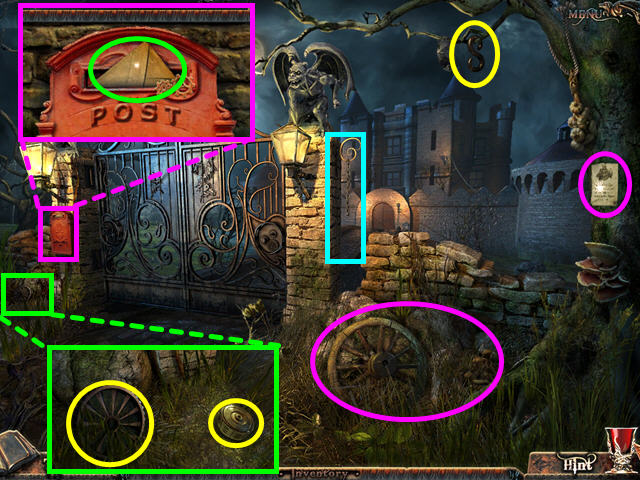
- You may select interactive help for a brief tutorial.
- Take the WEIGHT HOOK from the tree branch (A).
- Try to read the notice on the tree (B).
- Look at the close-up of the mailbox (C); read the letter in the mailbox (D).
- Look at the area beneath the mailbox (E); take the GEAR and the DIAL (F).
- Look at the hanging chain, and then exit the close-up to trigger a Hidden Object Scene (G).
- Select the wagon wheel area for a Hidden Object Scene to appear (H).
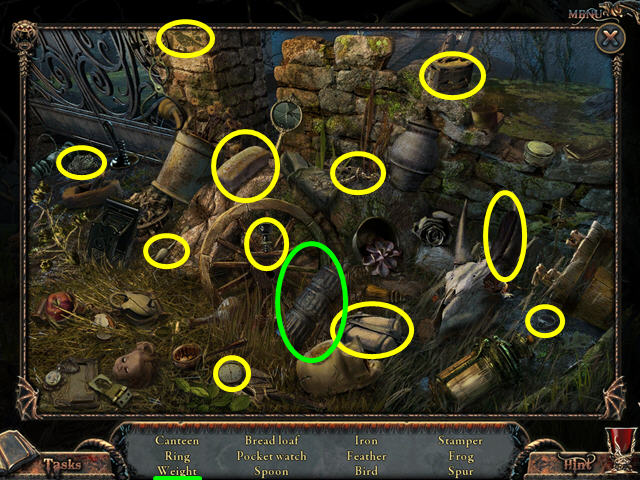
- Locate all the items on the list.
- You will earn the BALANCE WEIGHT.
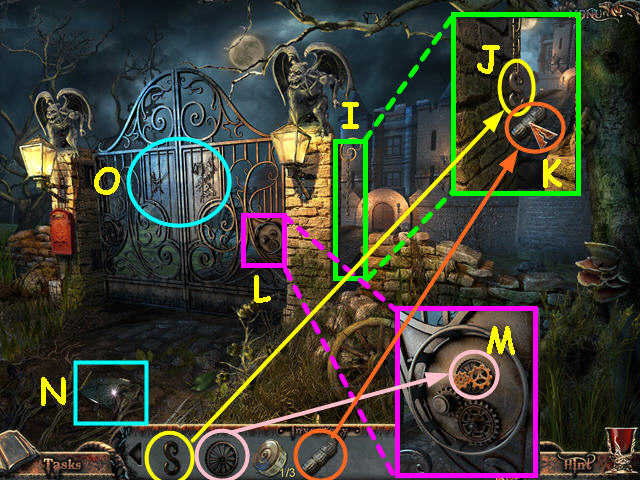
- Look at the close-up of the chain (I); place the WEIGHT HOOK on the end of the chain (J).
- Hang the BALANCE WEIGHT on the hook (K).
- Look at the close-up of the gear assembly on the gate (L); place the GEAR into the mechanism (M).
- Look at the plaque on the ground (N). This will be noted in your journal.
- Exit the close-up, and then look at the gate (O).
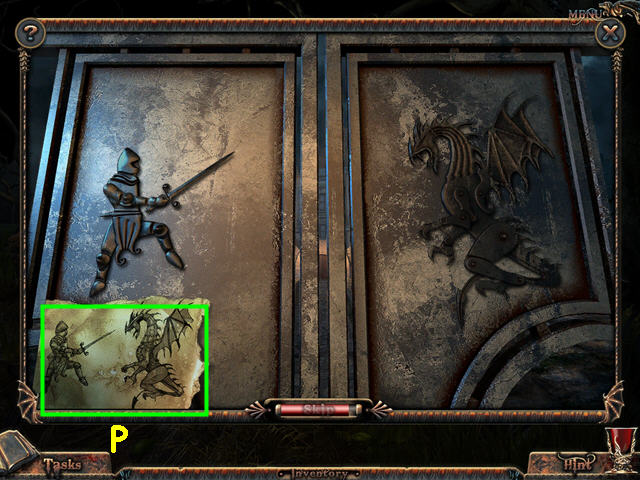
- The object of this mini-game is to position the knight and the dragon to match the sketch (P).
- Click on the piece you want to move until it is positioned correctly.
- Walk forward through the gate.
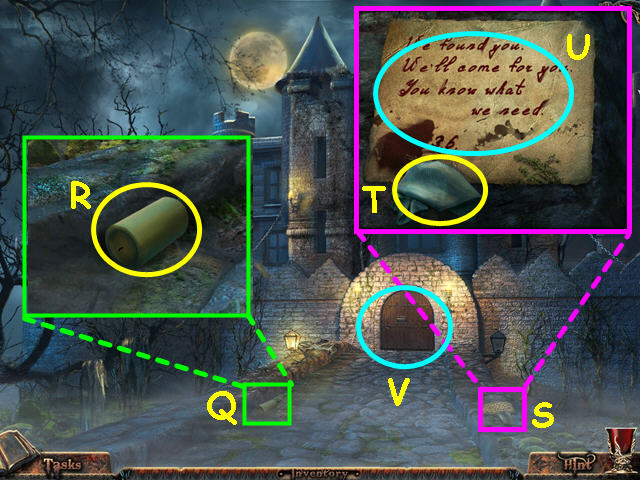
- Look at the close-up on the left side of the bridge (Q).
- Take the CANDLE (R).
- Look at the close-up on the right side of the bridge (S); take the RAG (T).
- Read the note with the 2 numbers (U); this note will go into your journal.
- Exit the close-up.
- Walk to the gate (V).
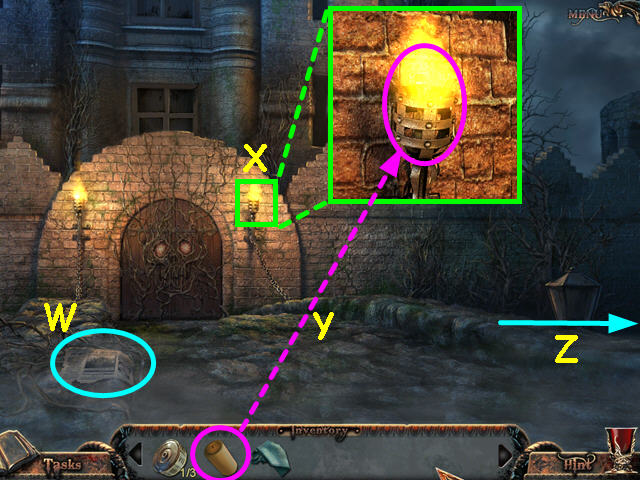
- Read the newspaper on the left (W).
- Look at the close-up of one of the torches (X); use the CANDLE on the torch (Y).
- Walk right towards the streetlamp (Z).
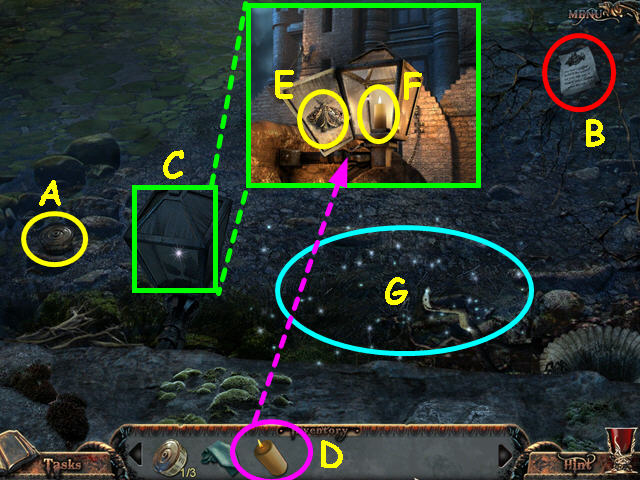
- Take the DIAL (A).
- Read the warning (B).
- Look at the close-up of the streetlamp (C); click on the glass to open the lamp.
- Use the lit CANDLE in the lamp (D).
- Take the MOTH once it flies to the lamp (E).
- Take the CANDLE (F).
- Select the area to the right of the lamp for a Hidden Object Scene (G).
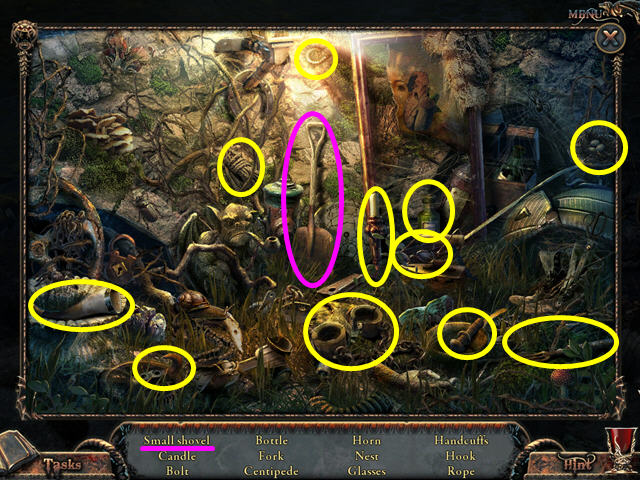
- Locate all the items on the list.
- You will earn the SHOVEL.
- Walk down 3 times to return to the front gate.
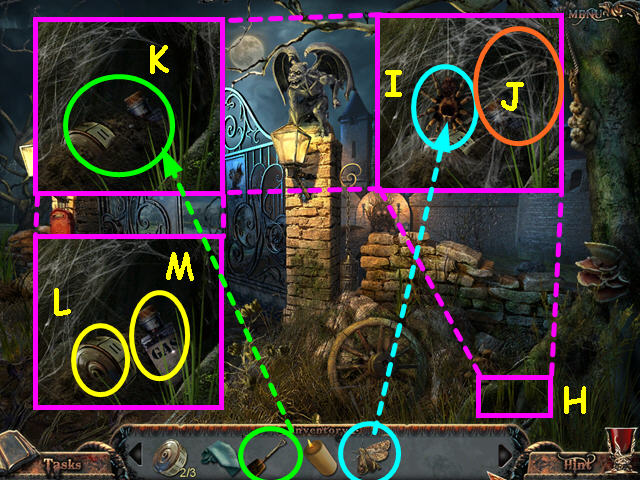
- Look at the close-up of the tree roots (H); use the MOTH on the web (I).
- Once the spider leaves, click on the web to remove it from the hole (J).
- Use the SHOVEL twice on the dirt (K).
- Take the DIAL (L) and the GAS (M).
- Walk forward twice to return to the inner gate.
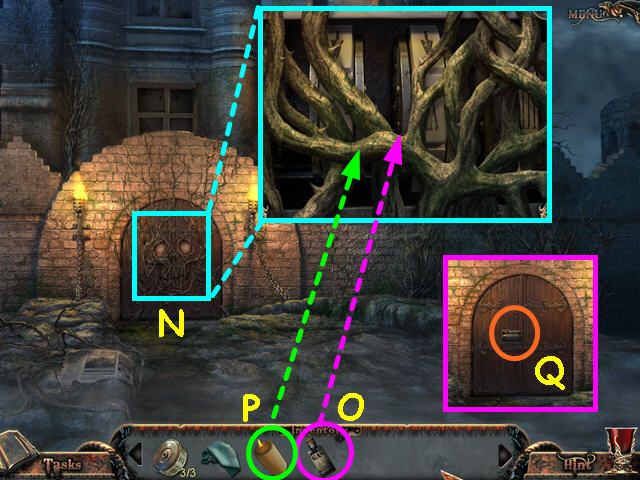
- Look at the close-up of the gate (N).
- Use the GAS on the vines (O).
- Use the CANDLE on the vines (P).
- Select the lock on the gate (Q).
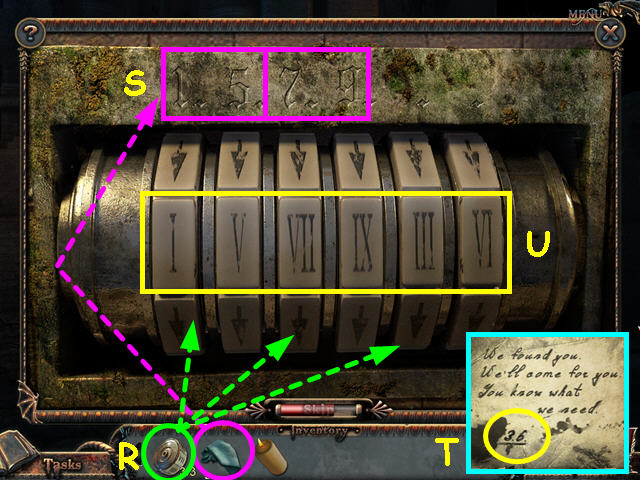
- Place each of the 3 DIALS into the device (R).
- Use the RAG to wipe the 2 spots over the device (S).
- Note the 4 numbers the rag uncovered.
- Refer to the note in your journal for the final 2 numbers (T).
- Enter 1-5-7-9-3-6 using the dials (U).
- Walk forward through the gate.
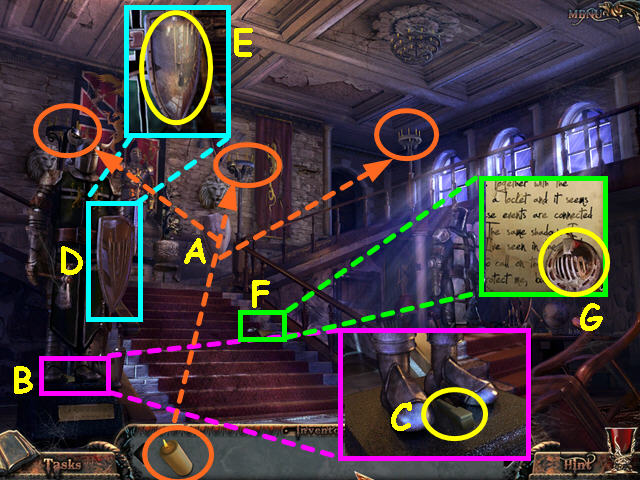
- Use the CANDLE from your inventory to light the 3 candelabras (A).
- Look at the close-up of the suit of armor's feet (B).
- Take the PIANO KEY (C).
- Look at the close-up of the suit of armor's shield (D); take the MIRROR SHIELD (E).
- Look at the close-up of the stairs (F); read the note and take the NEEDLE (G).
- Walk up the stairs.
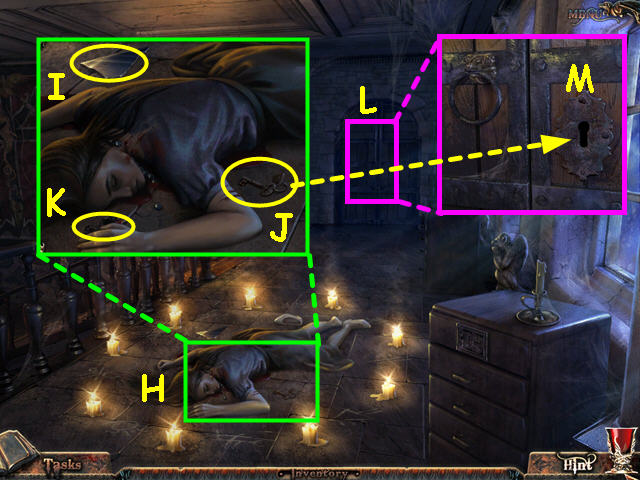
- Look at the close-up of the body (H); take the MIRROR SHARD (I), the DOOR KEY (J), and the CANVAS PIECE (K).
- Look at the close-up of the door (L); use the DOOR KEY on the lock (M).
- Walk forward.
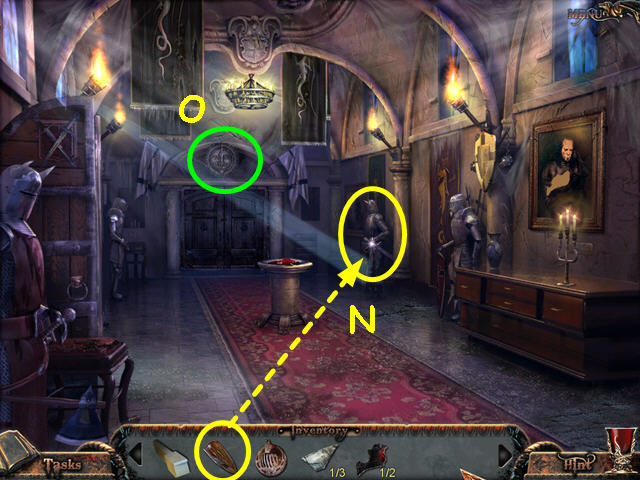
- Use the MIRROR SHIELD on the far right knight (N).
- Once the light is reflected, select the mini-game over the door (O).
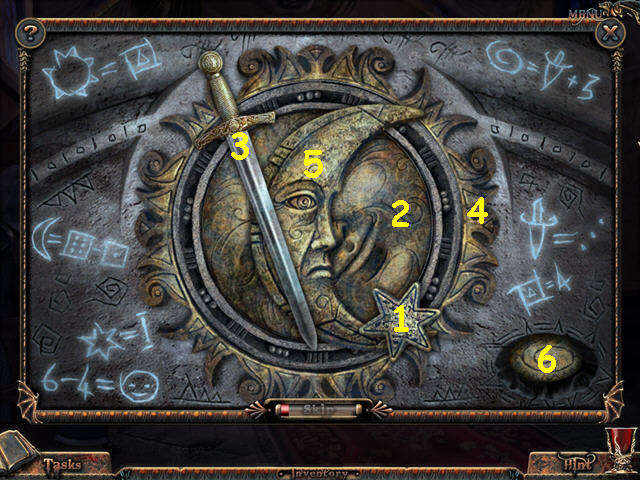
- The object of this mini-game is to press the elements of the sculpture in the correct order.
- Read the white graffiti for clues on the correct order.
- Press the star- the sun's face- the sword- the sun's outer ring- the moon- the swirl (1-6).
- Walk to the left.
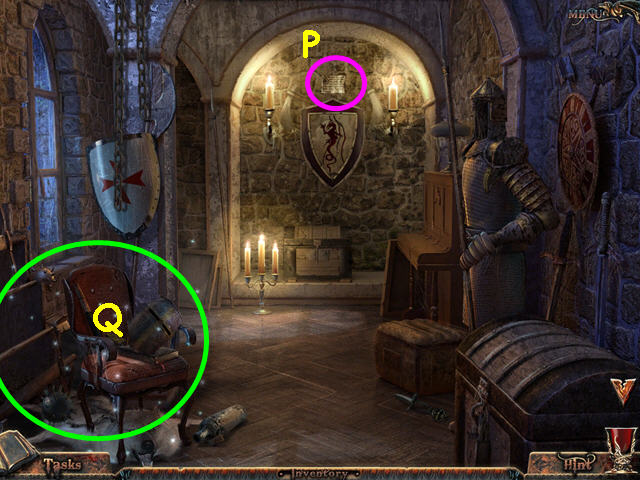
- Read the plaque over the shield (P).
- Select the chair on the left for a Hidden Object Scene to activate (Q).
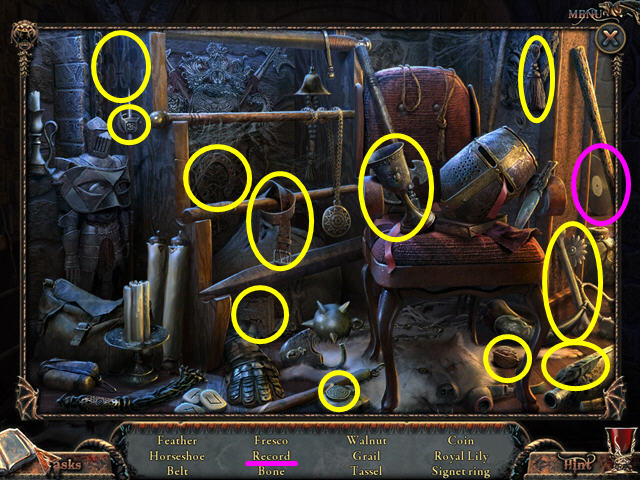
- Locate all the items on the list.
- You will earn the RECORD.
- Walk down, and then up to enter the bedroom.
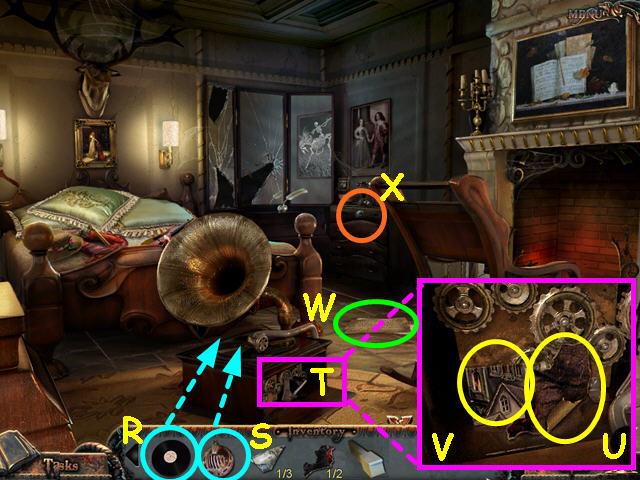
- Place the RECORD (R) and the NEEDLE (S) on the gramophone.
- Look inside the open gramophone (T).
- Take the CANVAS PIECE (U) and the PUZZLE PIECE (V).
- Read the note on the floor (W).
- Select the top dresser drawer for a mini-game to appear (X).
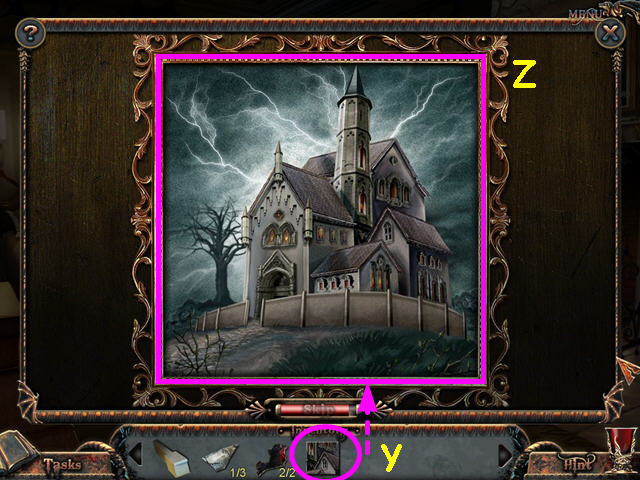
- Use the PUZZLE PIECE on the squares to activate the mini-game (Y).
- Click on each square to rotate the piece into the correct position.
- The object of this mini-game is to restore the picture as shown in the screenshot (Z).
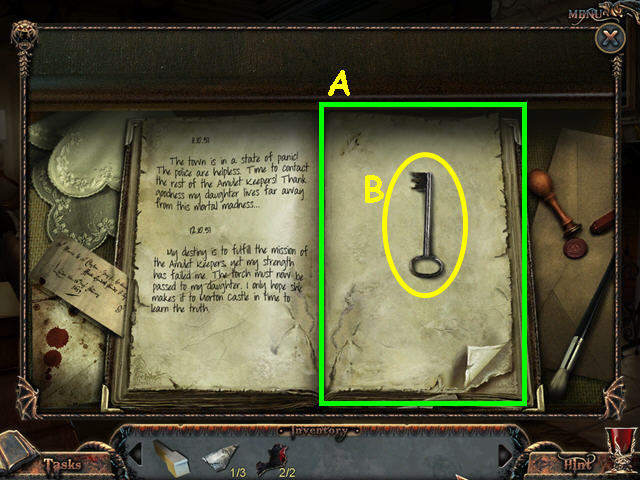
- Click on the right page to turn it over (A).
- Take the SMALL KEY (B).
- Exit the close-up.
- Walk down to exit the bedroom.
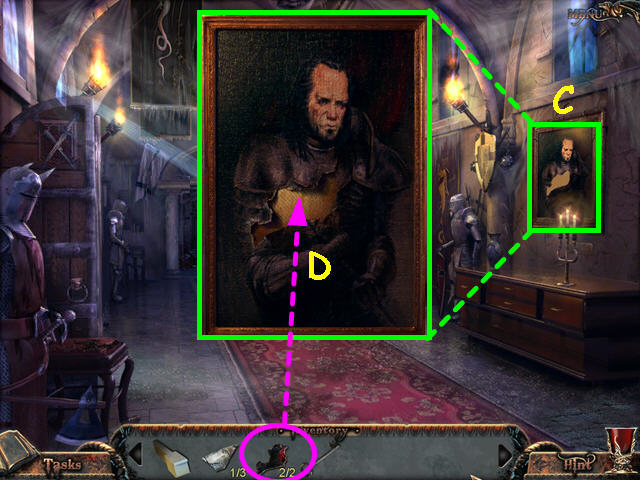
- Look at the close-up of the portrait on the right wall (C); use the CANVAS PIECES on the hole in the portrait (D).
- After the cut-scene, walk forward to the bedroom.
- Select the bed for a Hidden Object Scene.
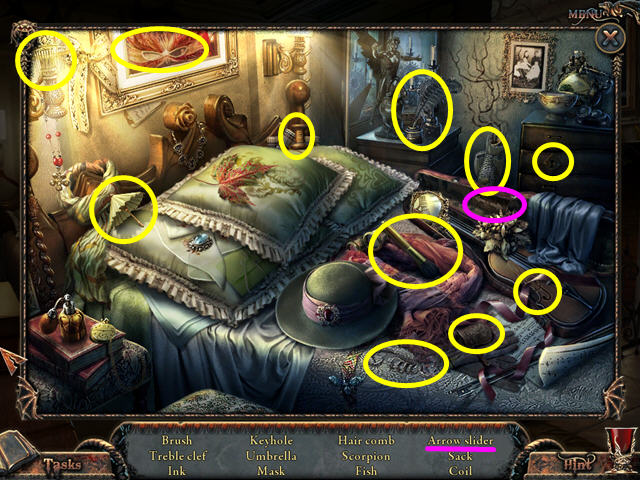
- Locate all the objects on the list.
- You will earn the ARROW SLIDER.
- Walk down twice to return to the top of the stairs.
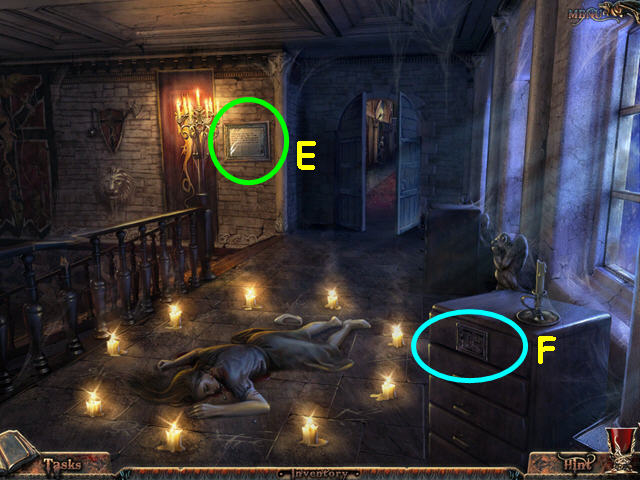
- Read the newspaper clipping on the wall (E).
- Look at the close-up of the top drawer for a mini-game (F).
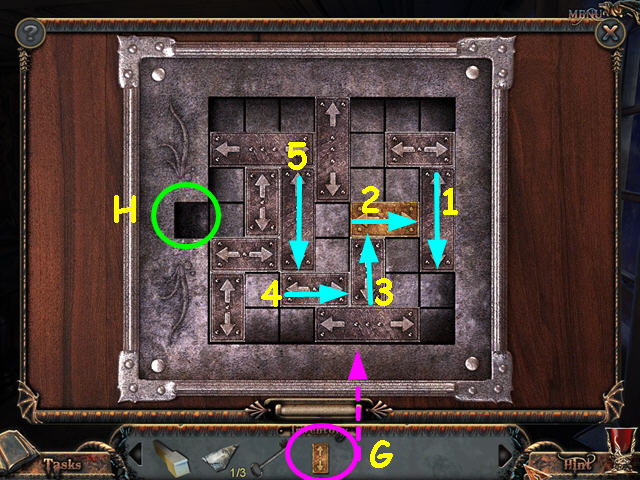
- Use the ARROW SLIDER on the grid to activate the mini-game to appear (G).
- Move the slider pieces so that the gold piece can exit to the left hole (H).
- Slide the pieces in the direction indicated by the aqua arrows.
- Slide the pieces in numerical order (1-5) to solve the puzzle.
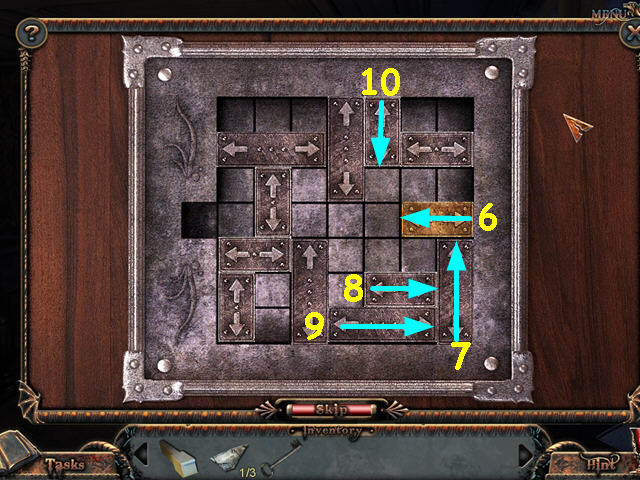
- Moves 6-10 are shown here (6-10).
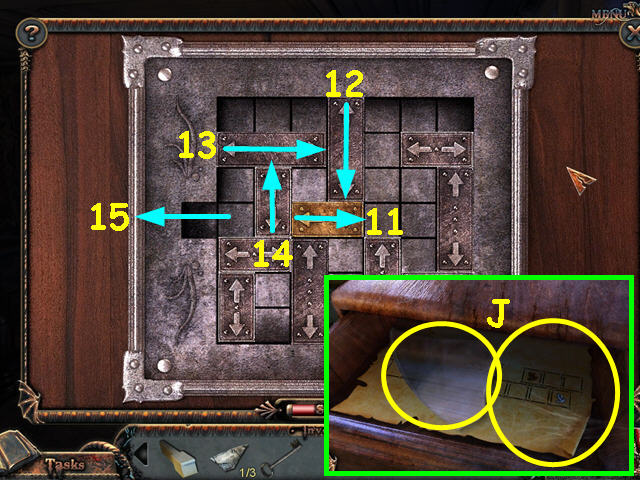
- Moves 11-15 are shown here (11-15).
- From the open drawer, take the MIRROR SHARD and the SHEET of music (J).
- Walk forward, then to the left.
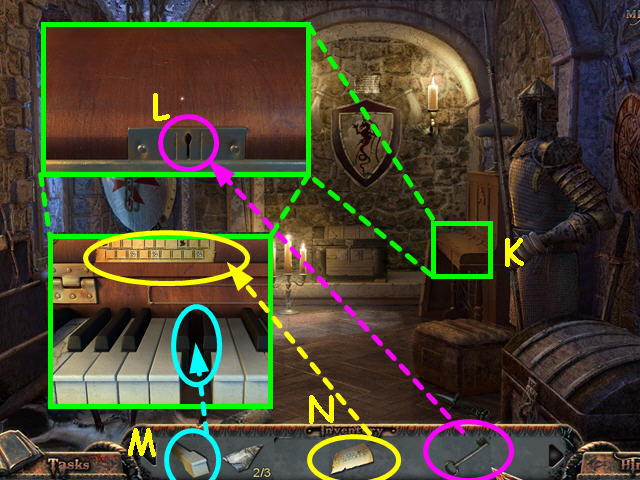
- Look at the close-up of the piano (K); use the SMALL KEY on the lock (L).
- Place the PIANIO KEY into the keyboard (M).
- Place the SHEET over the keyboard (N).
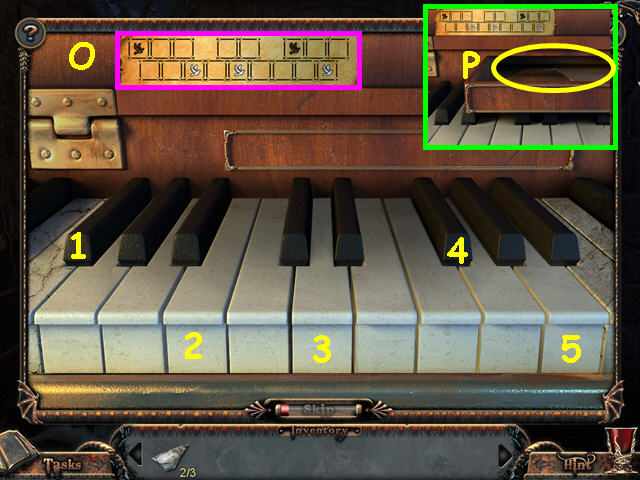
- Play the keys indicated by the sheet (O).
- Press the 5 indicated keys (1-5).
- Take the MIRROR SHARD from the drawer that opens (P).
- Walk down, then forward to return to the bedroom.
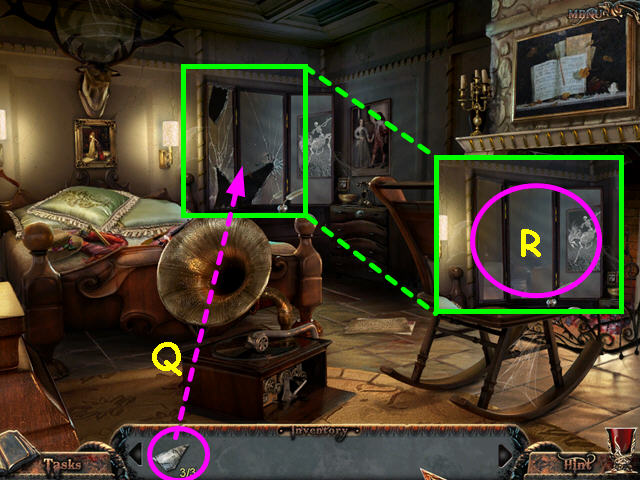
- Place the 3 MIRROR SHARDS into the mirror (Q).
- Click on the mirror to enter the world of the dead (R).
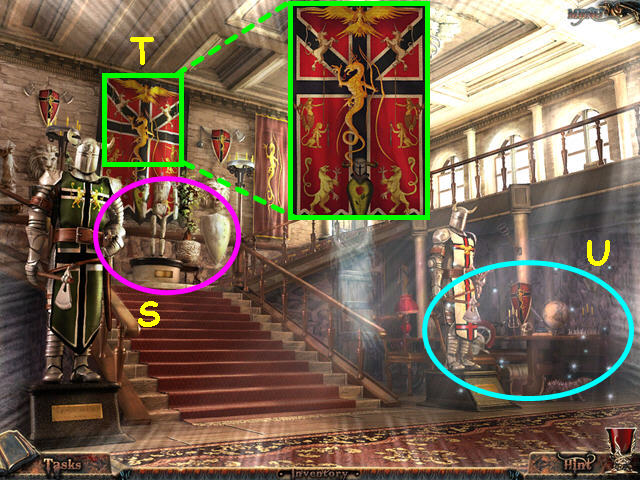
- Note the close-up area on the landing (S).
- Look at the flag on the wall (T).
- Select the area to the right of the stairs for a Hidden Object Scene (U).
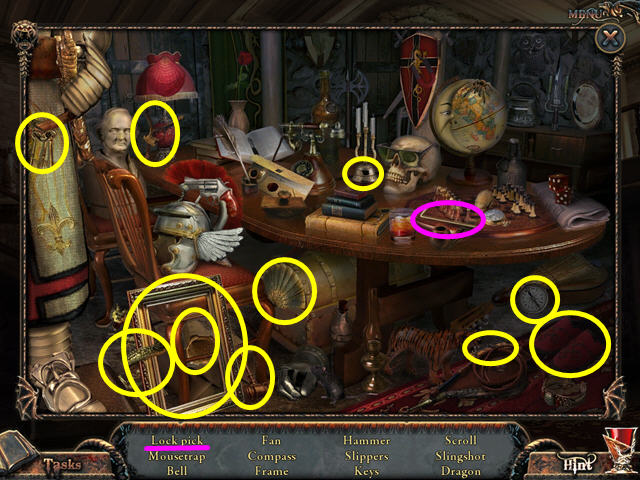
- Locate all the items on the list.
- You will earn the LOCK PICK.
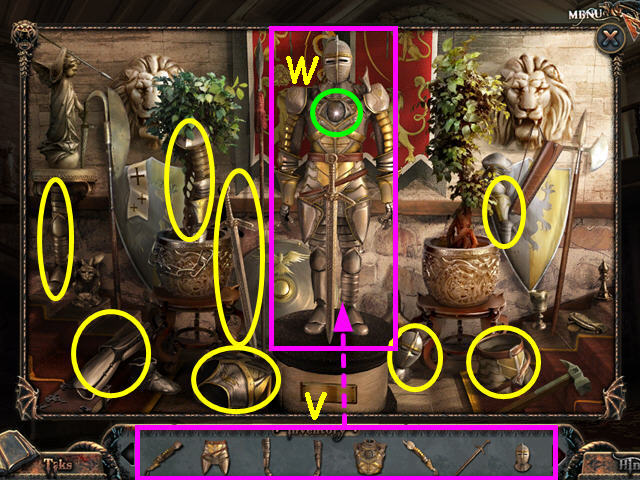
- Select the close-up area on the landing.
- Locate the 8 PIECES of ARMOR in the scene circled in yellow.
- Place the 8 PIECES of ARMOR onto the mannequin (V).
- Notice the missing medallion (W).
- Exit the close-up, and then walk upstairs.
- Walk to the left.
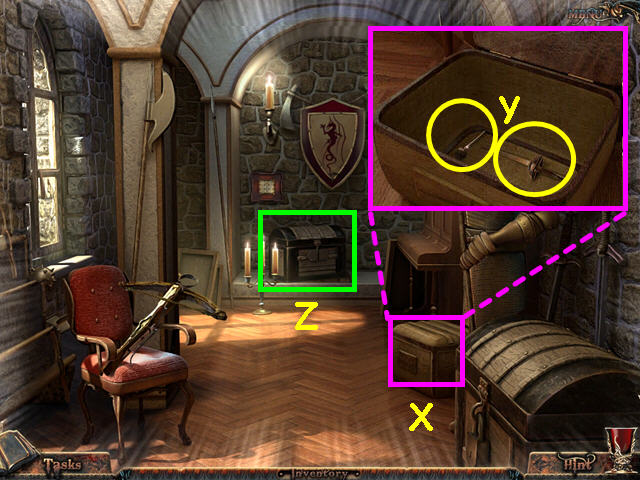
- Look at and open the chest on the right (X); take the LEVER and the SWORD (Y).
- Look at the chest in the back (Z).
- Walk down to exit the area.
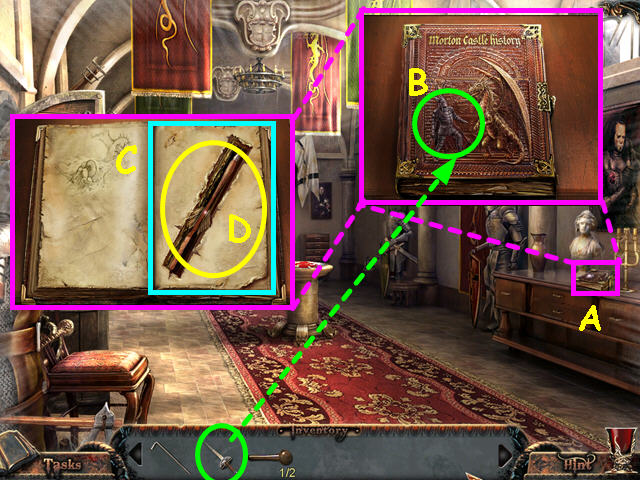
- Look at the close-up of the book on the right (A).
- Give the SWORD to the knight on the book (B).
- Click on the right page to turn it over (C).
- Take the ARROW (D).
- Exit the close-up, and then select the sideboard the book is in on for a Hidden Object Scene.
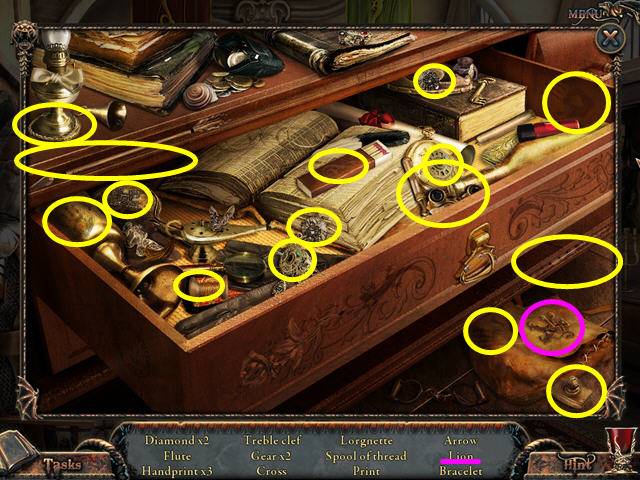
- Locate all the items on the list.
- You will earn the LION.
- Walk to the left.
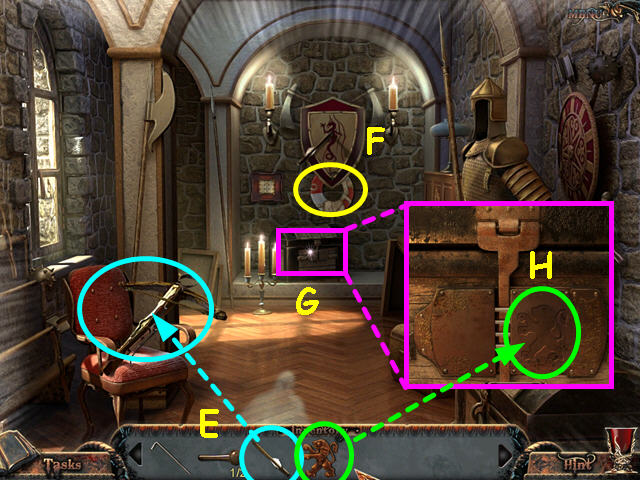
- Place the ARROW into the crossbow (E).
- Click on the crossbow to fire the arrow.
- Take the RING (F).
- Look at the close-up of the chest (G); use the LION on the indentation for a mini-game to appear (H).
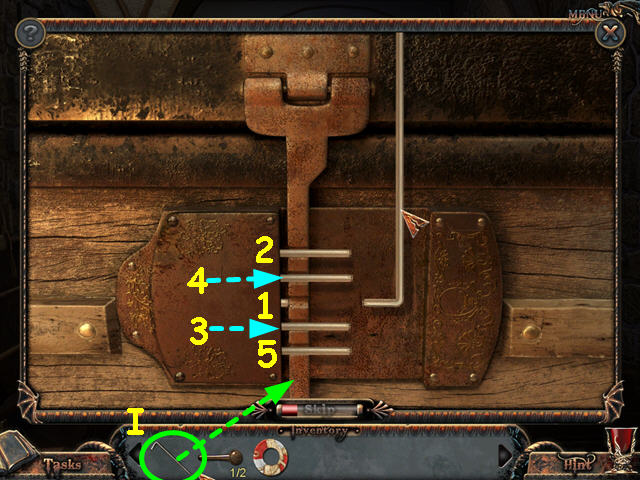
- Use the LOCK PICK on the lock to activate the mini-game (I).
- The object is to push all the pins in the correct order.
- Move the pick over a pin and click to push it down.
- When the pin stays in, you have the correct sequence.
- Should the pin come out, start the sequence over.
- Push the pins in numerical order (1-5).
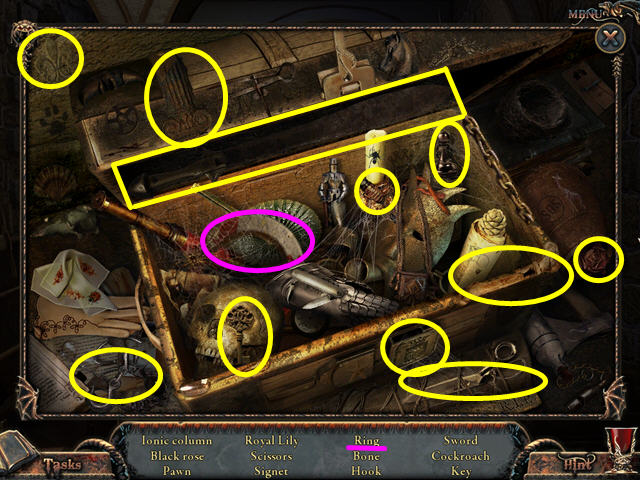
- Select the chest for a Hidden Object Scene.
- Locate all the items on the list.
- You will earn the RING.
- Walk down to exit the area.
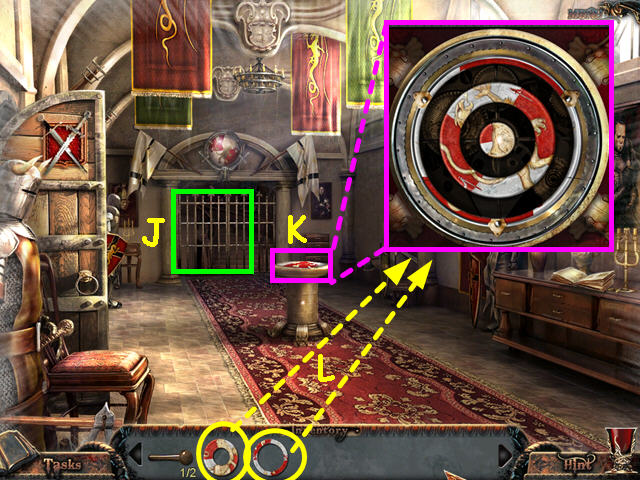
- Note the locked gate to the bedroom (J).
- Look at the close-up of the pedestal (K).
- Place both RINGS into the mechanism for a mini-game to activate (L).
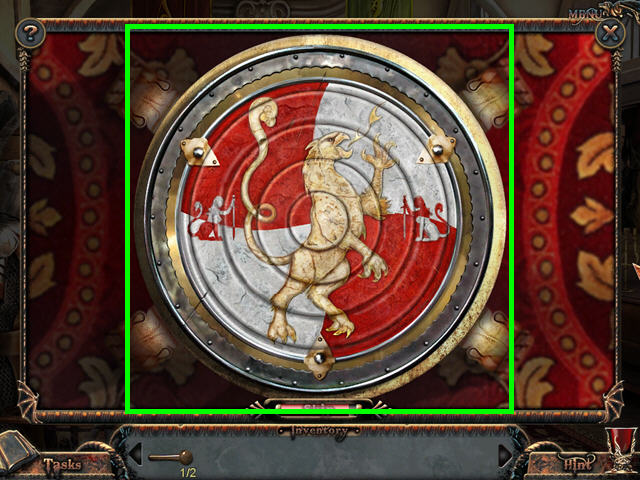
- The object of this mini-game is to restore the picture.
- Click on the rings to rotate them into position.
- The center circle does not move.
- Walk forward to the bedroom.
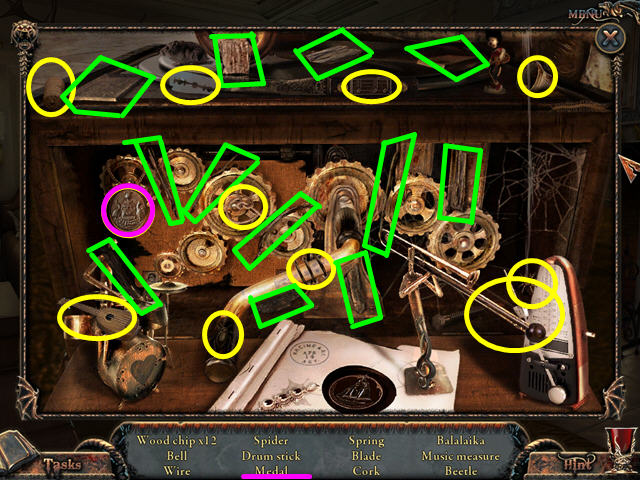
- Select the gramophone for a Hidden Object Scene.
- Locate all the items on the list.
- You will earn the KNIGHT'S MEDALLION.
- Walk down twice to return to the entrance.
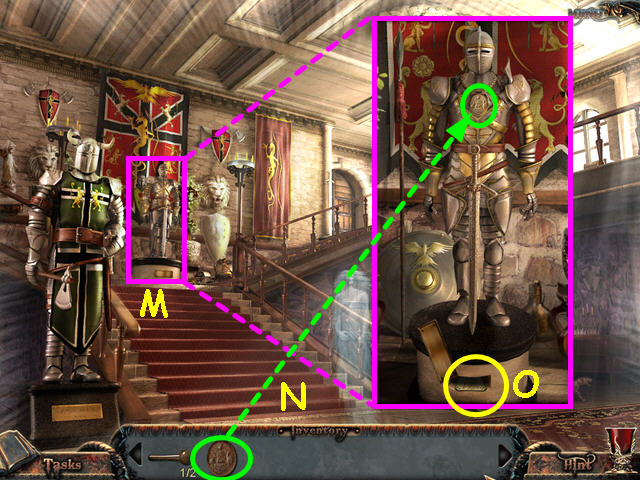
- Select the close-up of the armor on the landing (M).
- Place the KNIGHT'S MEDALLION into the chest-plate (N).
- Take the PIECE of the ORNAMENT from the secret niche (O).
- Walk upstairs, and then walk to the left.
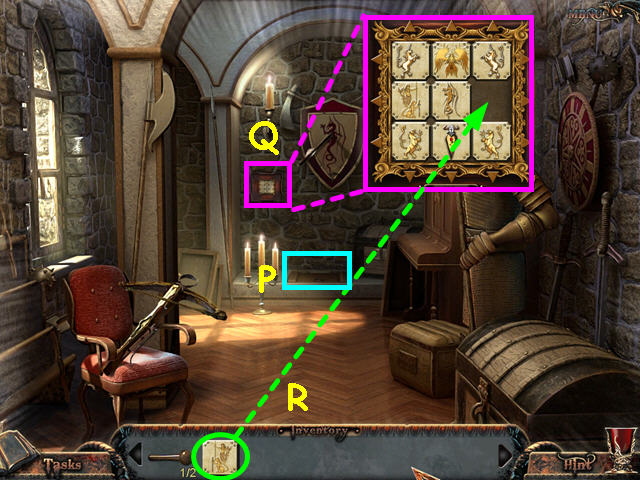
- Note the hatch door in the floor (P).
- Look at the close-up of the wall ornament (Q).
- Place the PIECE of the ORNAMENT into the grid for a mini-game (R).
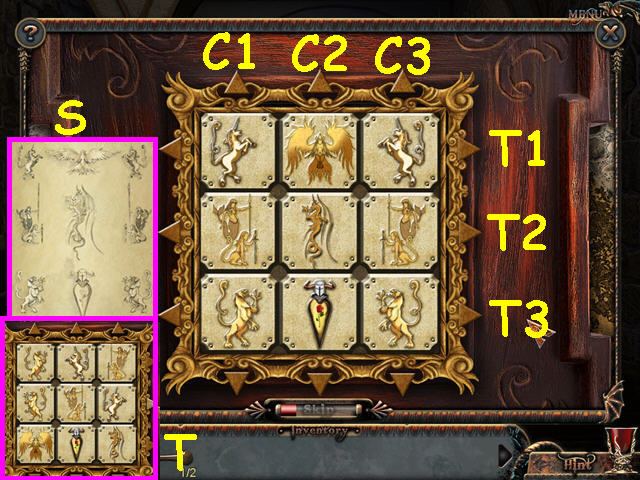
- Refer to your journal for the correct placement of each image (S).
- Click on the arrows to slide the tiles vertically or horizontally.
- This mini-game is randomly generated- your solution may vary.
- Our starting configuration is shown (T).
- Move the columns (R1, R2, R3) and tiers (T1, T2, T3) up, down, left or right.
- Our solution was: T2-Rx2, C1-Dx2, C3-Dx1, C2-Dx1, T2-Rx1, C2-Ux1, C3-Dx1, C1-Dx1, T2-Lx1, C1-Ux1, C3-Dx2, T2-Rx3, C3-Dx3, T2-Lx2, C3-Dx1, T2-Rx1, C3-Ux1, T2-Lx2, C3-Ux2, T2-Lx2, C3-Ux2, T2-Lx1, C3-Ux1, T2-Rx1, C3-Dx1.
- Check out our RANDOM video solution!
- Enter the hatch on the floor.
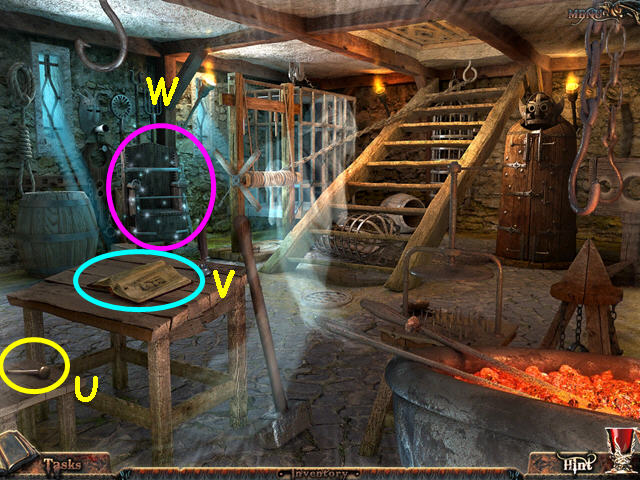
- Take the LEVER (U).
- Read the book (V).
- Select the area to the right of the barrel for a Hidden Object Scene (W).
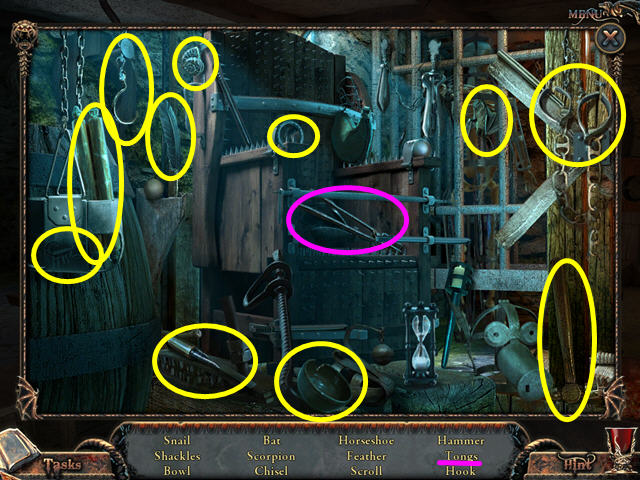
- Locate all the items on the list.
- You will earn the TONGS.
- Walk up the stairs, continue down, and then walk up to return to the bedroom.
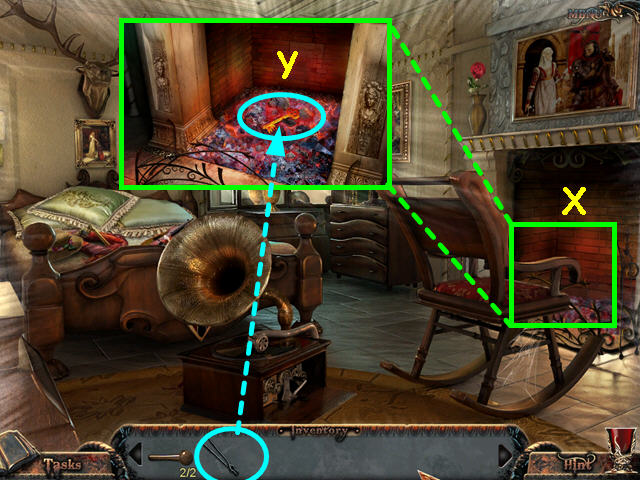
- Look at the close-up of the fireplace (X).
- Use the TONGS to take the HOT KEY (Y).
- Walk down to exit the room.
- Walk to the left, and then enter the hatch in the floor.
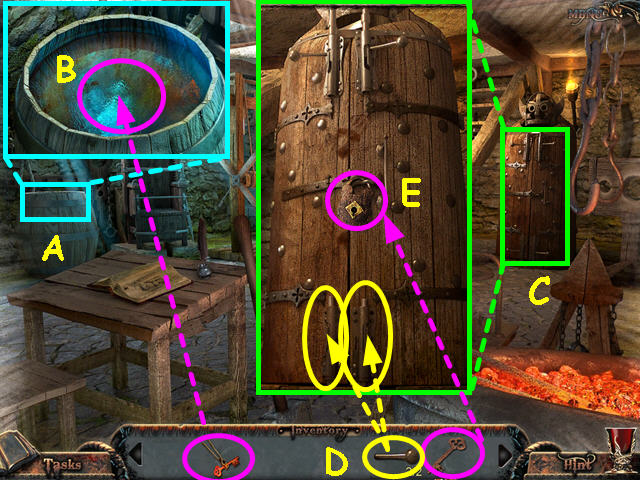
- Look at the close-up of the barrel (A); use the HOT KEY on the water (B).
- Look at the close-up of the Iron Maiden (C).
- Use the 2 LEVERS on the 2 lower latches (D).
- Use the KEY on the padlock (E).
- Walk up the stairs to exit the dungeon.
- Walk down, then up to return to the bedroom.
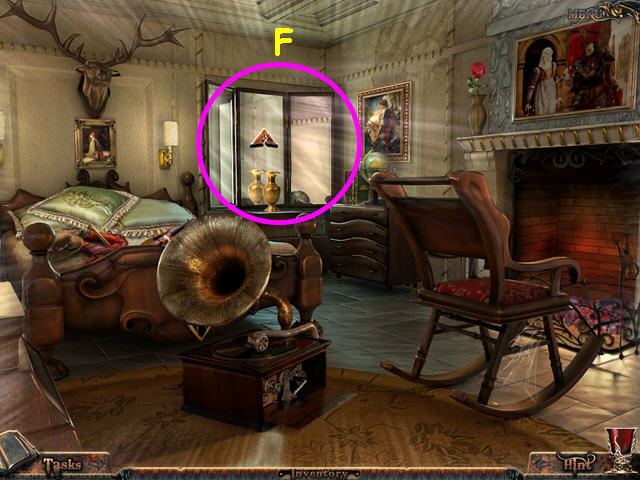
- Click on the mirror to return to the world of the living (F).
Chapter 2: Blackburn City
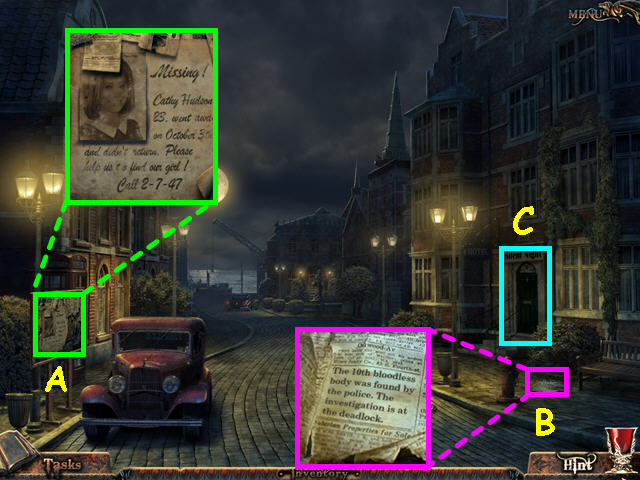
- Look at the bulletin board to read a missing persons notice (A).
- Read the newspaper clipping (B).
- Enter the hotel (C).
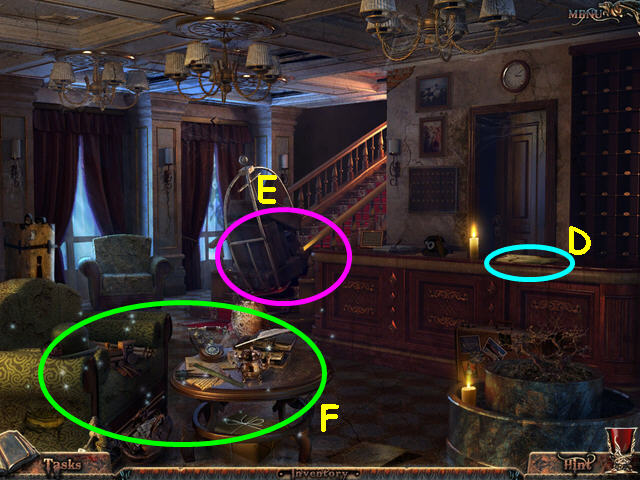
- Read the letter to your sister (D).
- Look at the luggage rack to see it is missing a wheel (E).
- Select the green chair and table for a Hidden Object Scene (F).
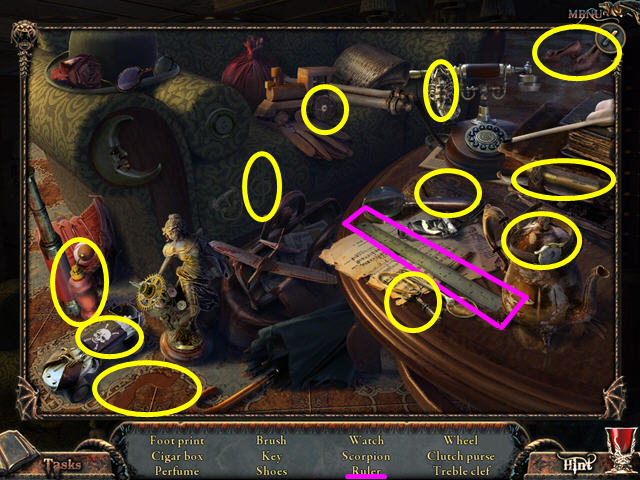
- Locate all the items on the list.
- You will earn the RULER.
- Walk down to exit the hotel.
- Walk forward to the fountain.
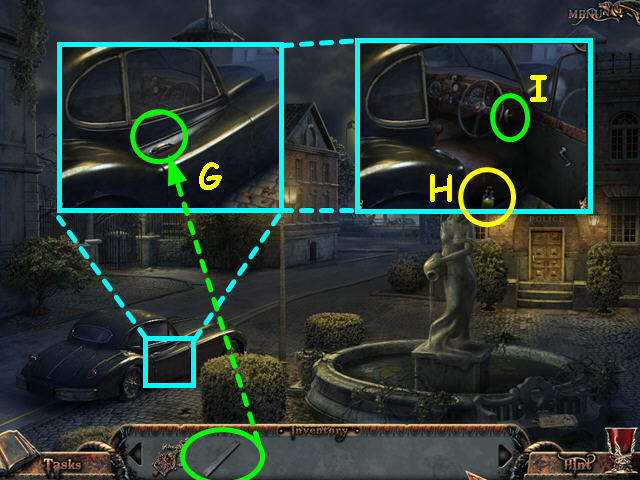
- Look at the close-up of the car door then use the RULER on the door (G).
- Take the CHEMICAL (H).
- Pull the trunk release (I).
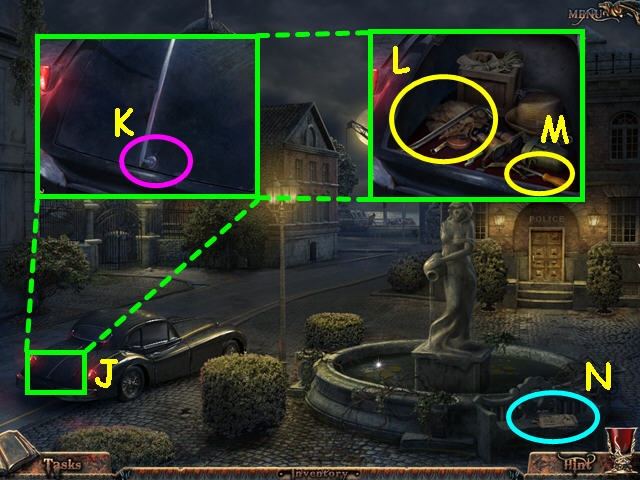
- Look at the close-up of the car's trunk (J).
- Click on the handle to open the trunk (K).
- Take the CROWBAR (L) and the SCREWDRIVER (M).
- Read the missing persons notice (N).
- Walk forward to the dock area.
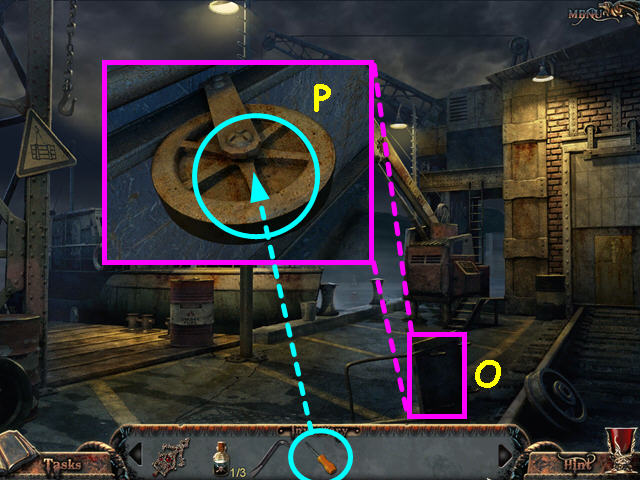
- Look at the close-up of the cart (O).
- Use the SCREWDRIVER to remove the WHEEL (P).
- Walk down twice, and then go right to enter the hotel.
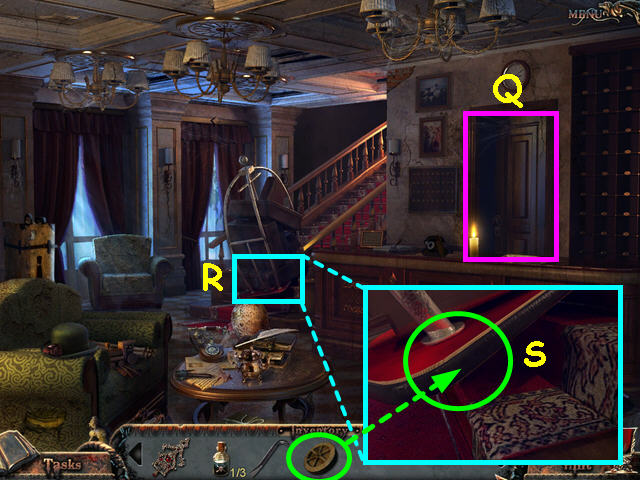
- Note the door behind the desk to learn the power is off (Q).
- Look at the close-up of the luggage cart (R).
- Use the WHEEL on the luggage cart (S).
- Walk up the stairs, and then enter the first room on the right.
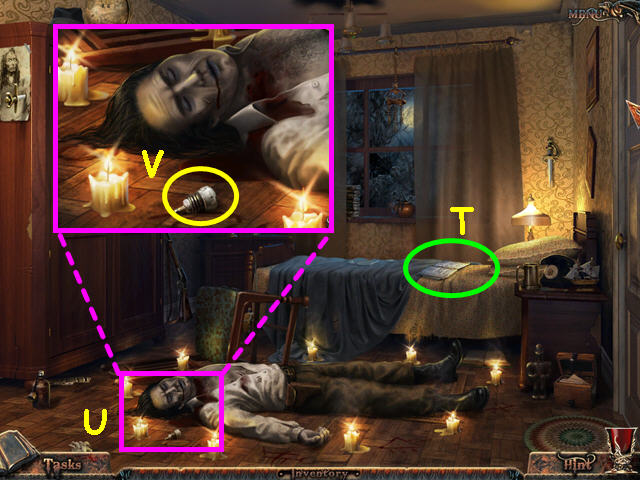
- Read the vampire slayer's diary (T).
- Look at the close-up of the corpse (U).
- Take the fuse (V).
- Walk down to exit the room.
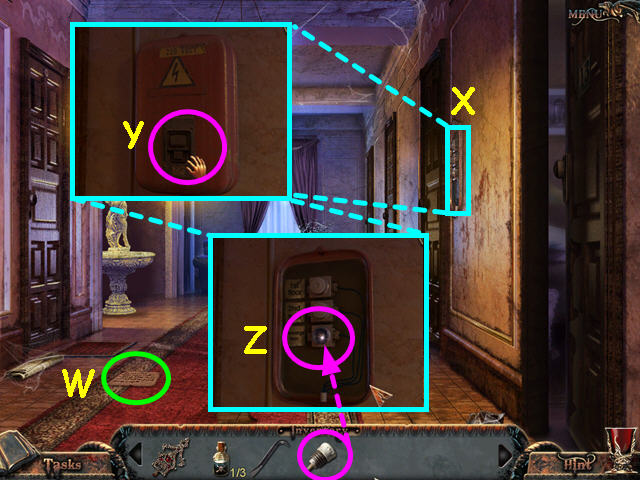
- Read the note on the floor (W).
- Look at the close-up of the fuse box (X).
- Click on the latch to open the box (Y).
- Use the FUSE on the empty socket (Z).
- Walk down, and then enter the door behind the hotel front desk.
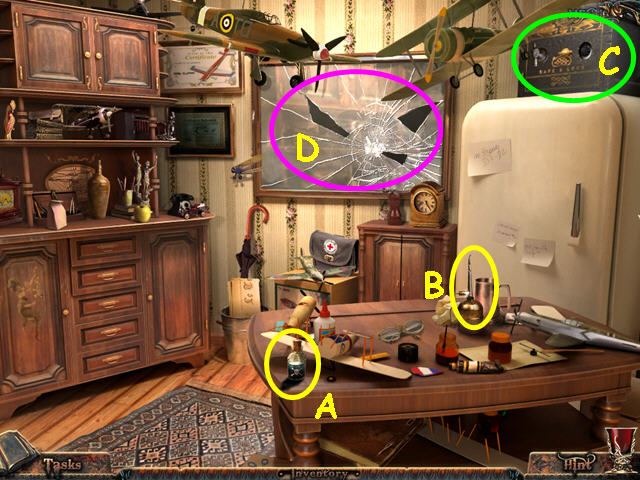
- Take the CHEMICAL (A).
- Take the OIL CAN (B).
- Look at the safe to learn it is missing a dial (C).
- Look at the mirror (D).
- Walk down twice to exit the hotel.
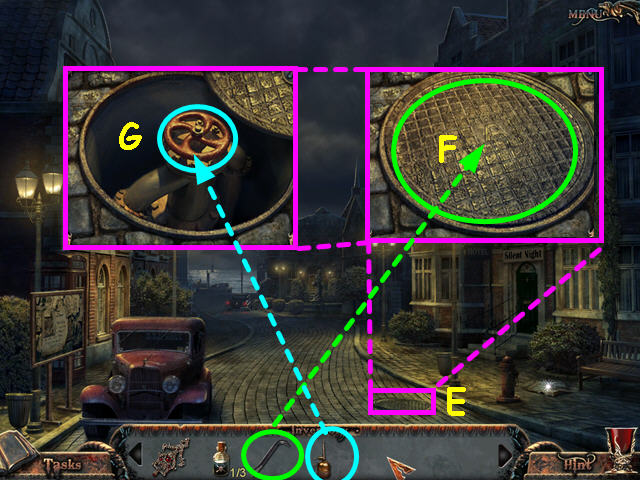
- Look at the close-up of the manhole cover (E).
- Use the CROWBAR to open the manhole (F).
- Use the OIL CAN on the valve (G).
- Walk forward to the fountain area.
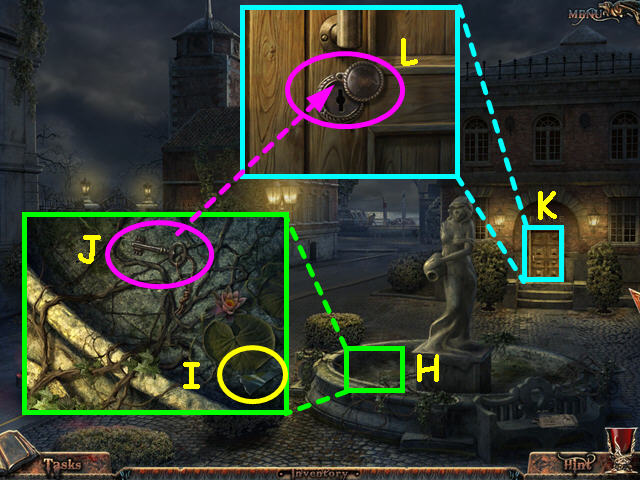
- Look at the close-up of the drained fountain (H).
- Take the MIRROR FRAGMENT (I).
- Take the KEY (J).
- Look at the close-up of the Police Station door (K).
- Use the KEY on the lock (L).
- Enter the Police Station.
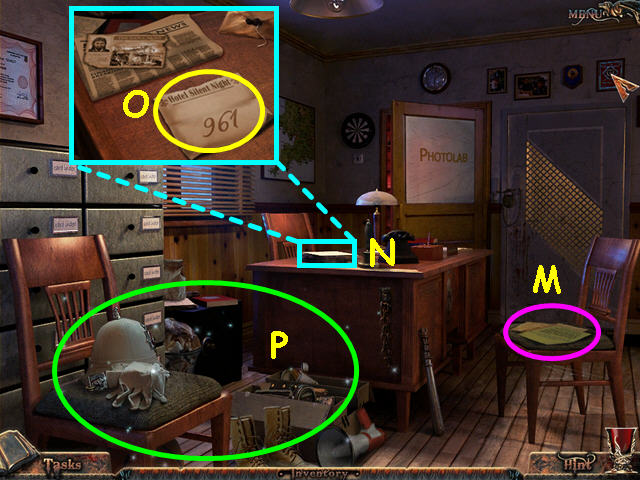
- Read the police report on the chair (M).
- Look at the close-up of the desk (N); take the paper with the CODE (O).
- Select the area by the left chair for a Hidden Object Scene (P).
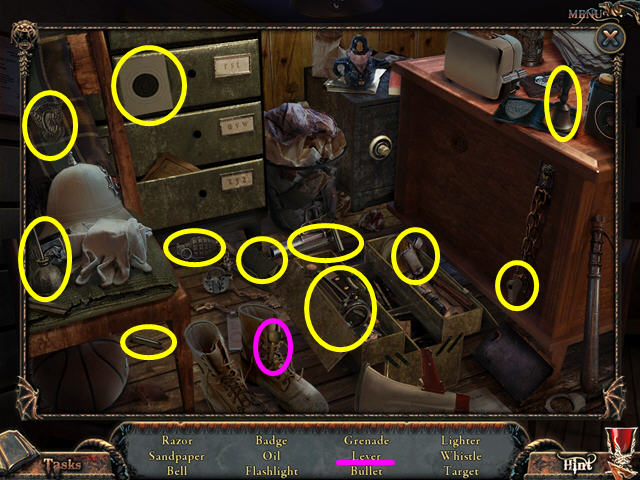
- Locate all the items on the list.
- You will earn the LEVER.
- Walk down to exit the Police Station.
- Walk forward to the dock area.
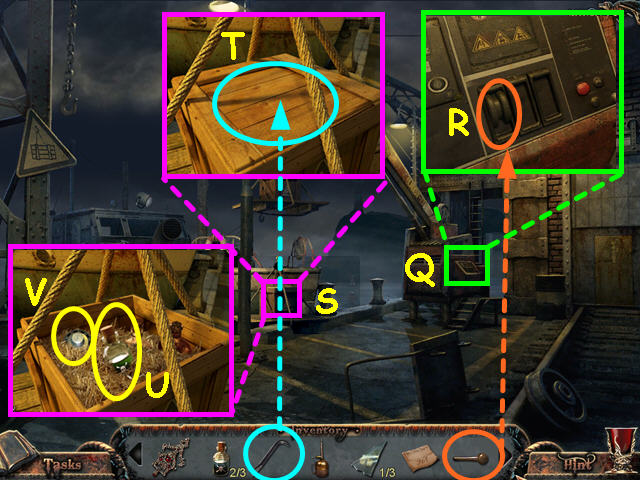
- Look at the close-up of the crane (Q).
- Use the LEVER on the controls (R).
- Click on the lever to lower to cargo.
- Look at the close-up of the cargo (S).
- Use the CROWBAR to open the box (T).
- Take the CHEMICAL (U).
- Take the LOCK (V).
- Walk down, and then enter the Police Station.
- Enter the Photolab door.
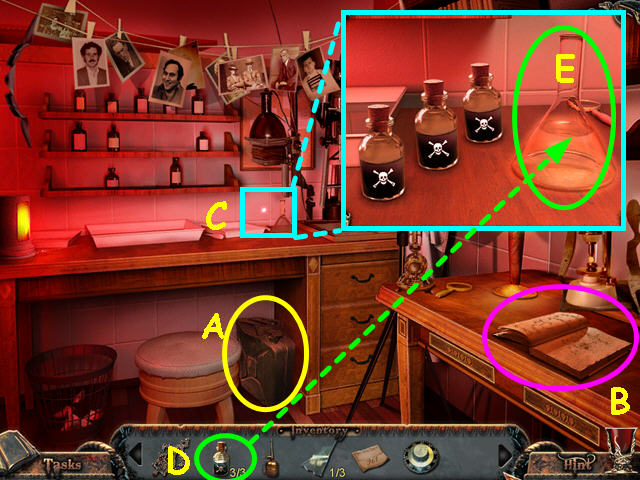
- Take the gas CAN (A).
- Read the instructions (B).
- Look at the close-up of the table (C).
- Pour the 3 CHEMICALS into the glass flask (D).
- Take the ACID (E).
- Walk down to exit the Photolab.
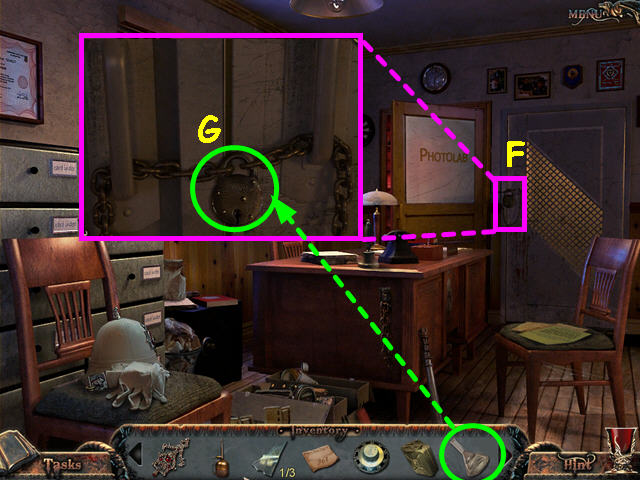
- Look at the close-up of the door on the right (F).
- Use the ACID on the lock (G).
- Enter the right door.
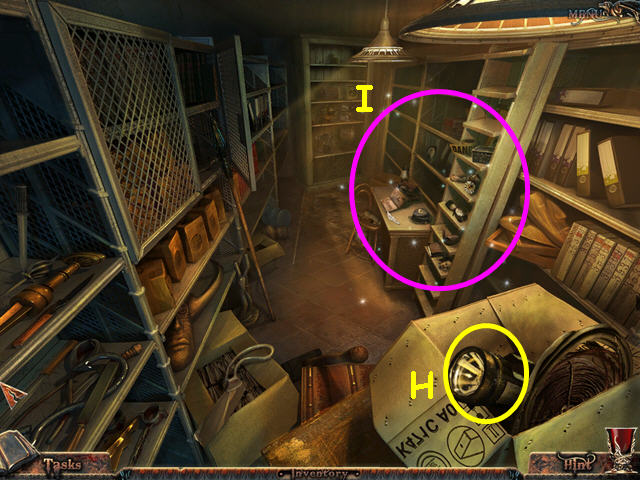
- Take the UV FLASHLIGHT (H).
- Select the desk area on the right for a Hidden Object Scene (I).
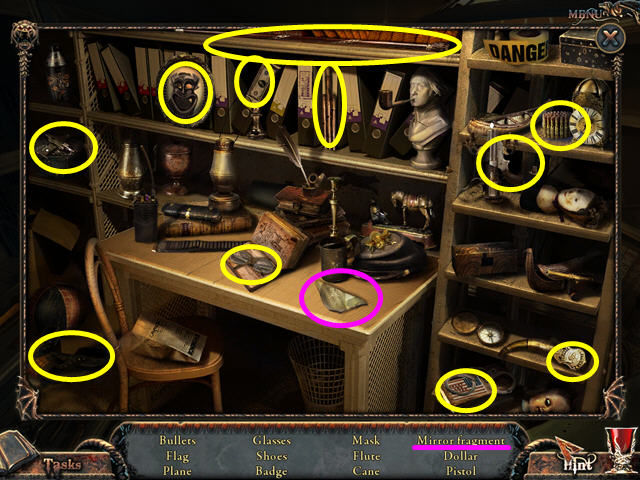
- Locate all the items on the list.
- You will earn the MIRROR FRAGMENT.
- Walk down 3 times, and then enter the hotel on the right.
- Enter the door behind the hotel's front desk.
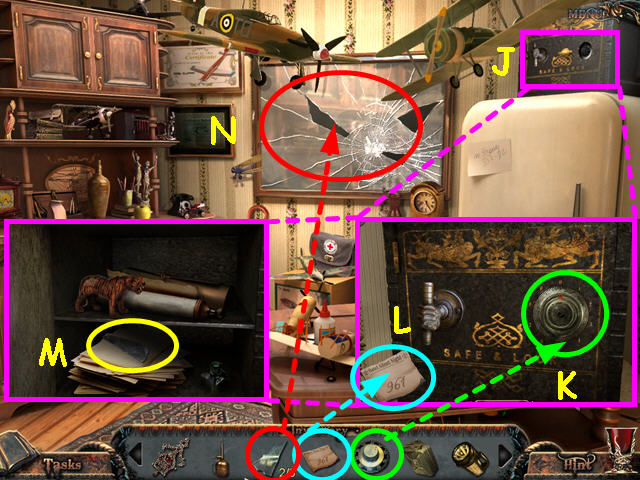
- Look at the close-up of the safe (J).
- Place the LOCK into the right circle (K).
- Use the CODE on the safe (L).
- Left-click, hold and drag the red arrow of the safe dial counter-clockwise to 9 and release.
- Continue counter-clockwise, stopping at 6 and then 1 to open the safe.
- Take the MIRROR FRAGMENT (M).
- Place the 3 MIRROR FRAGMENTS into the mirror (N).
- Select the mirror to travel to the world of the dead.
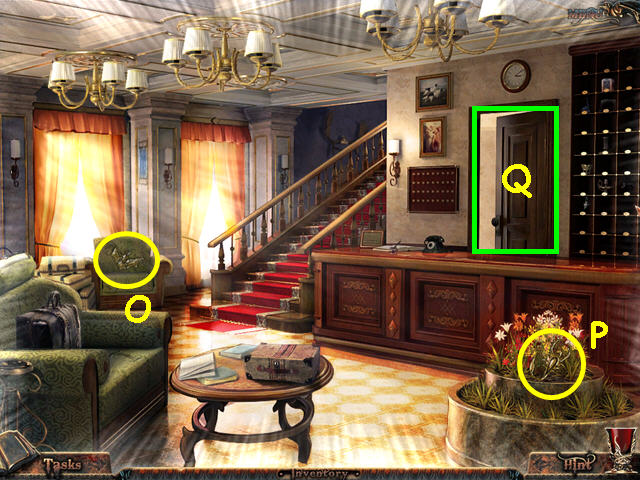
- Take the BAT SYMBOL (O).
- Take the SCORPION SYMBOL (P).
- Enter the door behind the hotel front desk (Q).
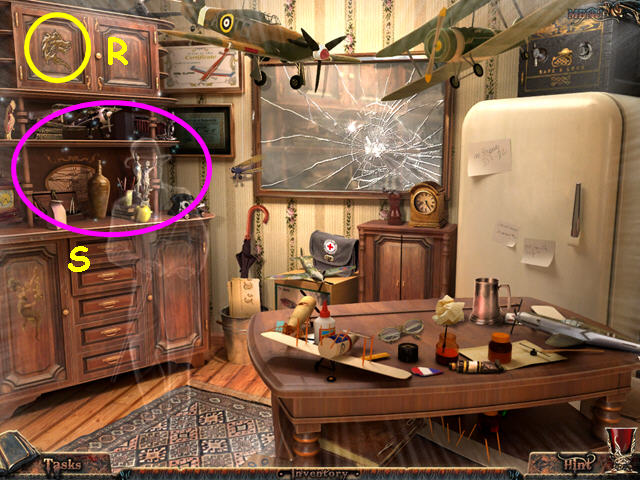
- Take the WOLF SYMBOL (R).
- Select the area below the symbol for a Hidden Object Scene (S).
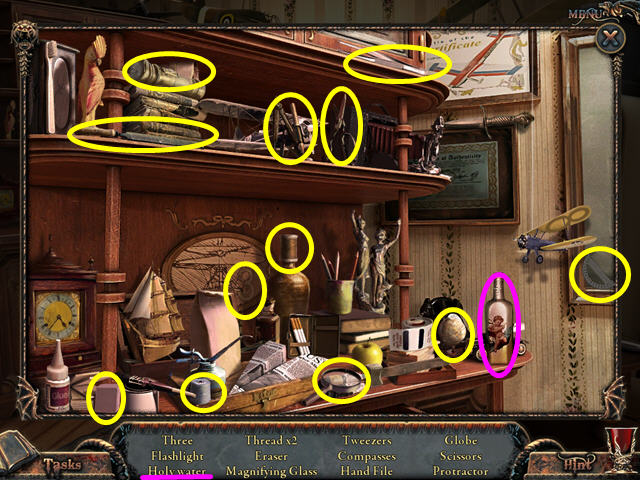
- Locate all the items on the list.
- You will earn the HOLY WATER.
- Walk down to exit the room.
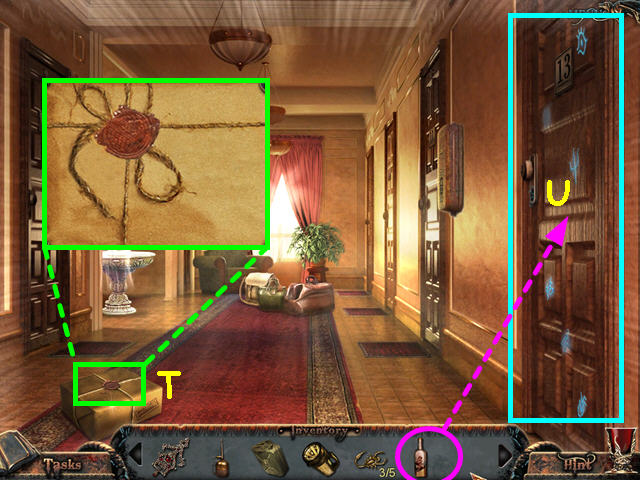
- Look at the package on the floor to learn you need a knife (T).
- Use the HOLY WATER on the door with the symbols (U).
- Enter the room on the right.
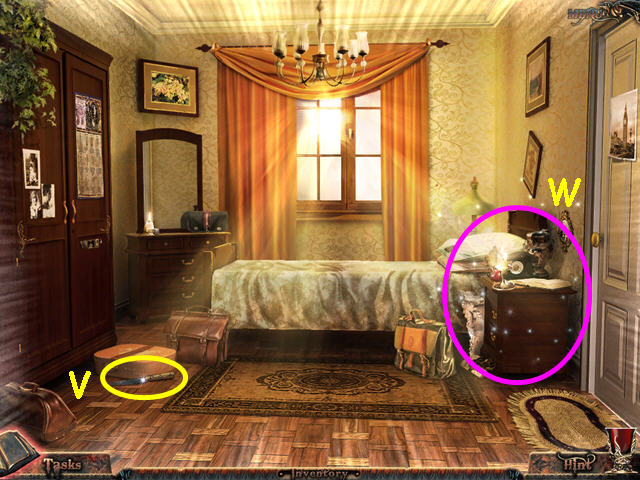
- Take the KNIFE (V).
- Look at the nightstand for a Hidden Object Scene (W).
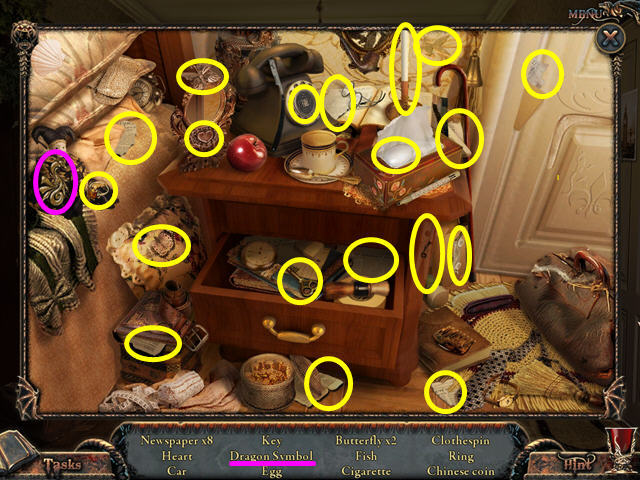
- Locate all the items on the list.
- You will earn a DRAGON SYMBOL.
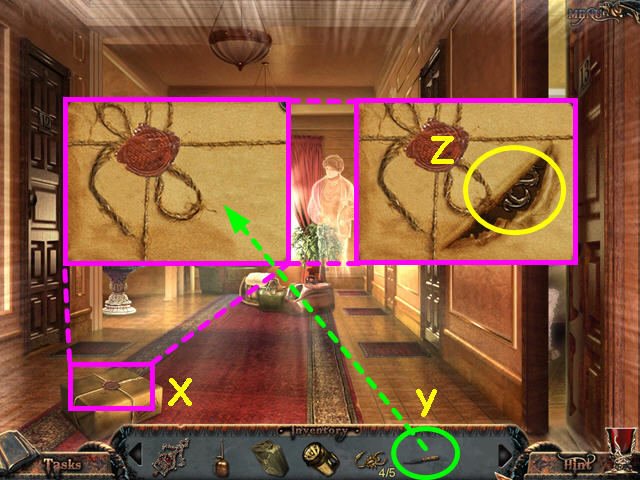
- Look at the close-up of the package (X).
- Use the KNIFE on the package (Y).
- Take the SYMBOL (Z).
- Walk down to return to the lobby.
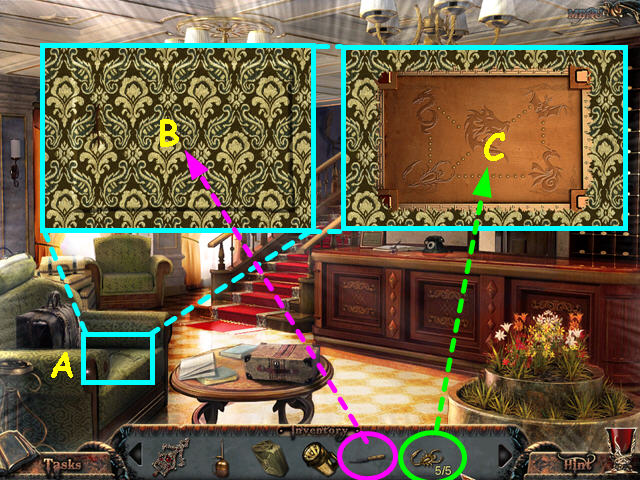
- Look at the close-up of the chair (A).
- Use the KNIFE on the fabric (B).
- Place the 5 symbols on the design for a mini-game to activate (C).
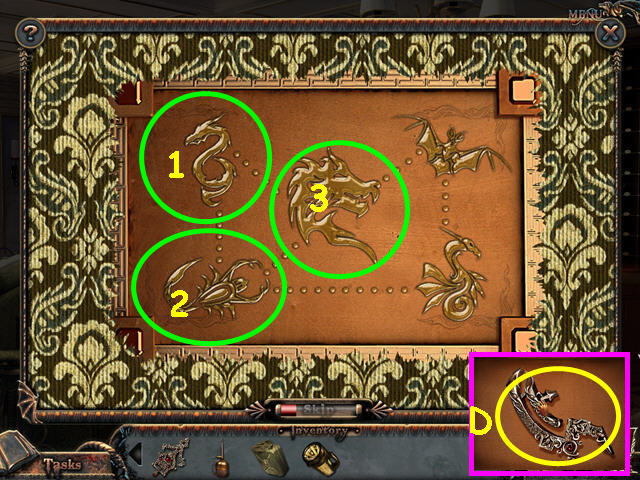
- The object of this mini-game is to push all the symbols into the wood.
- Pushing a symbol will affect other symbols.
- Push the symbols in numerical order (1-3).
- Take the PART of the AMULET (D).
- Enter the door behind the hotel front desk.
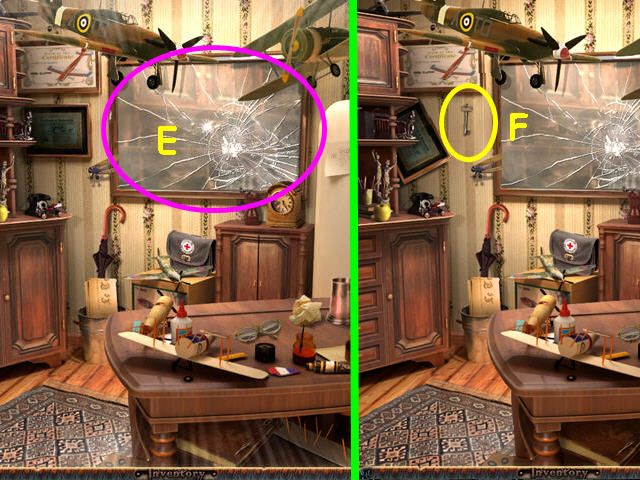
- Enter the mirror to return to the world of the living (E).
- Take the KEY that was under the picture (F).
- Walk down twice to exit the hotel.
- Walk forward twice to return to the dock area.
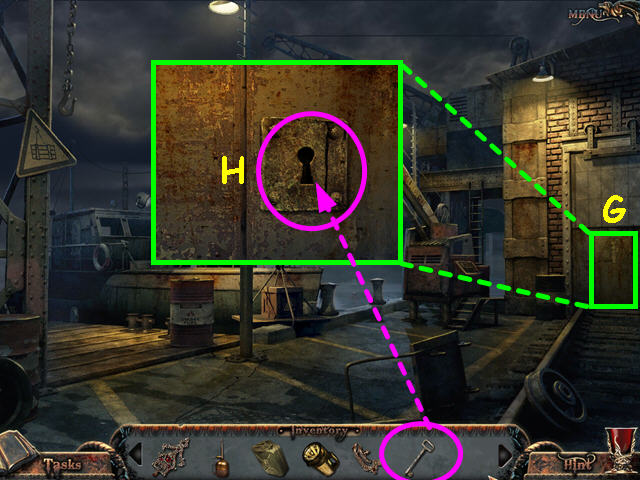
- Look at the close-up of the warehouse door (G).
- Use the KEY on the lock (H).
- Enter the warehouse.
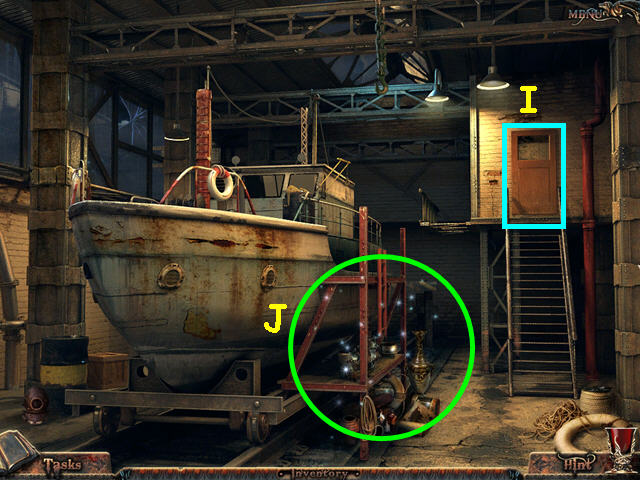
- Note the door to the office (I).
- Select the scaffolding for a Hidden Object Scene (J).
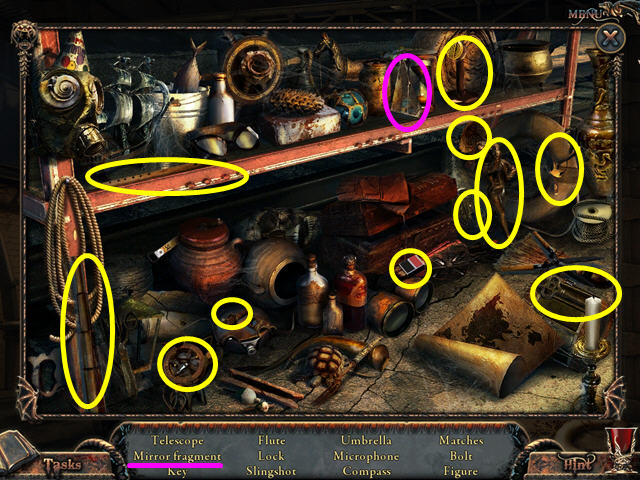
- Locate all the items on the list.
- You will earn the MIRROR FRAGMENT.
- Enter the office.
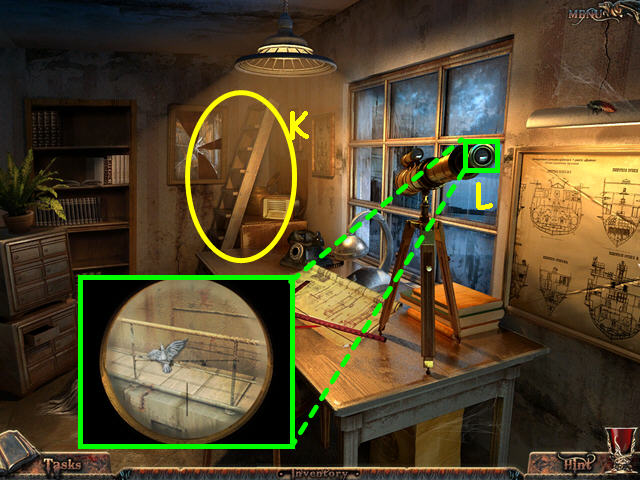
- Take the LADDER (K).
- Look through the telescope to see the item on the deck (L).
- Walk down to exit the office.
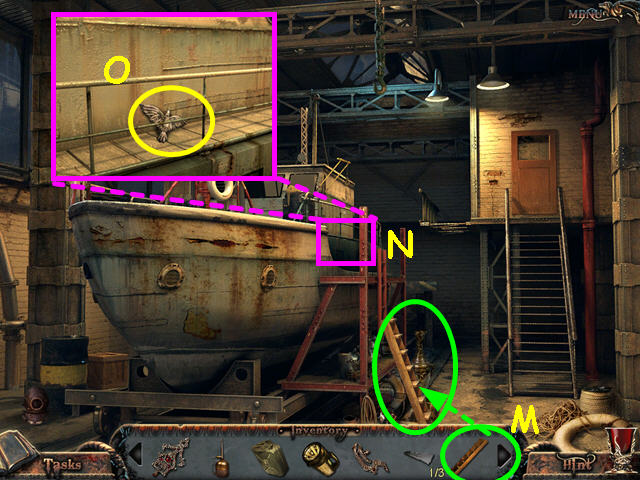
- Use the LADDER against the side of the boat (M).
- Look at the close-up of the deck (N).
- Take the CROW (O).
- Walk down twice to return to the fountain area.
- Walk left to the cemetery gate.
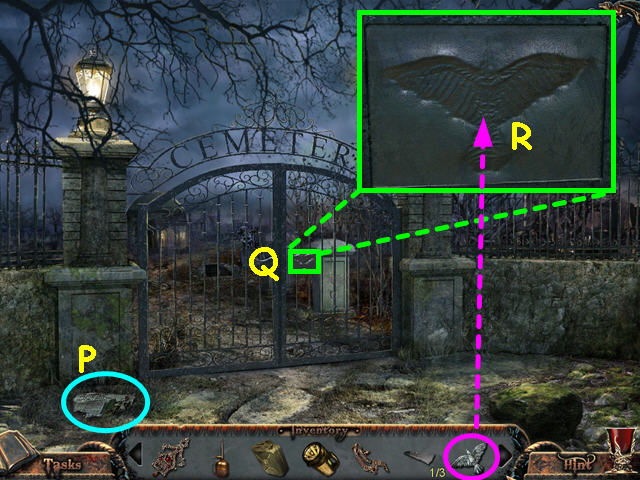
- Read the newspaper scrap (P).
- Look at the close-up of the gate (Q).
- Use the CROW on the plaque (R).
- Enter the cemetery.
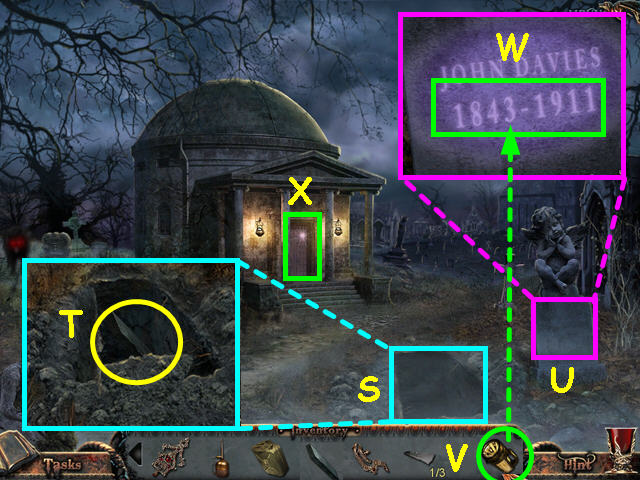
- Look inside the open grave (S); take the BOARD (T).
- Look at the close-up of the tombstone (U); use the UV FLASHLIGHT on the tombstone (V).
- Make note of the dates (W).
- Select the door to the mausoleum for a mini-game to appear (X).
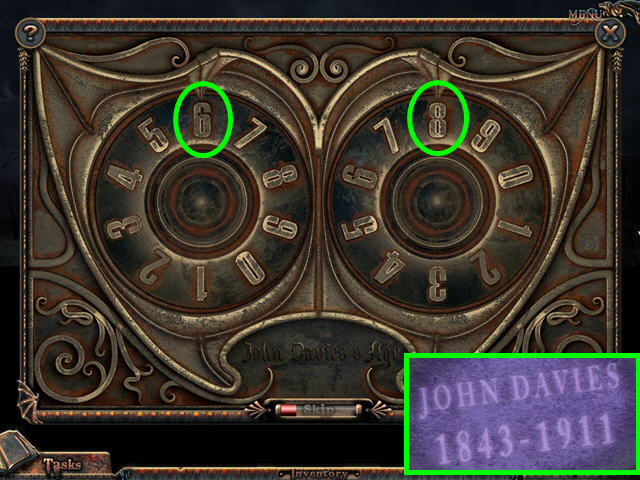
- Enter the age of John Davies onto the two dials.
- You can refer to your journal for the birth and death dates.
- Click on a dial to rotate it into position.
- Enter 6 on the left dial and 8 on the right dial.
- Walk down twice to return to the fountain area.
- Walk forward to the docks.
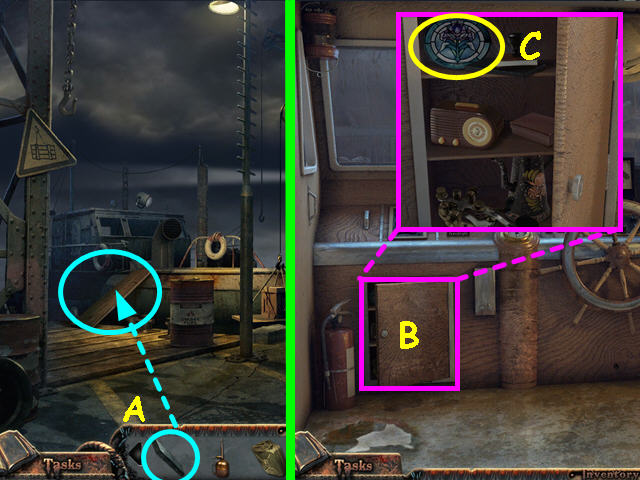
- Use the BOARD on the side of the boat (A).
- Enter the boat.
- Look at the cupboard (B).
- Take the FRESCO (C).
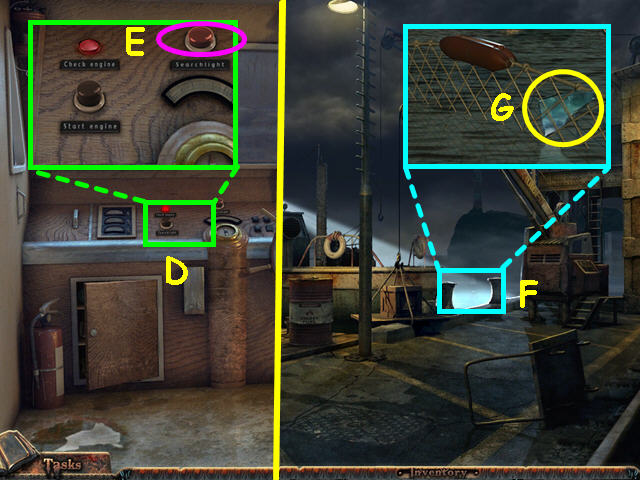
- Look at the control panel (D).
- Turn on the searchlight (E).
- Walk down to exit the boat.
- Look where the searchlight is pointing (F).
- Take the MIRROR FRAGMENT (G).
- Walk down to the fountain area, and then walk to the left.
- Enter the cemetery, and then enter the mausoleum.
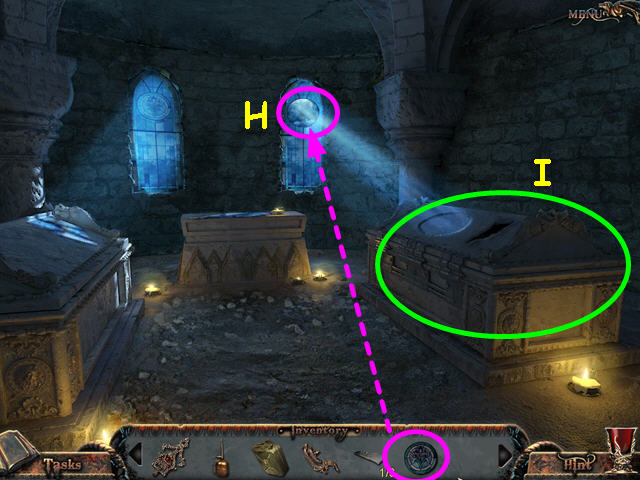
- Place the FRESCO into the window (H).
- Select the sarcophagus for a Hidden Object Scene to appear (I).
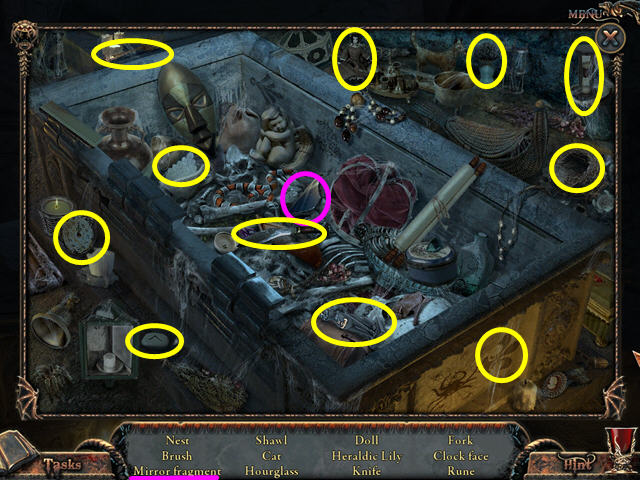
- Locate all the items on the list.
- You will earn a MIRROR FRAGMENT.
- Walk down 3 times to return to the fountain area.
- Walk forward to the docks, and then enter the warehouse on the right.
- Enter the office.
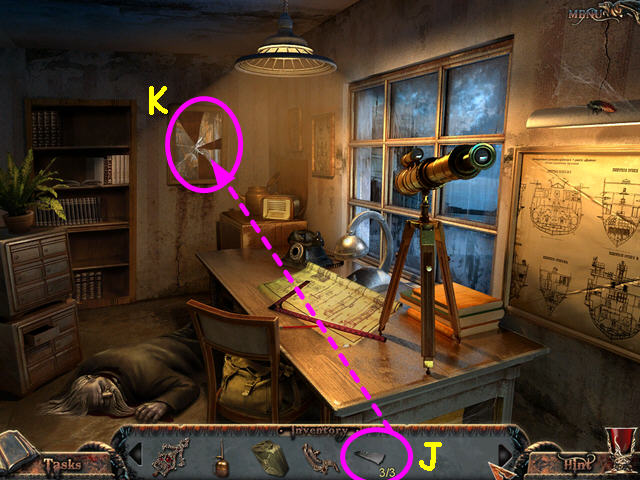
- Place the 3 MIRROR FRAGMENTS into the mirror (J).
- Click on the mirror to enter the world of the dead (K).
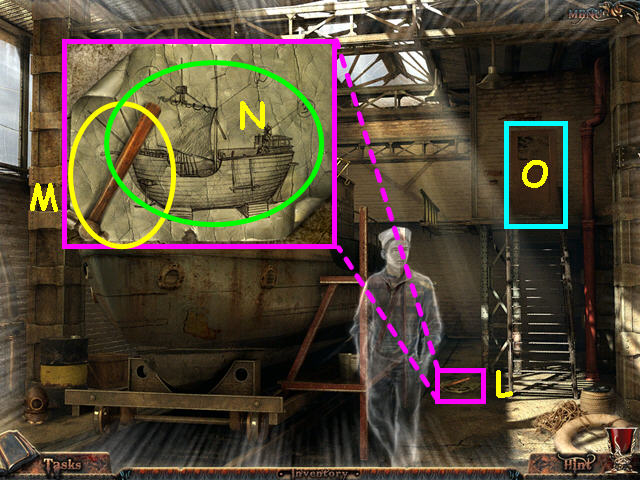
- Look at the area on the floor (L).
- Take the HAMMER (M).
- Read the plans (N).
- Enter the office (O).
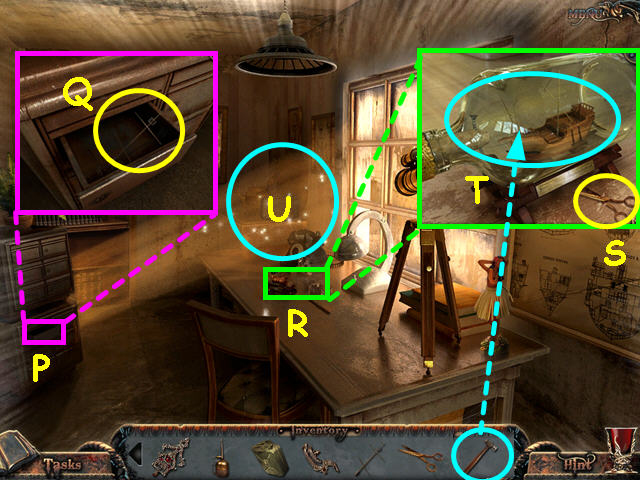
- Look at the close-up of the drawers (P); take the MAST (Q).
- Look at the close-up of the table (R); take the SCISSORS (S).
- Use the HAMMER to break the bottle (T).
- Select the back corner for a Hidden Object Scene (U).
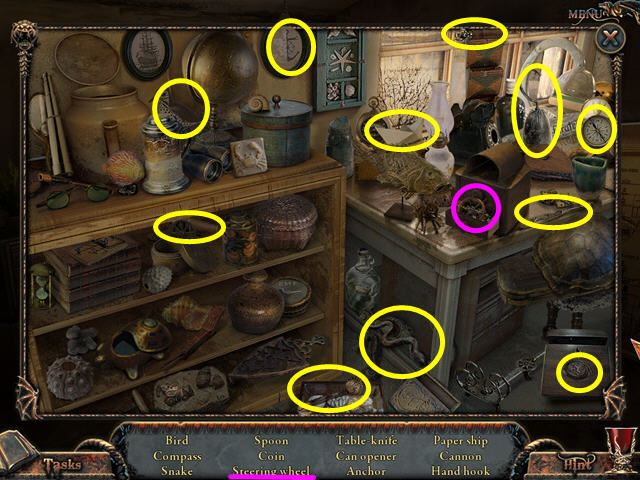
- Locate all the items on the list.
- You will earn the STEERING WHEEL.
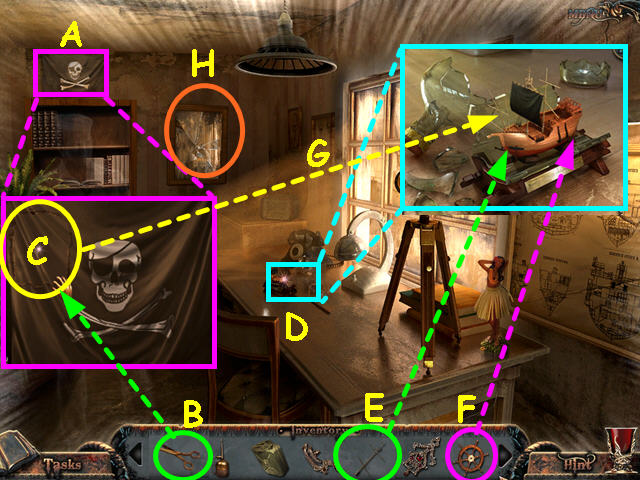
- Look at the pirate flag (A; use the SCISSORS on the flag (B) and take the SAIL (C).
- Look at the close-up of the ship (D); use the MAST on the ship (E).
- Use the STERING WHEEL on the ship (F).
- Use the SAIL on the ship (G).
- You will be given the third amulet piece and it will combine with the others to make the AMULET.
- Select the mirror to return to the world of the living (H).
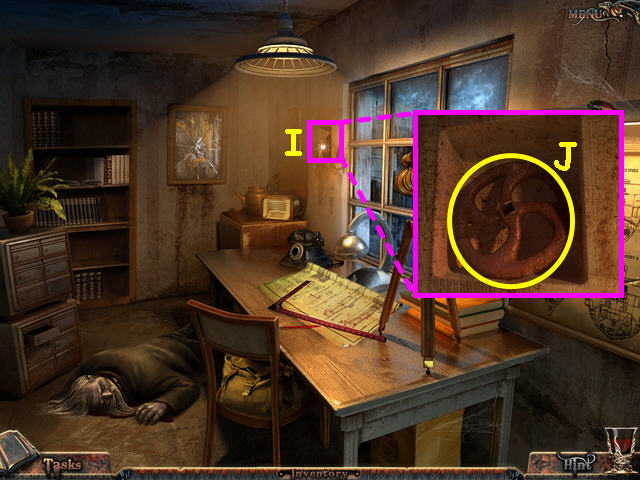
- Look at the hidden compartment (I).
- Take the VALVE (J).
- Walk down twice, and then enter the boat.
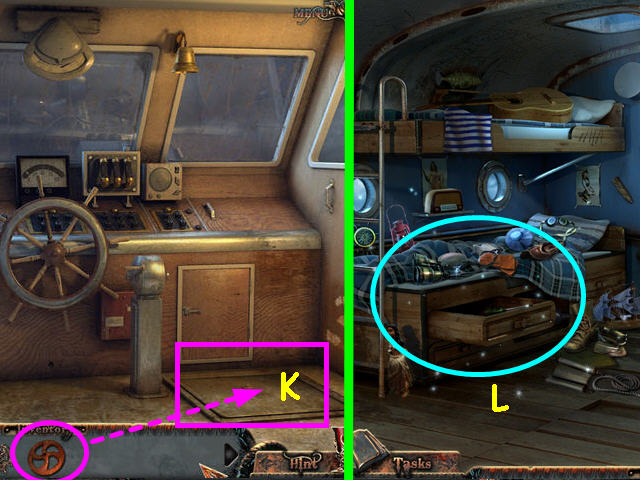
- Use the VALVE on the hatch (K).
- Enter the hatch.
- Select the cot for a Hidden Object Scene to appear (L).
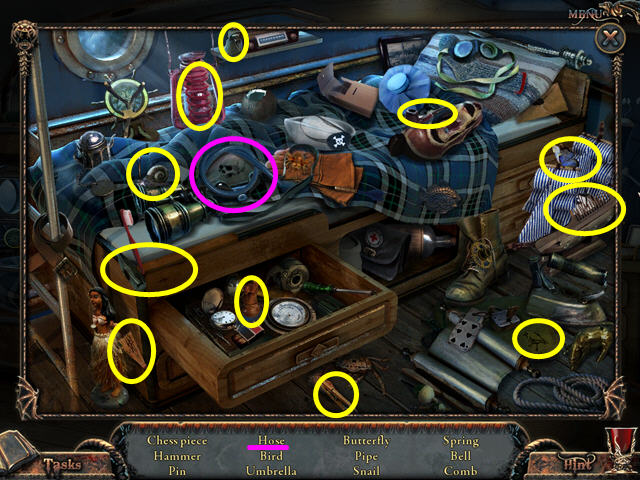
- Locate all the items on the list.
- You will earn the HOSE.
- Walk down twice to return to the dock area.
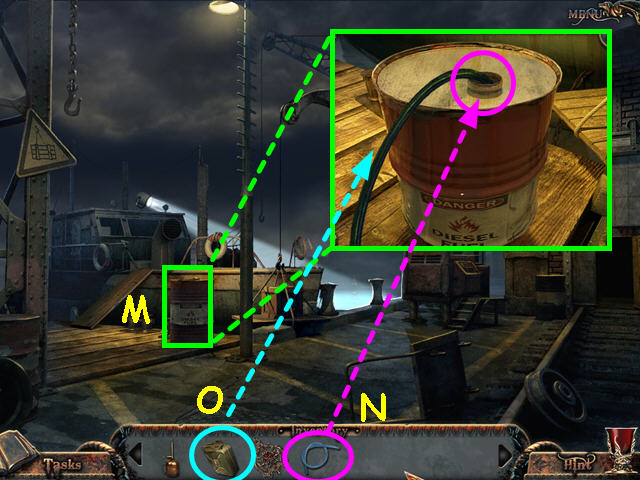
- Look at the close-up of the fuel barrel (M); use the HOSE on the barrel (N).
- Use the CAN on the barrel to get the FULL CAN (O).
- Enter the boat, and then go down the hatch.
- Once inside the cabin, walk forward through the metal door to the engine room.
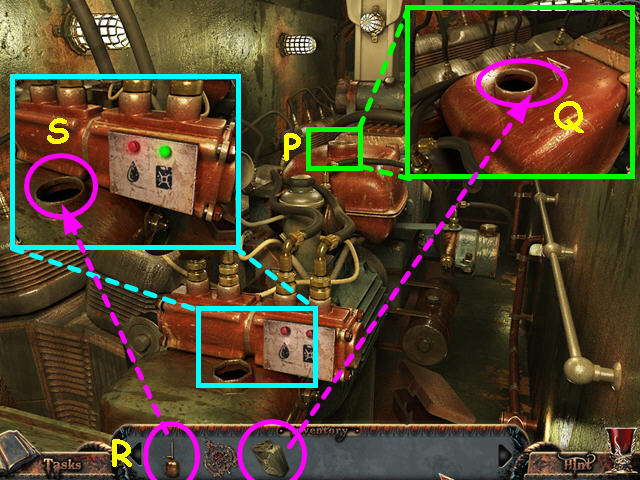
- Look at the close-up of the fuel tank (P); use the FULL CAN on the tank (Q).
- Look at the close-up of the oil tank (R).
- Use the OIL CAN on the tank (S).
- Walk down twice to return to the wheelhouse of the ship.
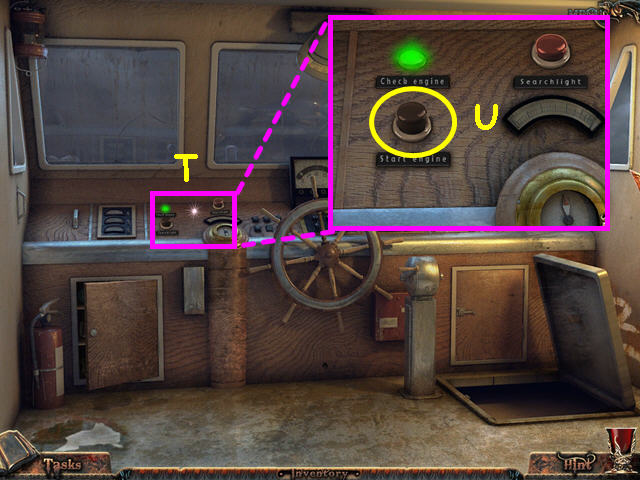
- Look at the close-up of the control panel (T).
- Push the 'Start Engine' button (U).
Chapter 3: Island Cursed
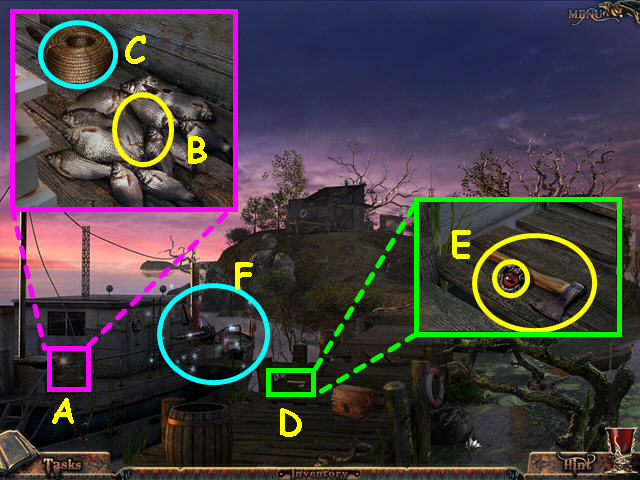
- Look at the close-up of the deck (A); take a FISH (B).
- Note the rope (C).
- Exit the close-up of the deck.
- Look at the dock (D); take the HEXAGON and the AXE (E).
- Select the bow area of the boat for a Hidden Object Scene (F).
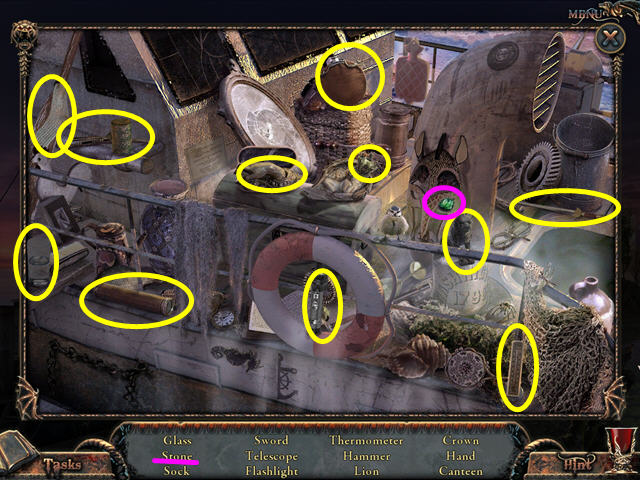
- Locate all the items on the list.
- You will earn the GREEN STONE.
- Walk forward to the island.
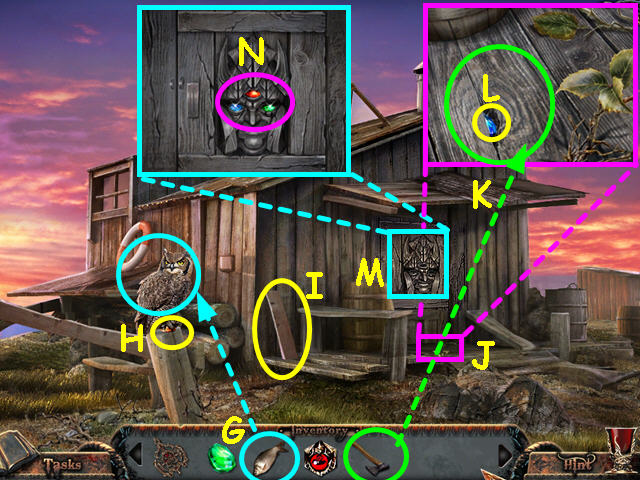
- Give the FISH to the owl (G).
- Take the ORANGE STONE the owl was guarding (H).
- Take the BOARD (I).
- Look at the close-up of the porch floor (J); use the AXE on the hole (K).
- Take the BLUE STONE (L).
- Look at the close-up of the face on the door (M); place the 3 colored STONES into the face (N).
- Enter the shack.
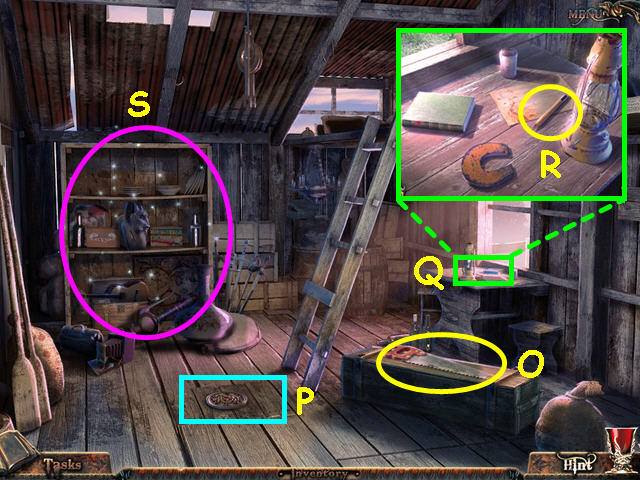
- Take the saw (O).
- Note the hatch on the floor (P).
- Look at the close-up of the table (Q).
- Take the PENCIL (R).
- Select the shelves for a Hidden Object Scene to appear (S).
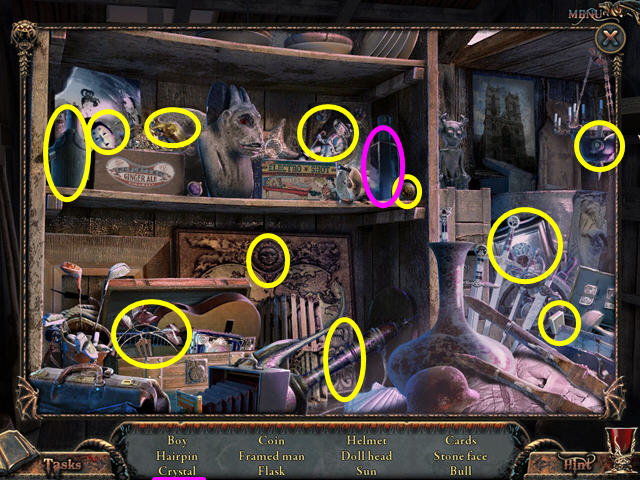
- Locate all the items on the list.
- You will earn the CRYSTAL.
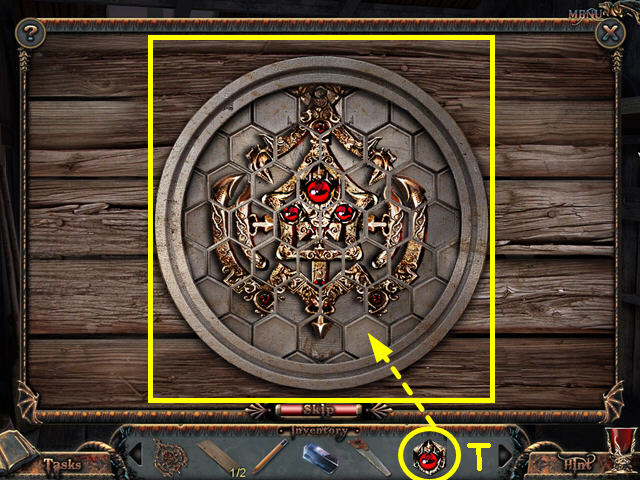
- Look at the hatch on the floor.
- Place the HEXAGON into the grid to activate the mini-game (T).
- The object is to restore the picture.
- Click on each hexagon to rotate it into position as shown in the screenshot.
- Walk down to exit the shack.
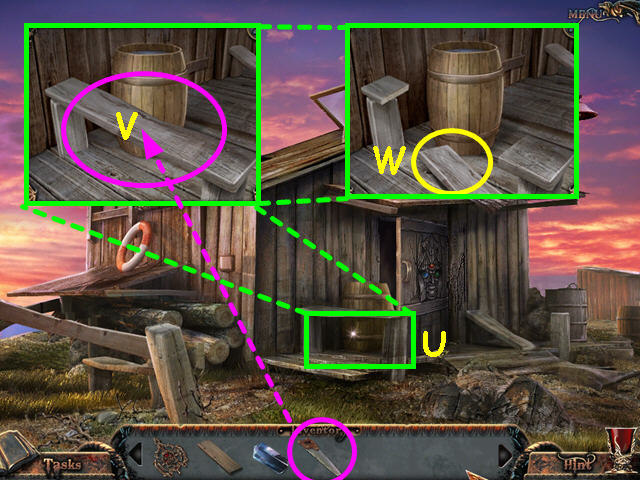
- Look at the bench on the porch (U).
- Use the SAW on the bench (V).
- Take the BOARD (W).
- Enter the shack, and then go down the hatch.
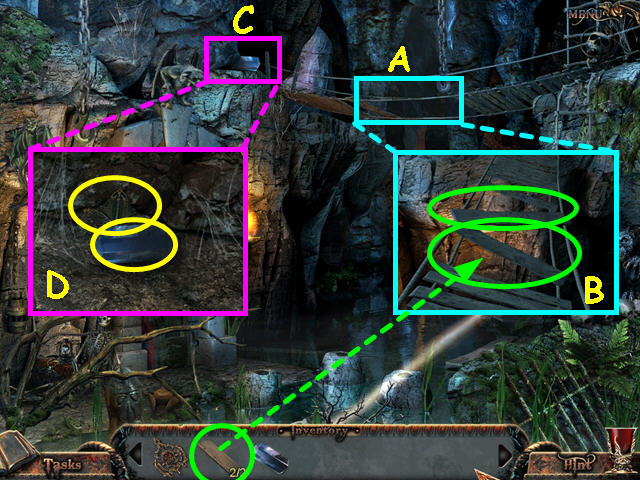
- Look at the gap in the bridge (A).
- Place the 2 boards onto the gap in the bridge (B).
- Look at the area at the left end of the bridge (C).
- Take the CRYSTAL and the BUTTERFLY (D).
- Walk down 3 times to return to the dock.
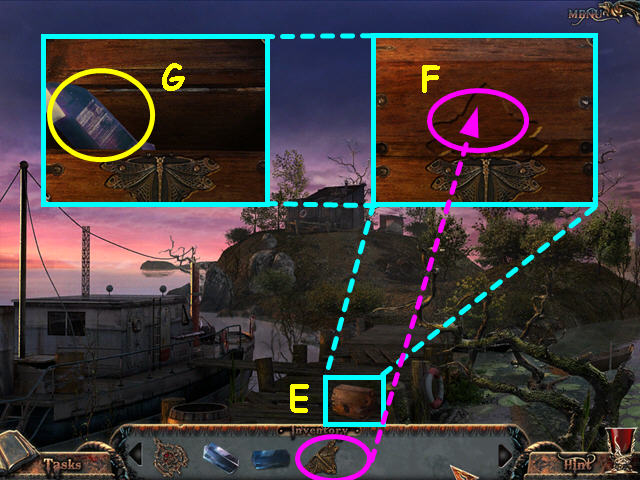
- Look at the wooden box on the dock (E).
- Place the BUTTERFLY on the box (F).
- Take the CRYSTAL (G).
- Walk forward twice to enter the shack, and then enter the hatch on the floor.
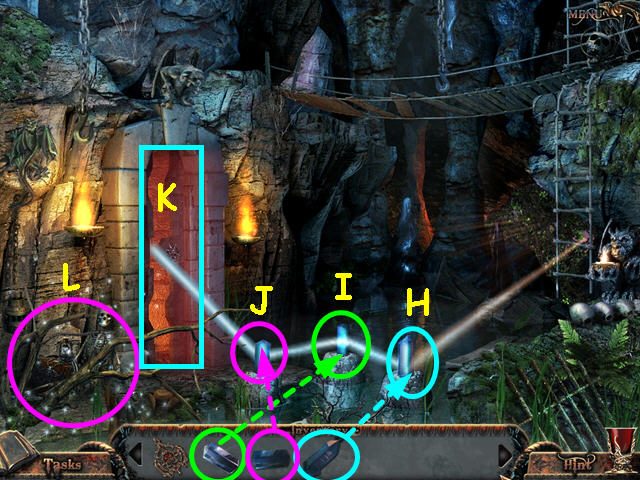
- Place the CRYSTAL from the wooden box into the right hollow (H).
- Place the CRYSTAL from the Hidden Object Scene into the center hollow (I).
- Place the CRYSTAL from the end of the bridge into the left hollow (J).
- Note the crypt door is now open (K).
- Select the area by the skeleton for a Hidden Object Scene to appear (L).
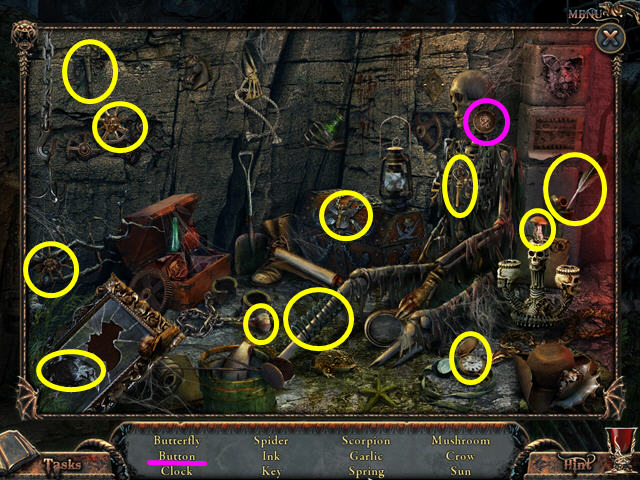
- Locate all the items on the list.
- You will earn the BUTTON.
- Enter the crypt.
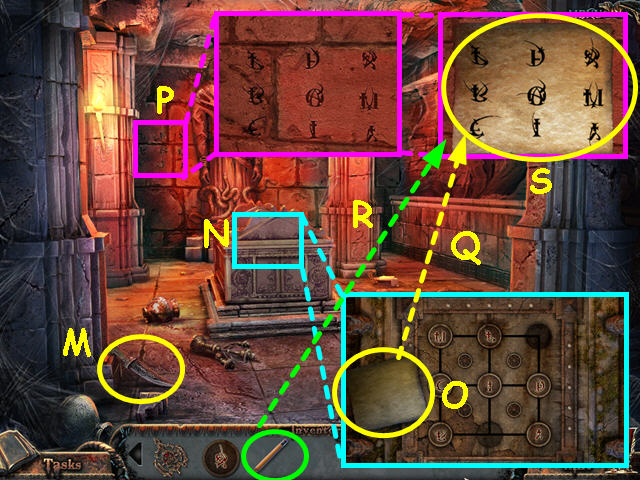
- Take the KNIFE (M).
- Look at the sarcophagus (N).
- Take the paper (O).
- You are missing a piece, so exit the mini-game.
- Look at the back wall (P); place the paper over the symbols (Q).
- Use the PENCIL on the paper 3 times (R).
- Take the PAPER SIGNS (S).
- Walk down 4 times to return to the dock.
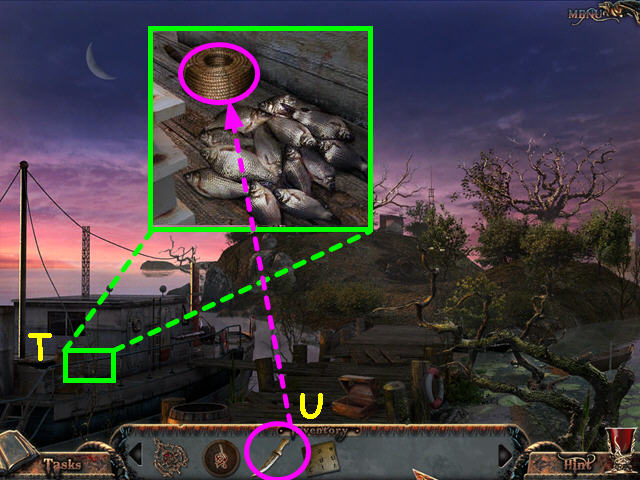
- Look at the close-up of the boat (T); use the KNIFE on the coil of rope (U).
- Walk forward twice to enter the shack.
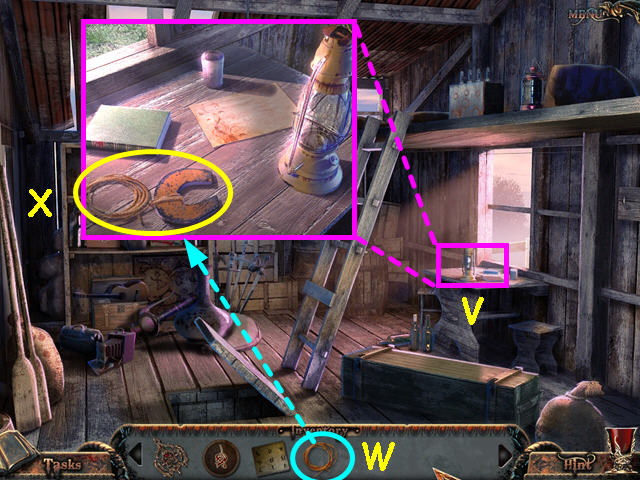
- Look at the close-up of the table (V).
- Use the ROPE on the magnet (W).
- Take the MAGNET ROPE (X).
- Enter the hatch on the floor, and then enter the crypt.
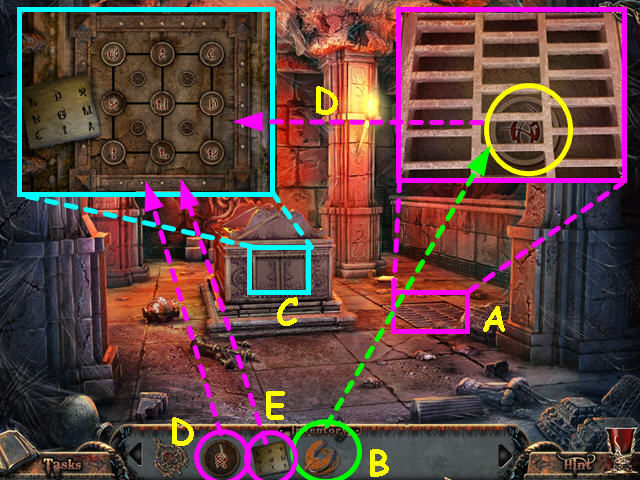
- Look at the floor grating (A).
- Use the MAGNET ROPE to get the BUTTON (B).
- Look at the sarcophagus (C).
- Place both BUTTONS into the grid (D).
- Place the PAPER SIGNS onto the grid to trigger a mini-game (E).
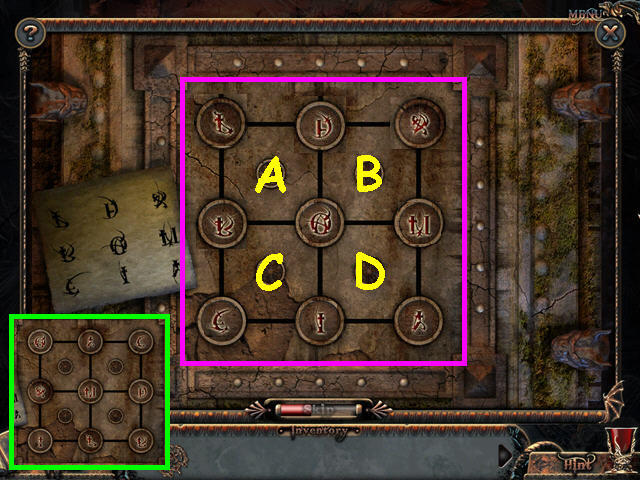
- The object of this mini-game is to move the buttons so that the symbols match the paper.
- Click on the 4 controls to rotate 4 of the buttons.
- This mini-game is randomized- your solution may vary.
- Our starting position is shown in the bottom, left corner.
- Lettering the controls A-D, press the following to solve the puzzle: Cx1, Bx2, Dx1, Cx1, Bx1, Ax1, Bx3, Cx3, Dx2, Cx1, Dx3, and Cx3.
- Check out our RANDOM video solution!
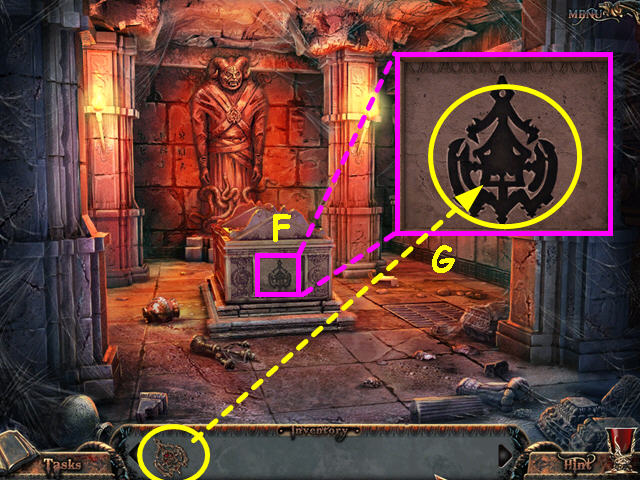
- Look at the end of the sarcophagus (F).
- Use the AMULET in the indentation (G).
- Congratulations! You have completed Shades of Death: Royal Blood!
Created at: 2011-03-19

