

Walkthrough Menu
- General Tips
- Chapter 1 – Small Island
- Chapter 2 – Southern-Coast of the Island
- Chapter 3 – Central Part of the Island
- Chapter 4 – Northern Coast of the Island
General Tips
- This is an Interactive Fragmented Hidden Object Game.
- Click on Options for Sound Effects, Music, Ambient Audio, Screen Resolution, Fullscreen, Wide Screen and Windows Cursor settings.
- When starting a new game you can choose between Casual or Expert mode.
- In Casual Mode the places of interest have a glint and you get hint recharges in a minute.
- In Expert Mode, there is no glint in areas of interest and you get a hint recharge in 2 minutes.
- You will have the option of a tutorial after the introduction.
- Move your cursor around each scene to find interactive areas by watching the cursor change.
- The cursor will change to an eye when you can look closer at something.
- Skipping the puzzles will add 30 minutes to your total game time.
- There are 56 “Beyond” morphing objects hidden in the game; the items are all marked in green throughout the walkthrough.
- There are notes hidden throughout the game that give you clues or journal updates; these are marked in orange in the walkthrough.
- Your cursor will change to a hand if you place it over a Beyond item or any other item you need to collect that is not a fragment piece.
- The cursor will change to a gear if you can use an item there.
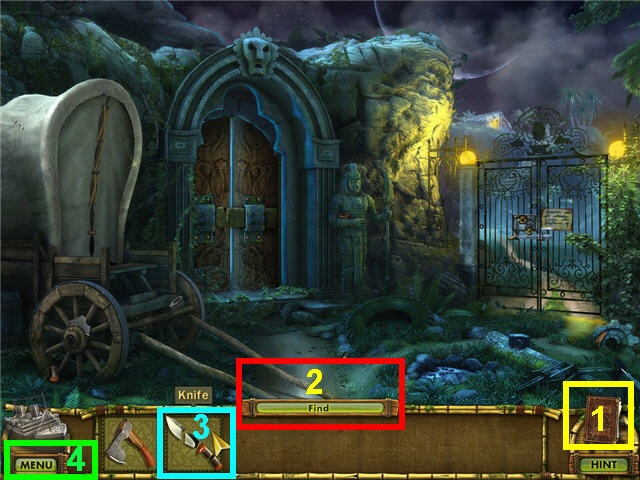
- Click on the book (1) in the lower right to access your journal and map.
- The Map tab will show you your current location, locations still to be unlocked and if the unlocked locations have any current tasks available.
- The Journal will house all the notes collected and contains story updates.
- Click on the words Use/Find on the bottom inventory bar to toggle between the items to find and the items that are already assembled that are available for use.
- Assembled items in the Find bar will automatically be moved to the Use bar.
- A piece that requires you to do an extra action to find it will glow in red in the find bar.
- Click on the X in the corners of the pop-up boxes or anywhere outside the box to close them.
- To see the shape of the pieces to be found, hover your cursor over the item to be assembled and they will separate to show you the pieces (3).
- To exit, click on Menu (4) in the lower left and then click on exit to main menu.
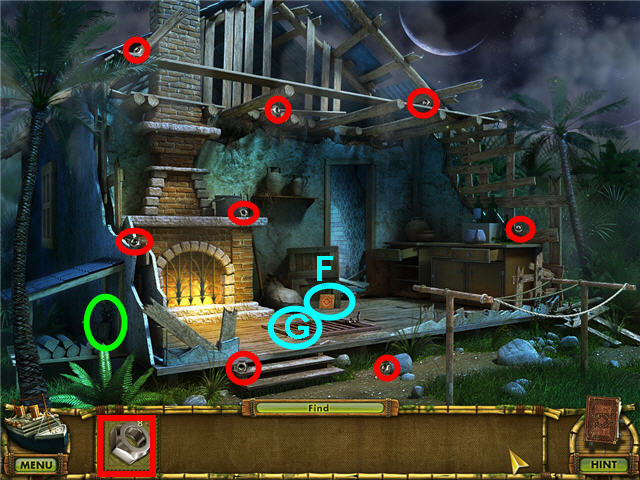
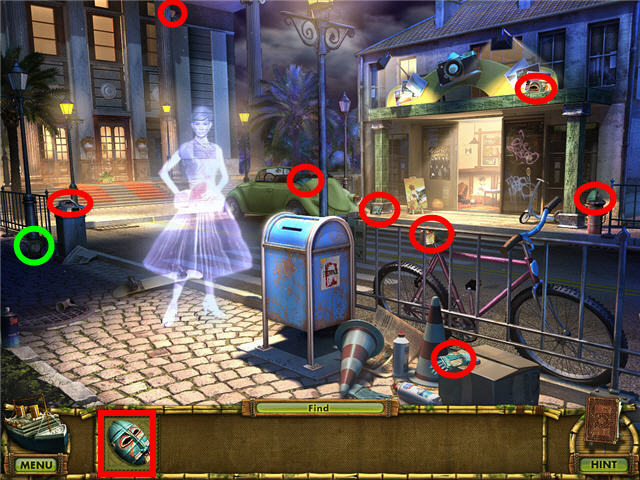
Chapter 1 – Small Island
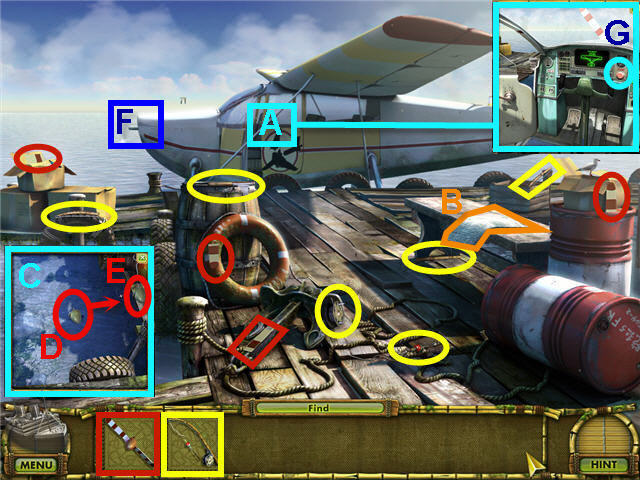
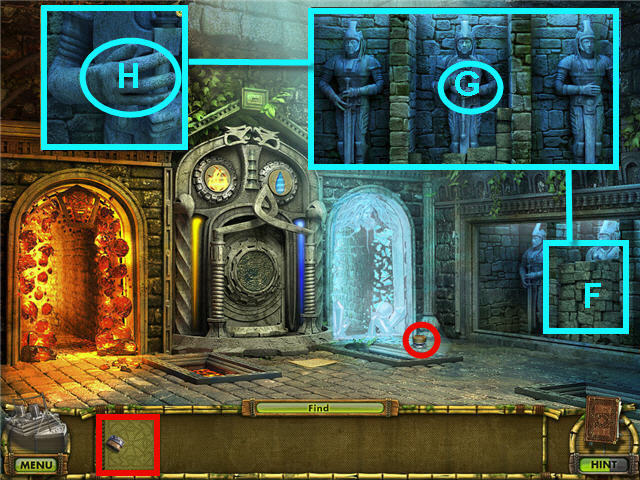
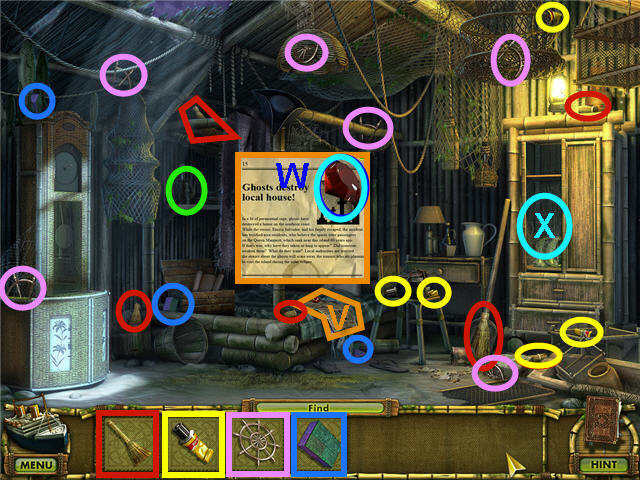
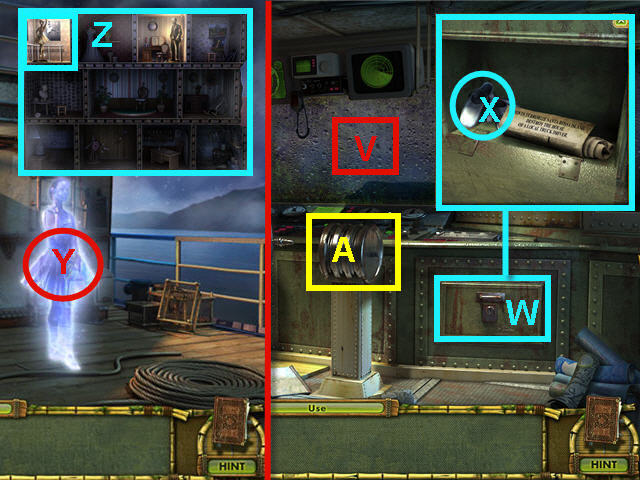
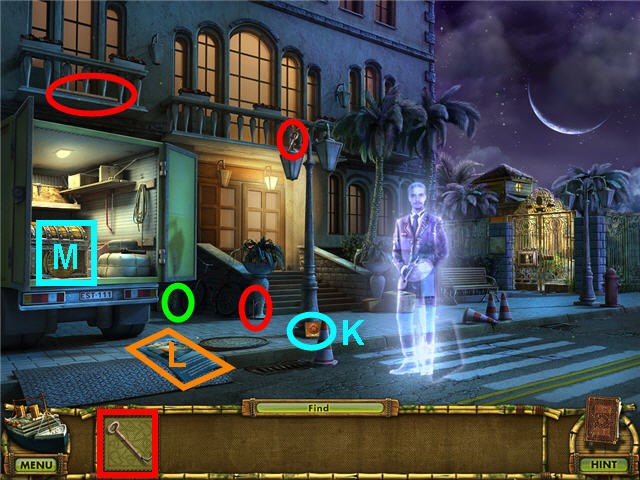
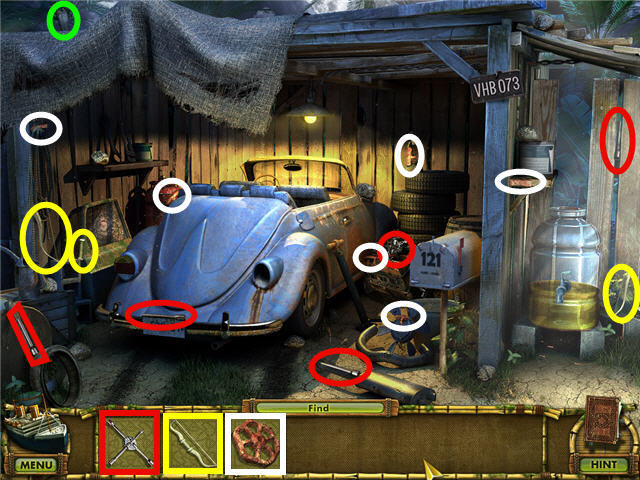
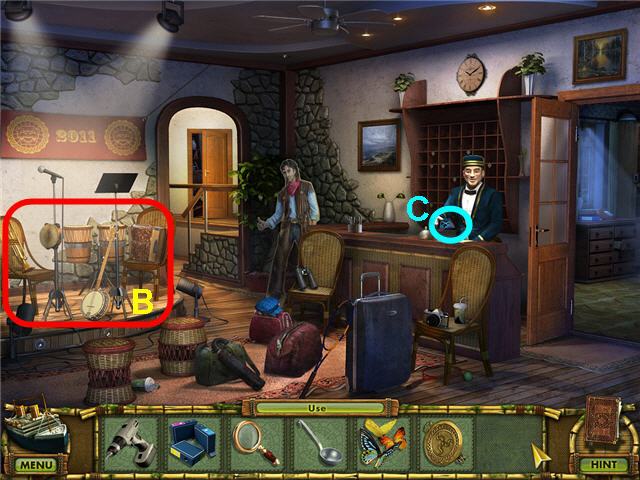
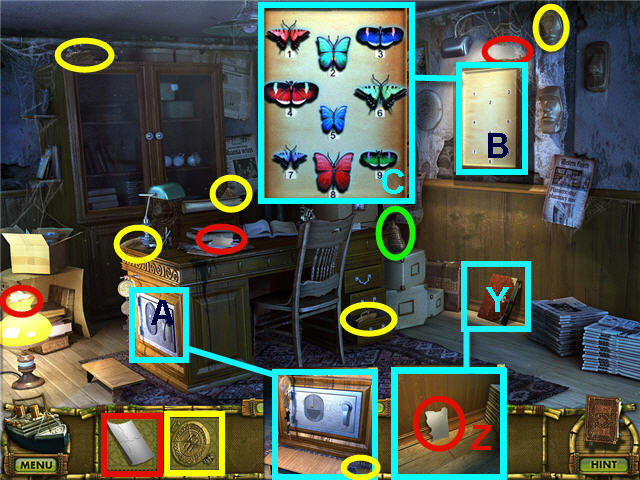
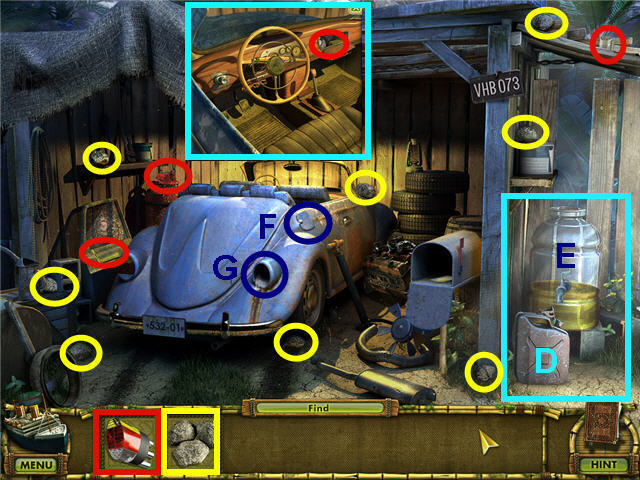
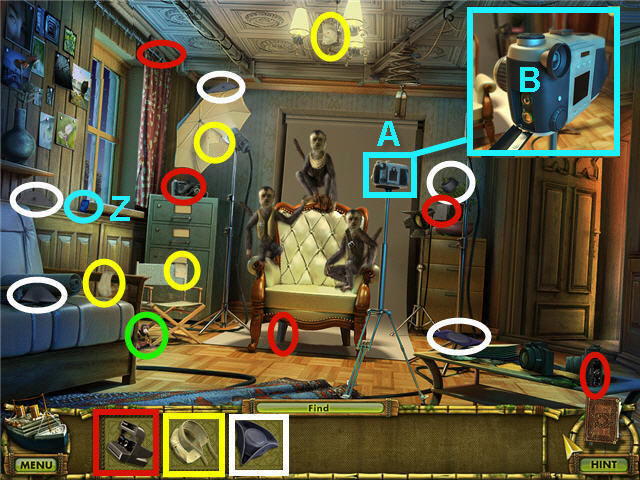
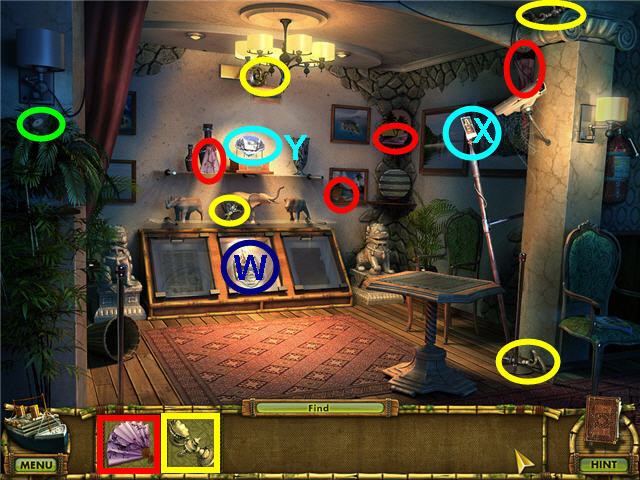
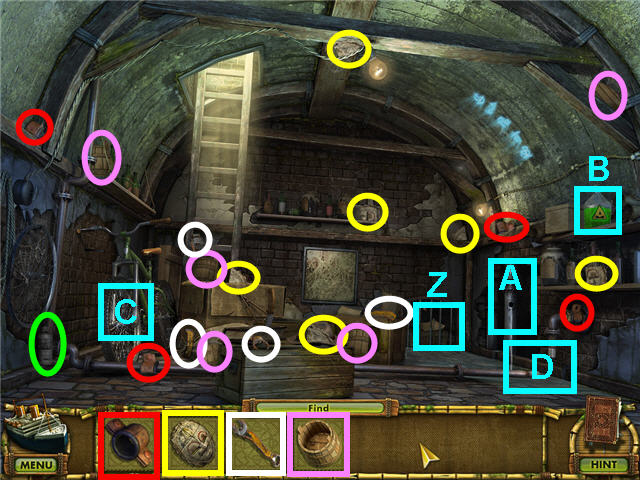
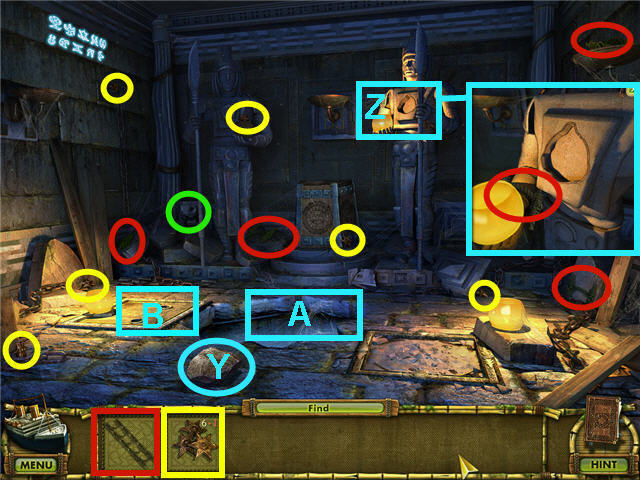
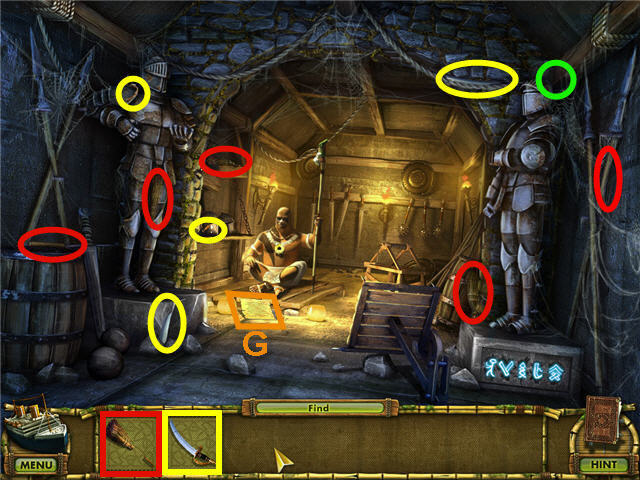
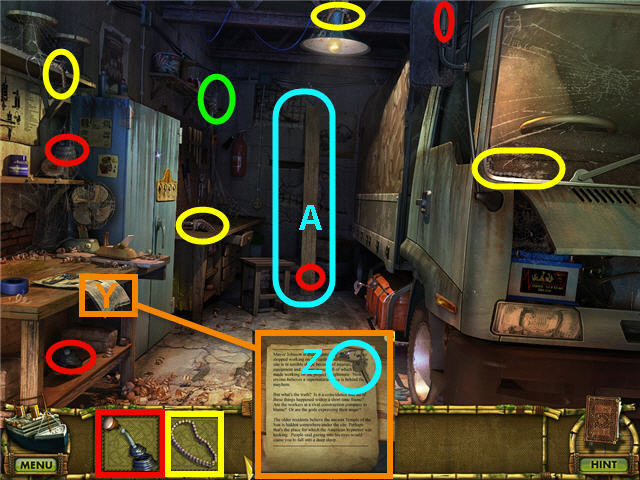
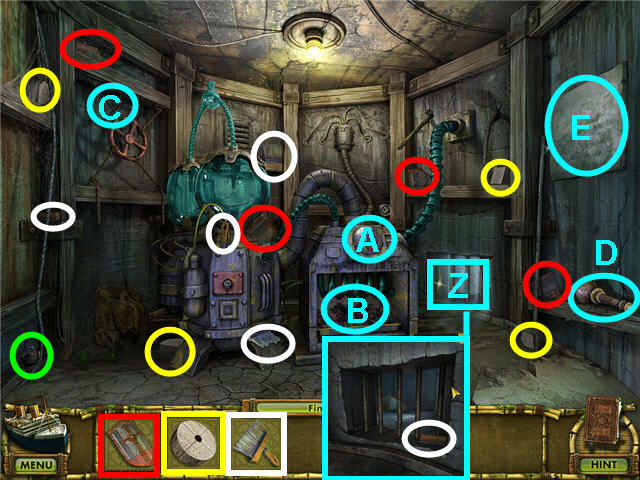
- Click on the plane door (A) and note the propeller is missing.
- Read the note (B) on the bench.
- Find the pieces of the FISHING ROD.
- Click on the water (C) by the left tire bumper and click on the find/use tab and use the FISHING ROD (click on the Find tab to change to Use) on the propeller part (D); take the propeller part (E) from the dock.
- Find all the pieces of the PROPELLER.
- Click on the nose of the plane to get a close-up and use the PROPELLER on it the tip (F).
- Enter the plane and press the start button (G).
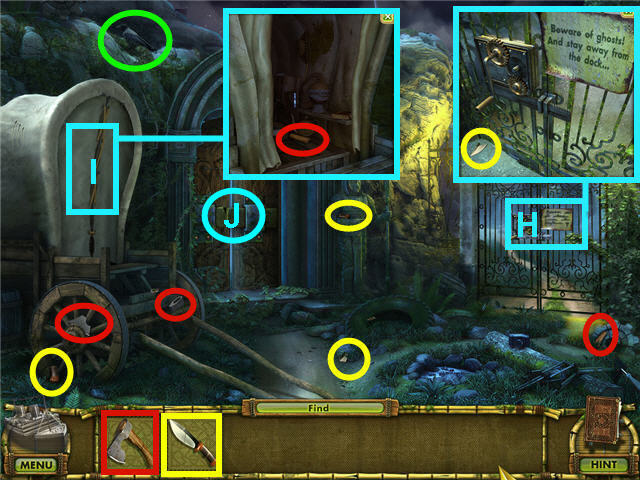
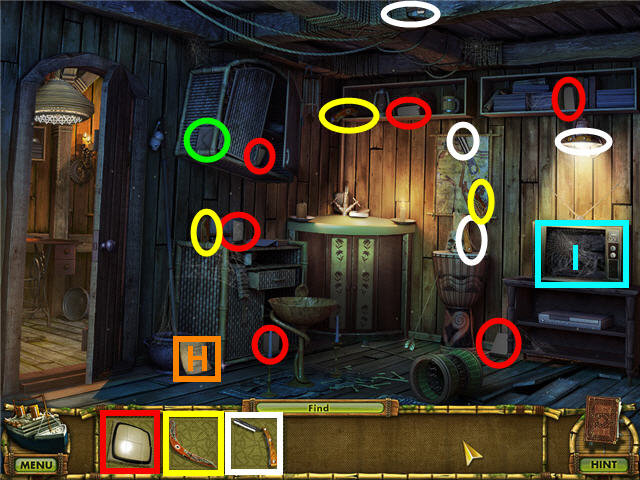
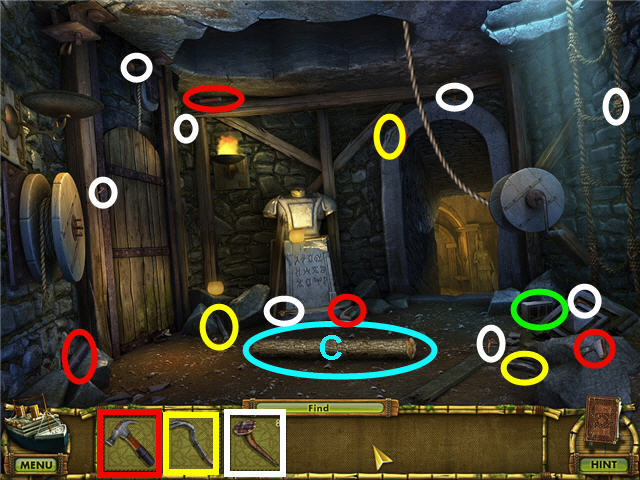
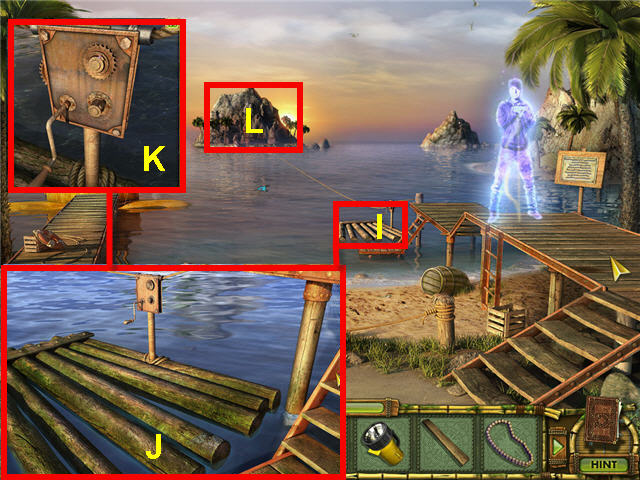
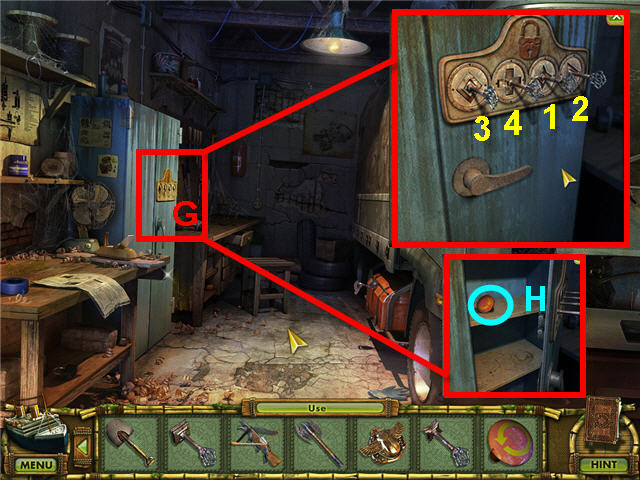
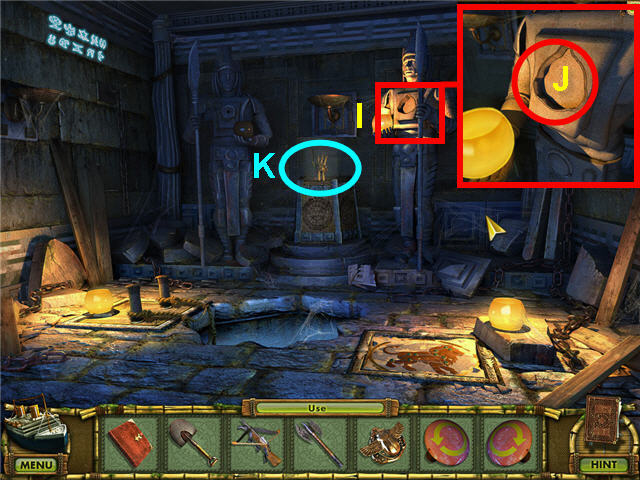
- Click on the gate (H) and note the missing gear and take the knife part.
- Find the pieces for the KNIFE.
- Use the KNIFE on the rope (I) on the covered wagon and take the AXE part.
- Find the pieces for the AXE.
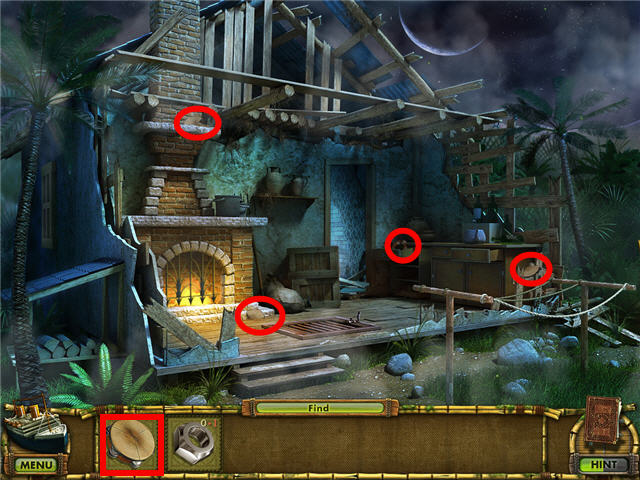
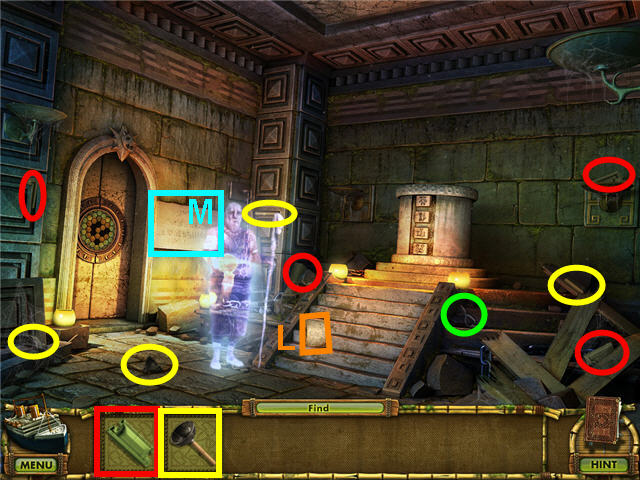
- Click on BEYOND ITEM 1.
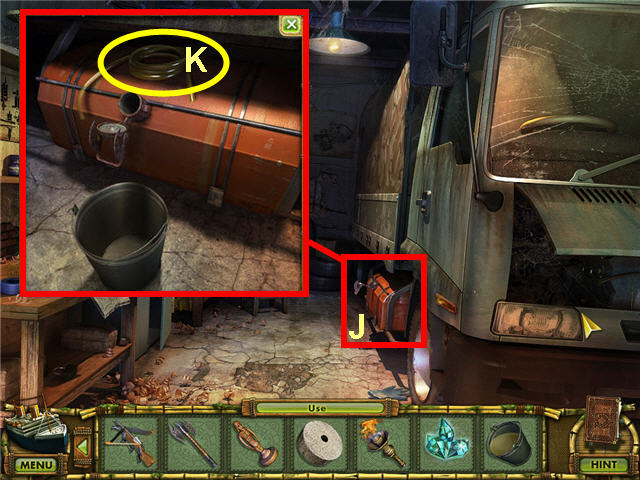
- Use the AXE on the front door (J) and enter through the door.
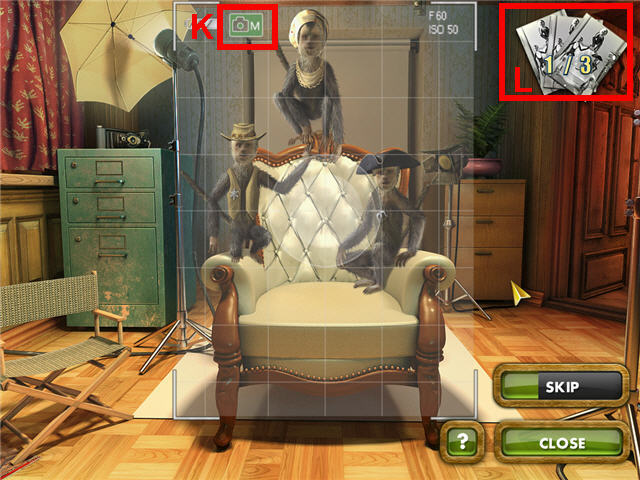
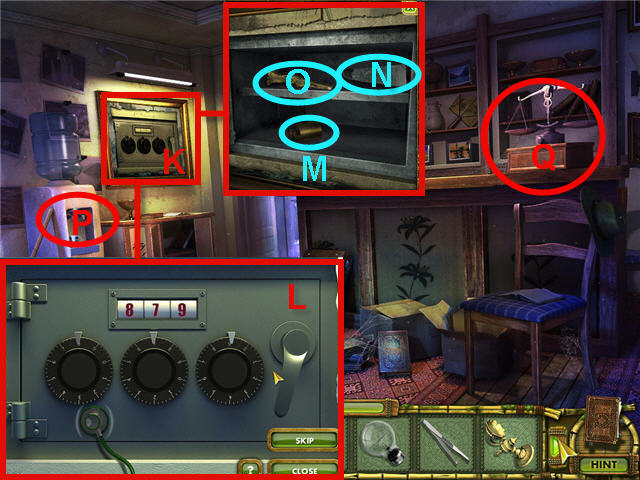
- Read the note (K).
- Find the BEYOND ITEM 2.
- Find the pieces of the X-SHAPED HANDLE.
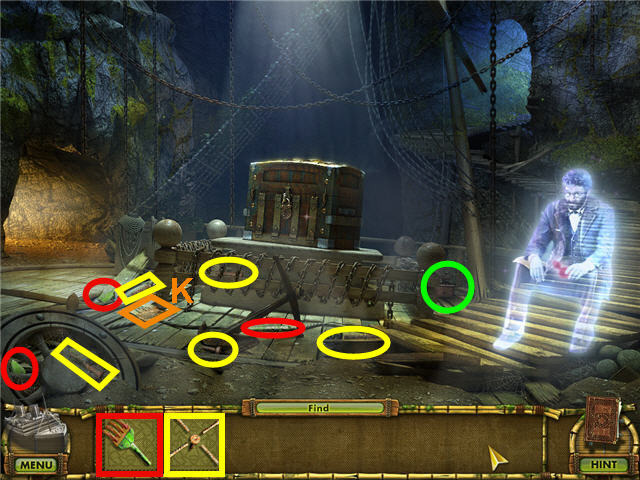
- Find all the pieces except the red for the RAKE.
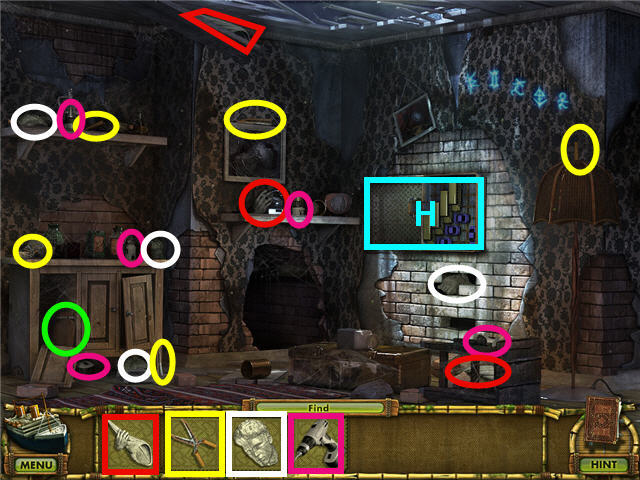
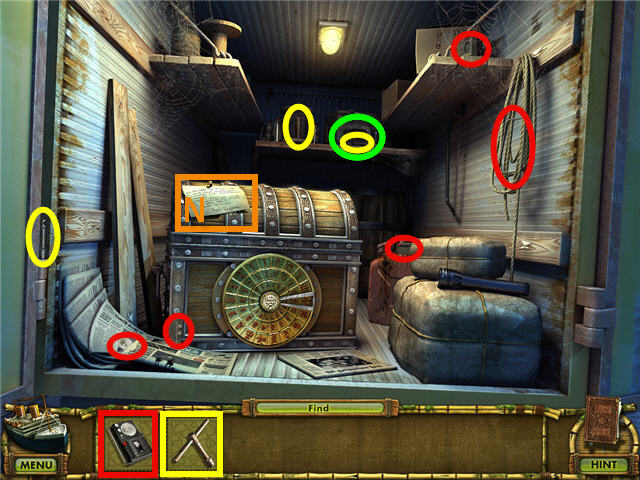
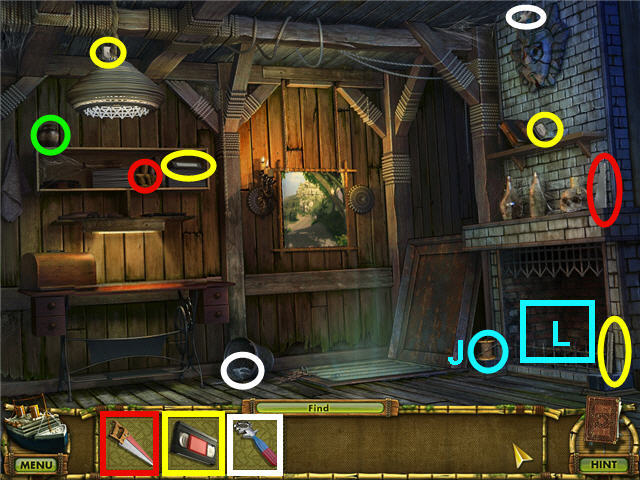
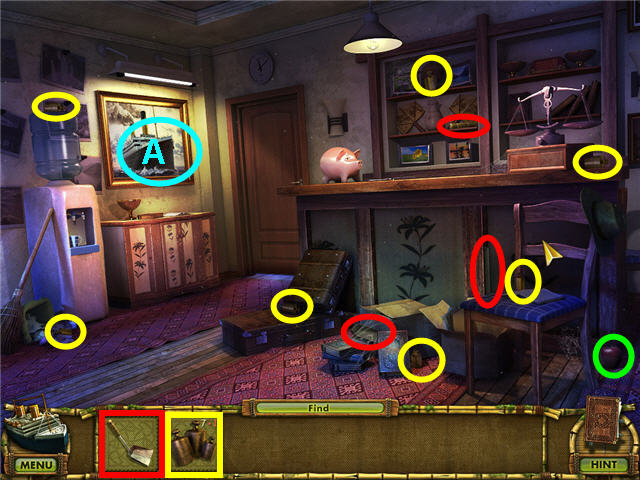
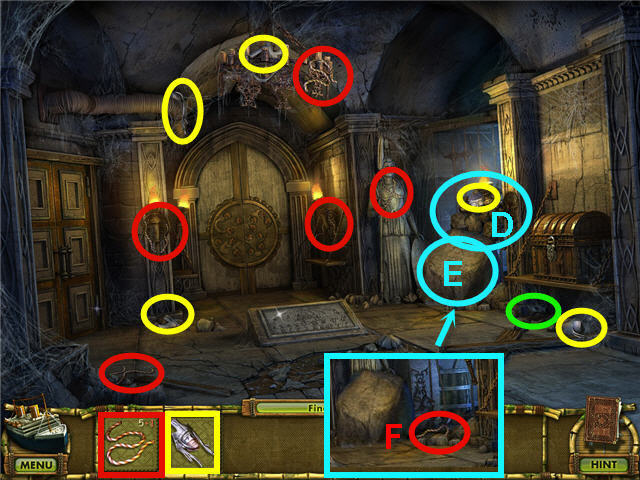
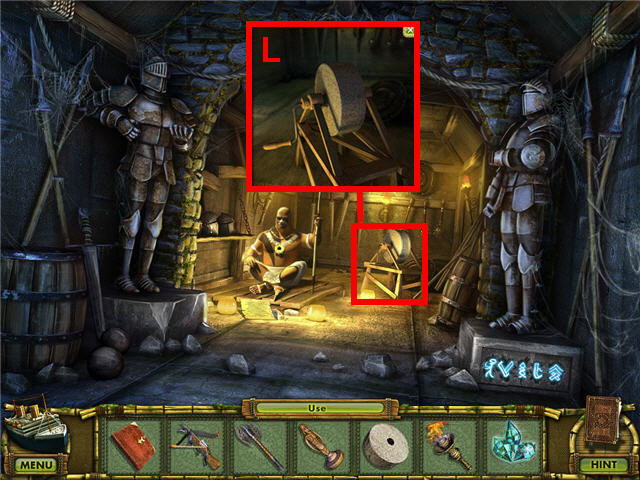
- Head into the room on the left.
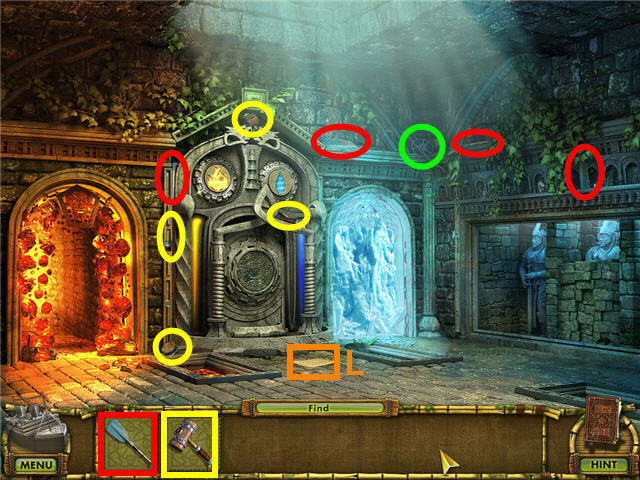
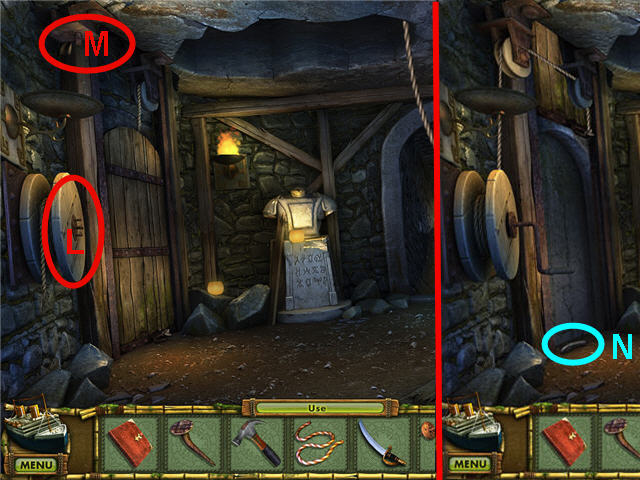
- Read the note (L).
- Find the BEYOND ITEM 3.
- Find the pieces of the OAR.
- Find all the pieces except for the red one for the SLEDGEHAMMER.
- Click on the statues to the right and the secret panel between the ice and fire.
- Exit via the fiery doorway.
- Find the BEYOND ITEM 4.
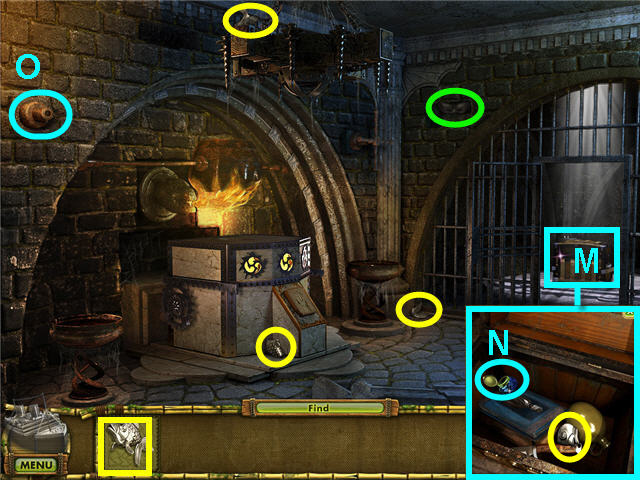
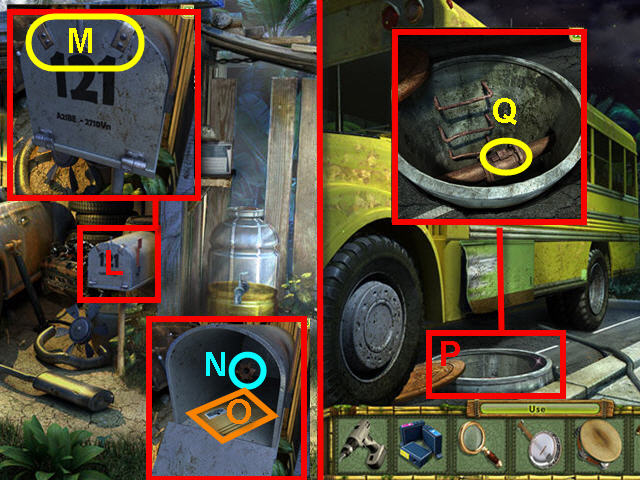
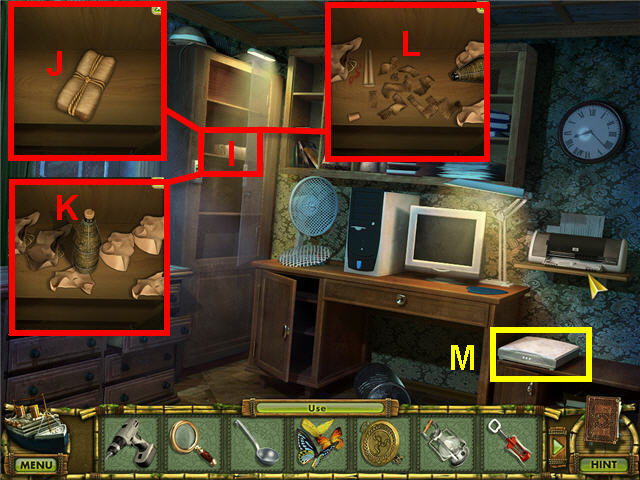
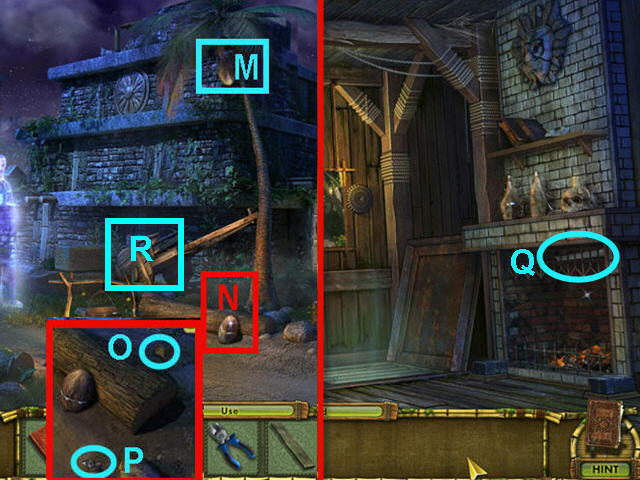
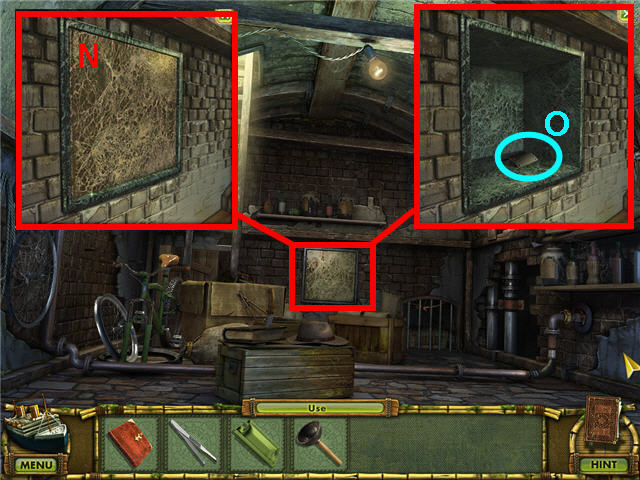
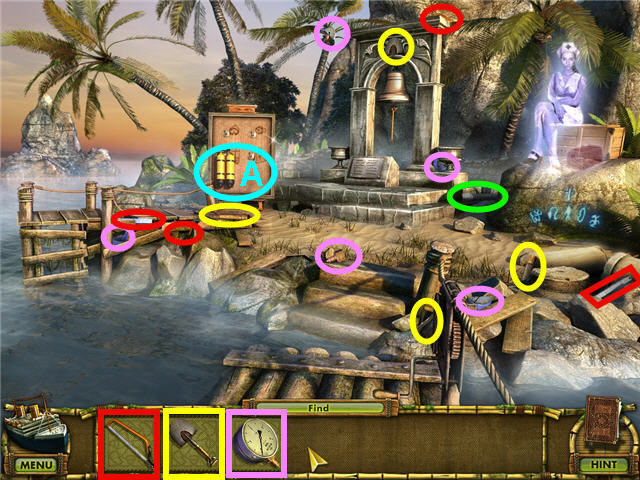
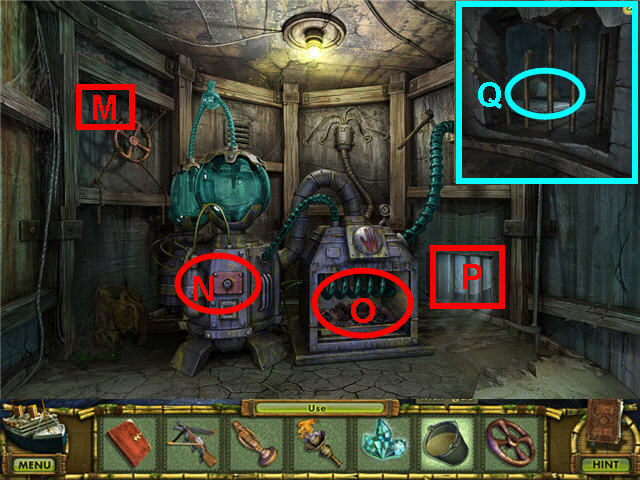
- Look close and click on the chest (M) and take the INKPOT (N) and the piece of the FISH.
- Find the pieces of the FISH.
- Use the X-SHAPED HANDLE on the left valve (O).
- Exit the room via the bottom the screen two times.
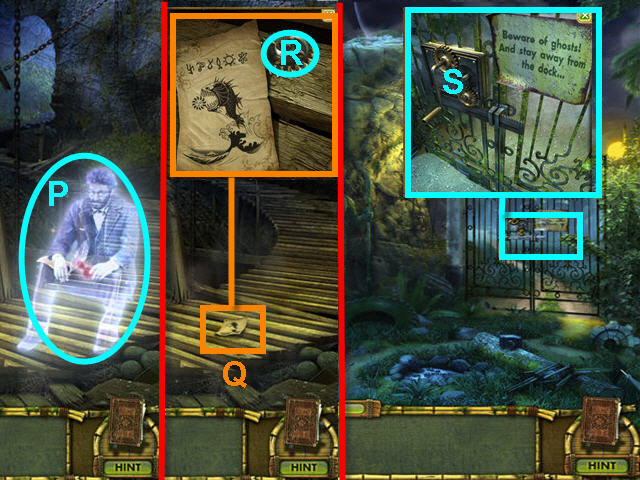
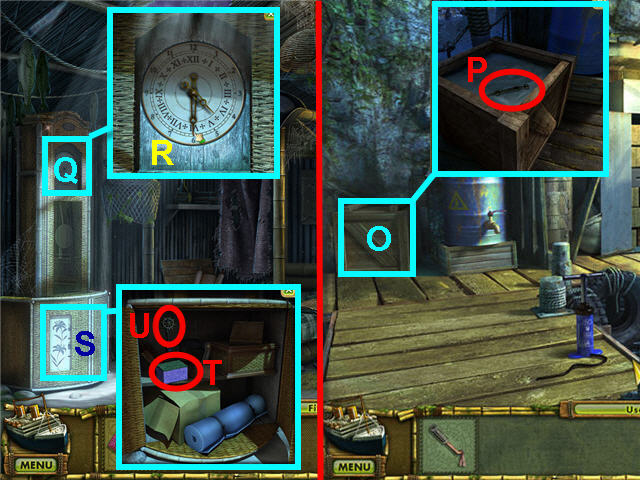
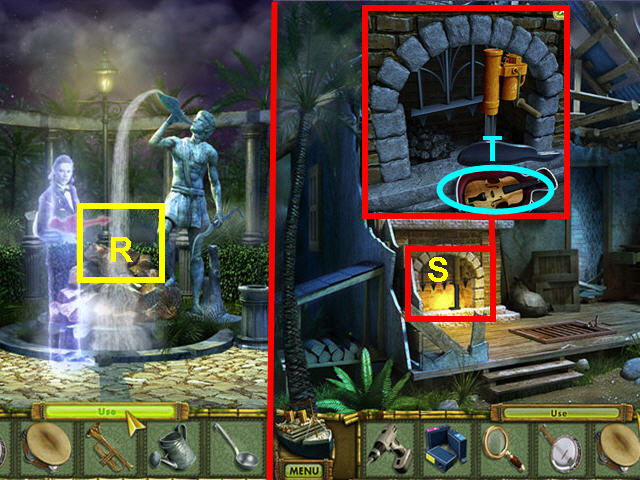
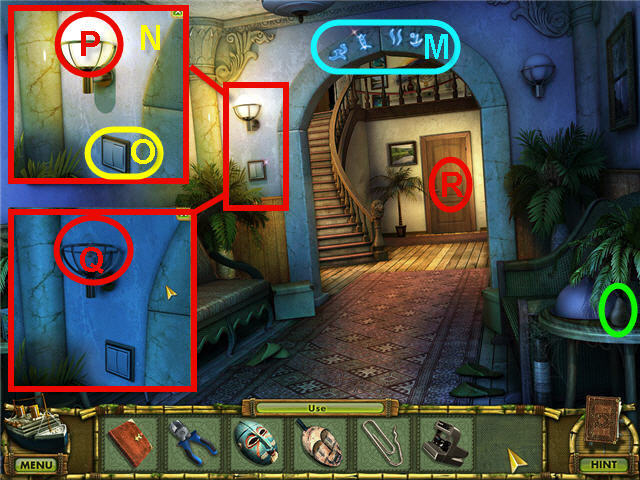
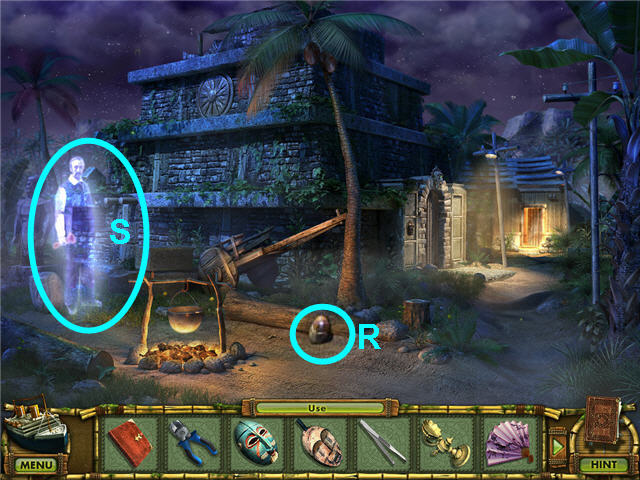
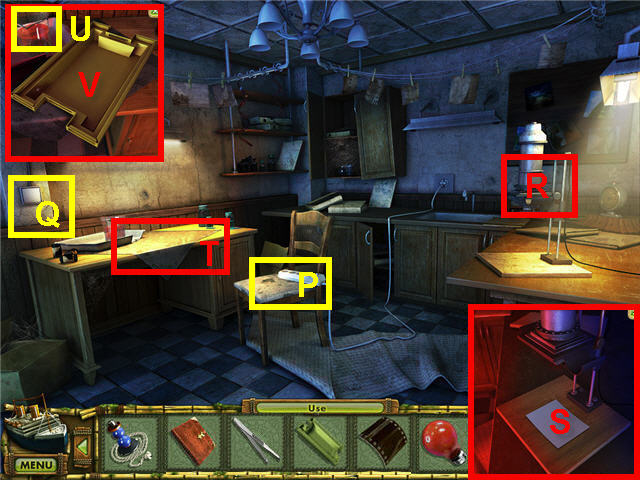
- Give the INKPOT to the author (P) and get a WOODEN WRITER.
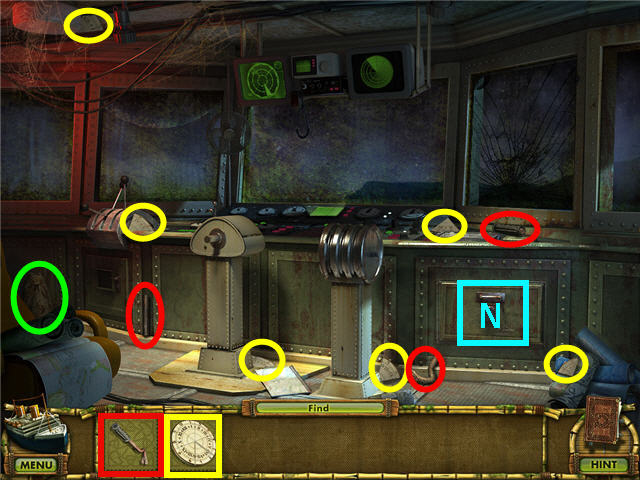
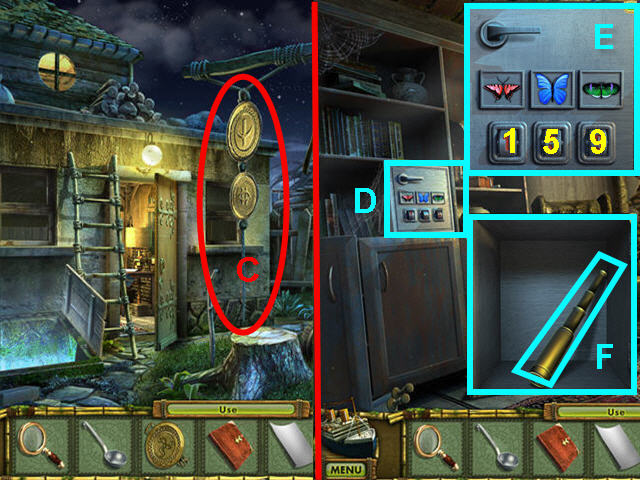
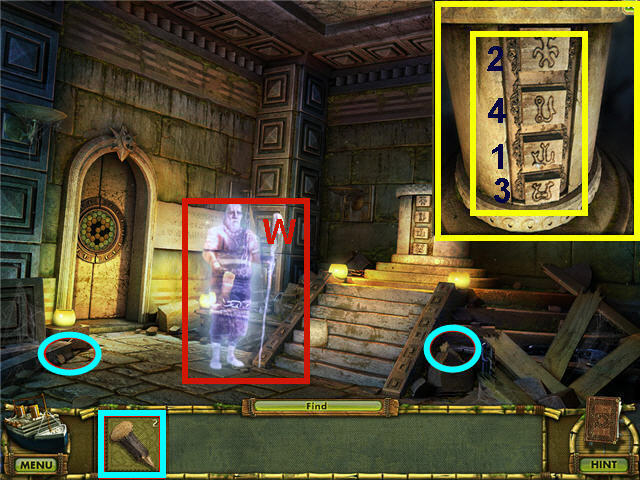
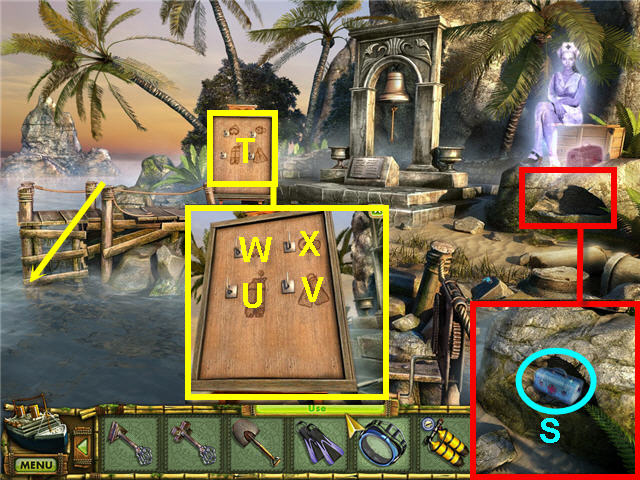
- Click on the note (Q) and take the GEAR (R) and click on the note in close-up to get it added to your journal.
- Back out of the room one time.
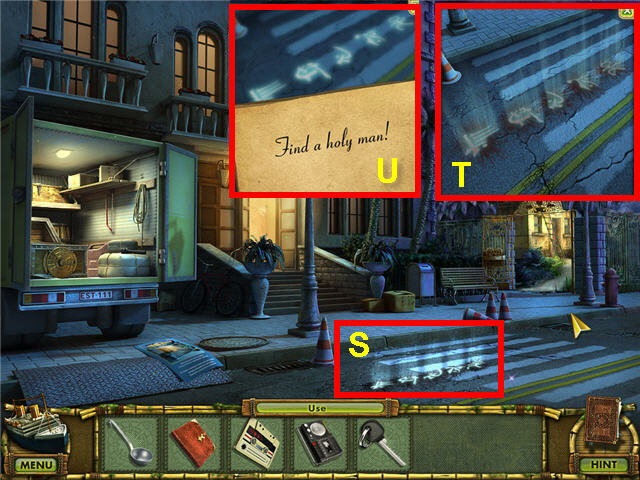
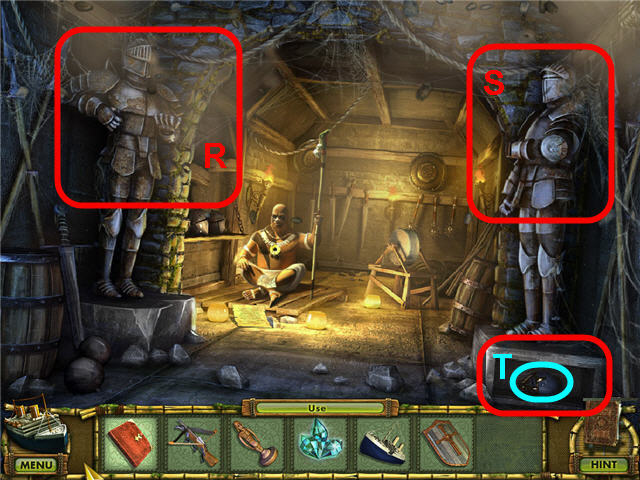
- Use the GEAR on the lock (S) on the gate and turn the handle.
- Head back inside the temple and go up the stairs to the right.
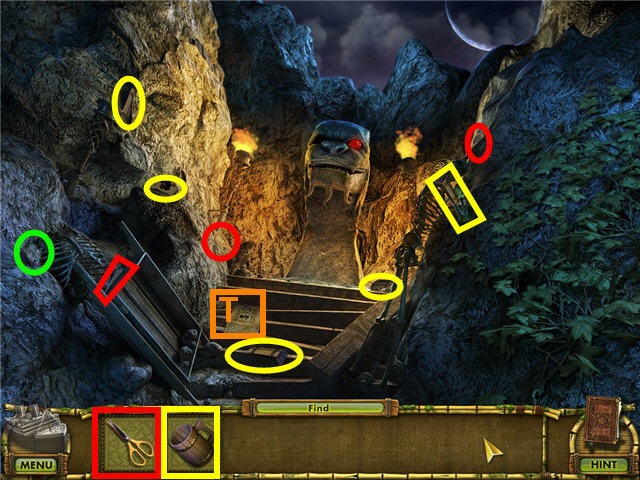
- Find the BEYOND ITEM 5.
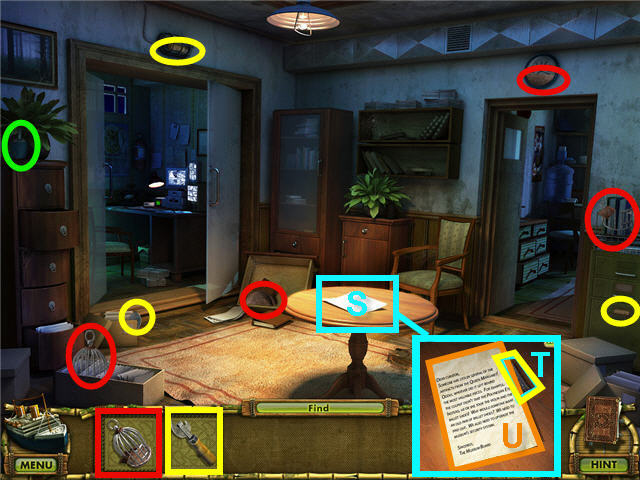
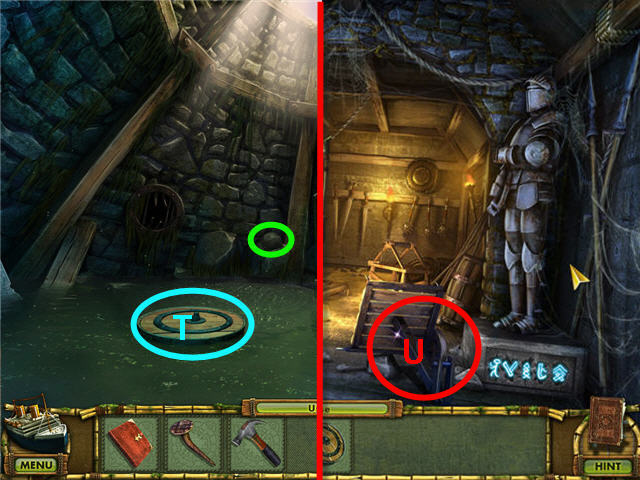
- Read the note (T).
- Find the pieces of the MUG.
- Find all the pieces except for the red one for the SCISSORS.
- Click on the statue and note it is missing an eye.
- Back out of the area two times and head through the gate on the right.
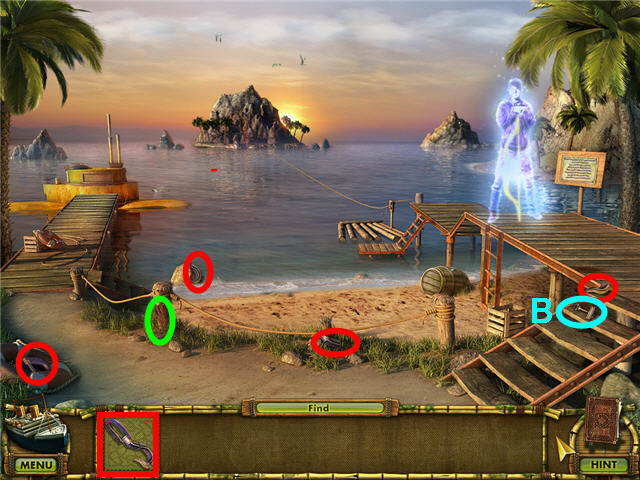
- Head right to the dock.
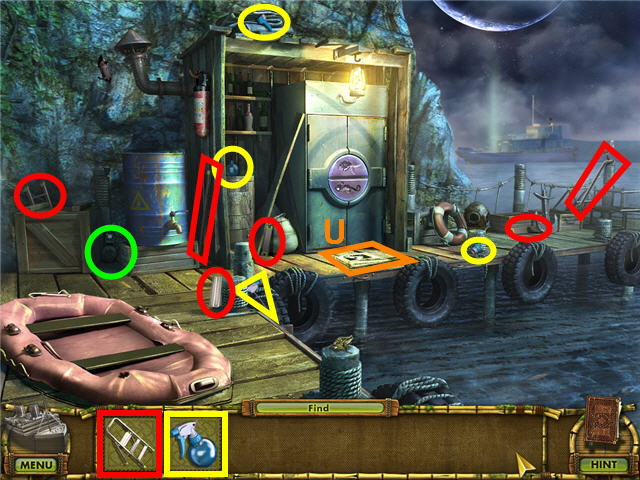
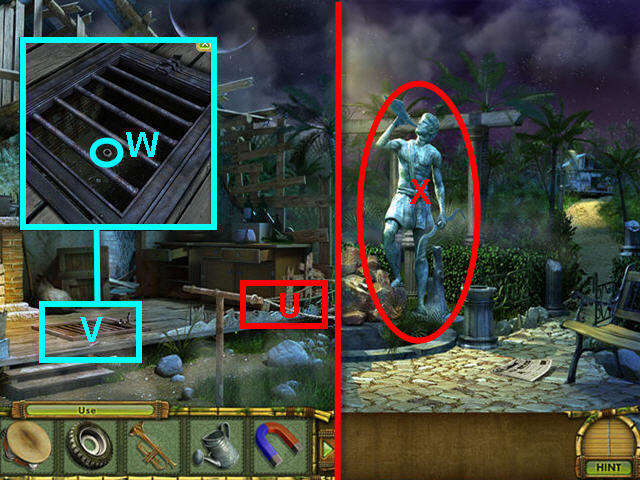
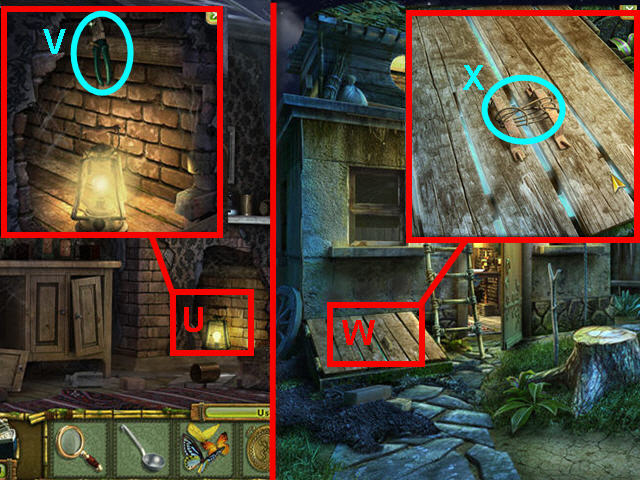
- Read the note (U).
- Find the BEYOND ITEM 6.
- Find the pieces of the STEPLADDER and GLASS CLEANER.
- Click on the drum of oil, the crate, the inflatable raft and the locker and note the missing items.
- Back out of the area one time.

- Find the BEYOND ITEM 7.
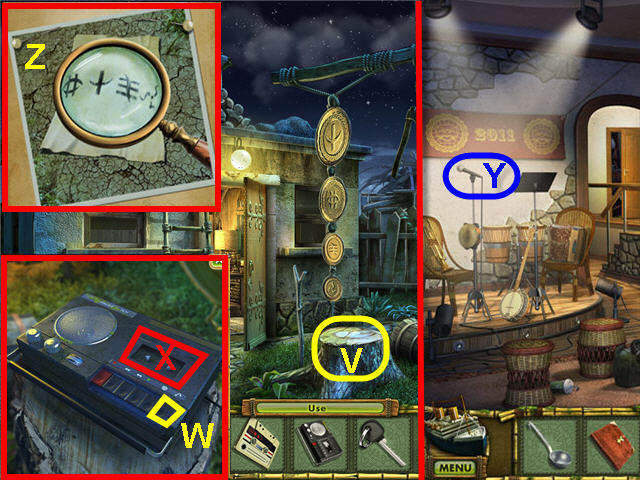
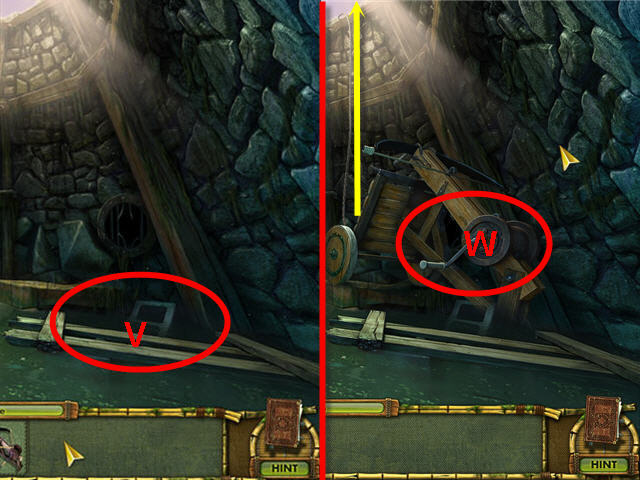
- Use the STEPLADDER on the bottom of the staircase (V).
- Head up the staircase.
- Find the BEYOND ITEM 8.
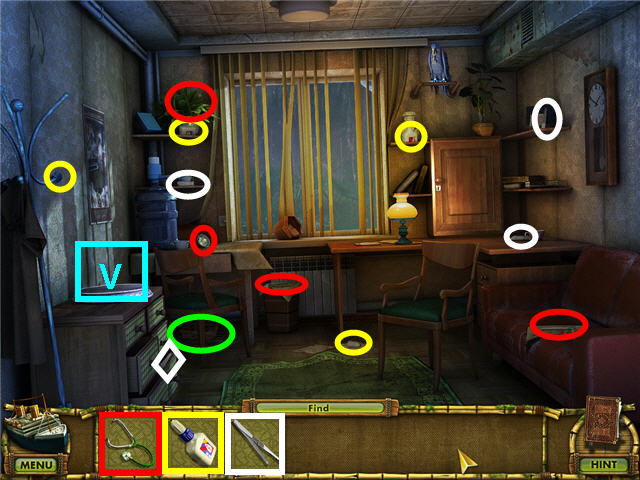
- Read the note (W).
- Click on the hut door and note we need oil.
- Click on the seahorse (X) so that it falls into the fire.
- Click on the fire.
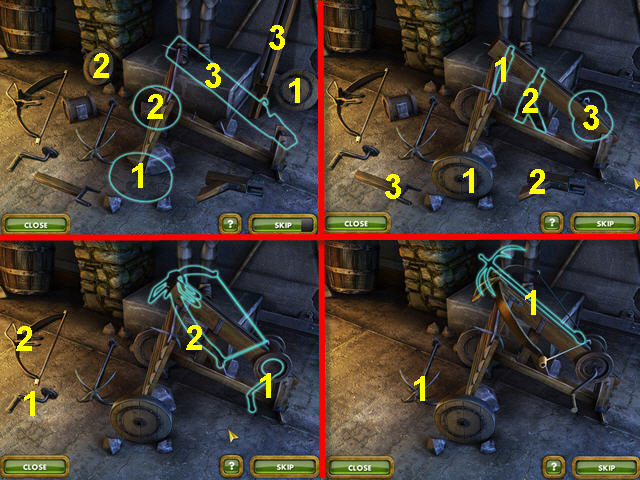
- Find the pieces of the PICKAXE and the PUMP.
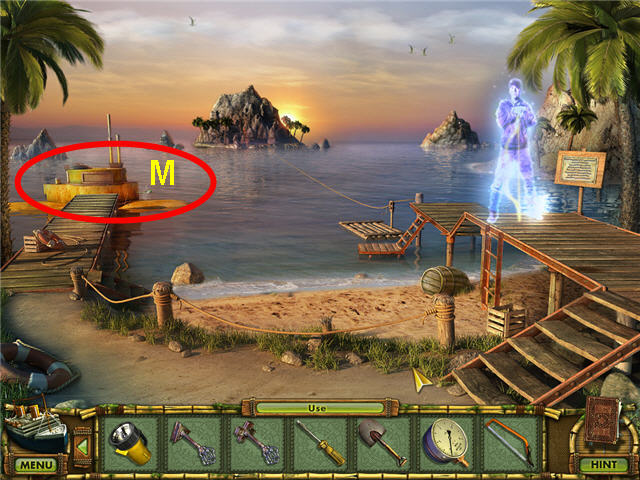
- Back out one time and head to the dock on the right.
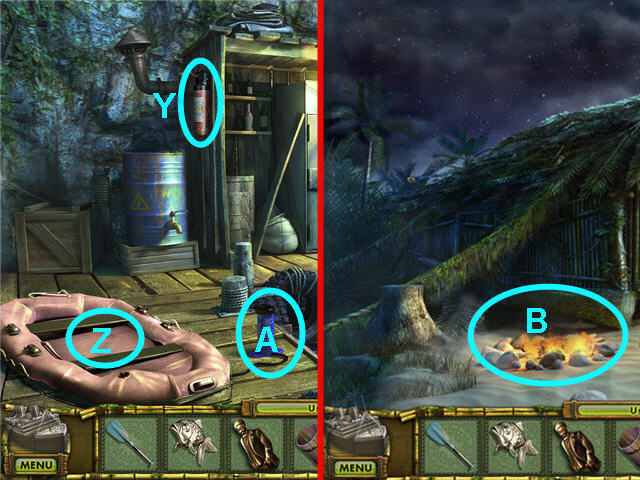
- Take the FIRE EXTINGUISHER (Y).
- Use the PUMP on the inflatable raft (Z).
- Click on the PUMP (A) and note we need a patch.
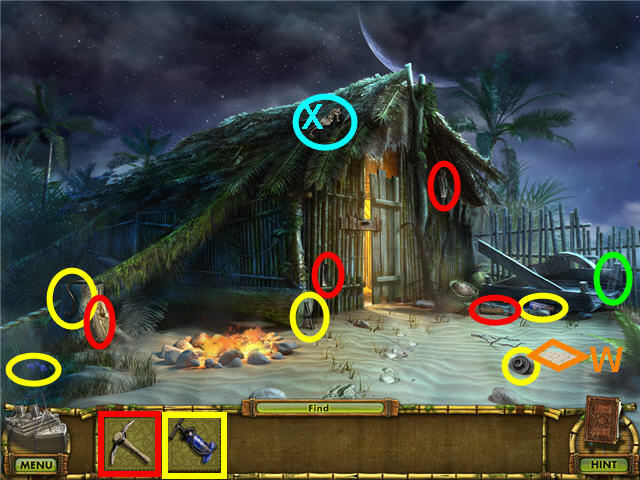
- Exit the area and head up the stairs.
- Use the FIRE EXTINGUISHER on the fire pit (B).
- Look close at the fire pit and note you need a rake.
- Exit via the bottom of the screen two times and enter the temple.
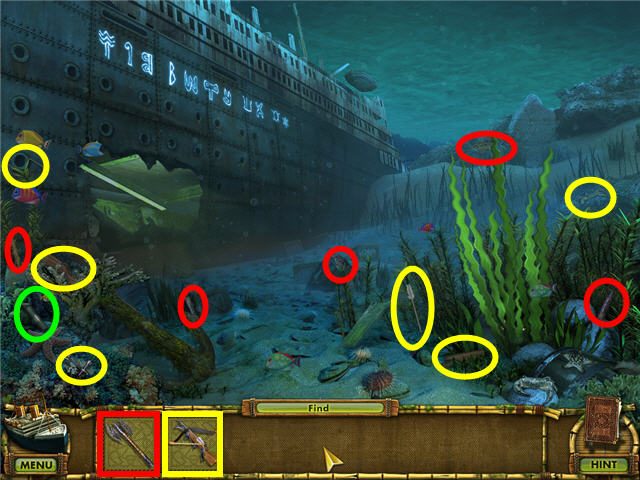
- Head to the left to the fire and ice room and use the PICKAXE on the icy doorway.
- Enter into the icy doorway.
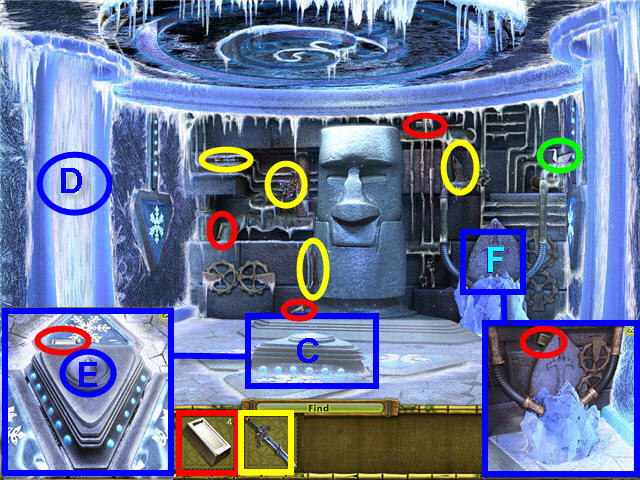
- Find the BEYOND ITEM 9.
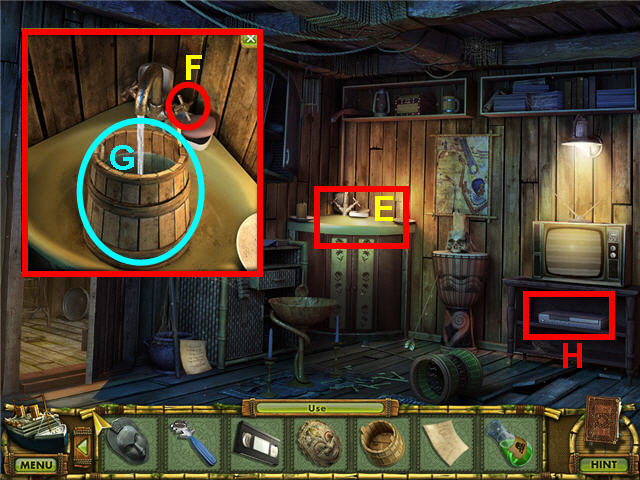
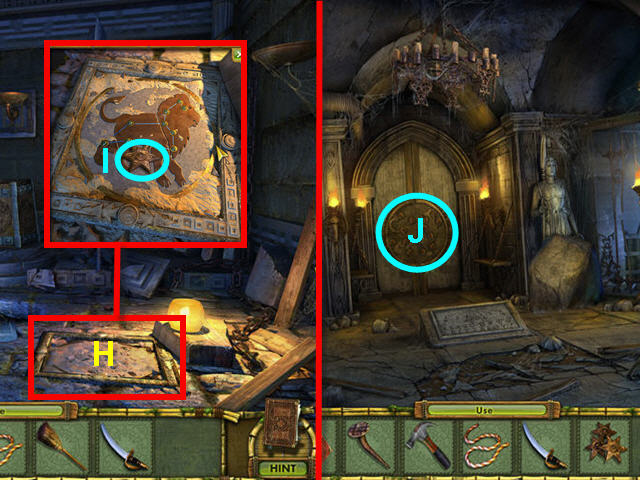
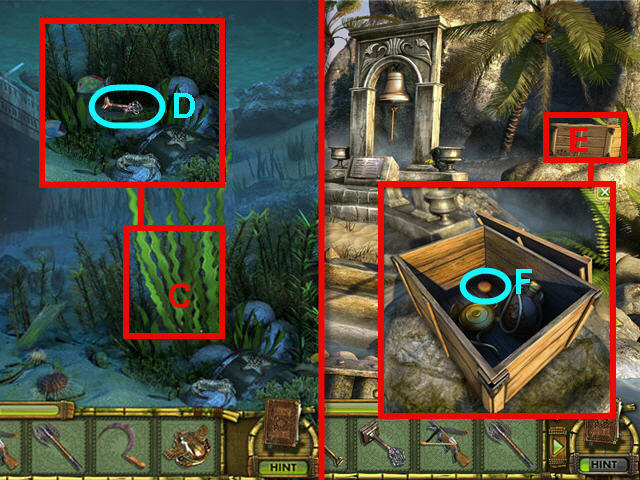
- Look close at the center pedestal (C) and take the SILVER BRICK and note the water drop impression.
- Use the MUG with the waterfall (D) on the left to get a MUG WITH WATER.
- Use the MUG WITH WATER on the water drop impression (E) on the pedestal.
- Look close at the sword stone (F) on the right and take the SILVER BRICK and note the sword is missing.
- Find the pieces of the SILVER BRICKS and SWORD.
- Place the SWORD by the sword stone and note the breath from the statue to the pedestal.
- Look close at the pedestal (C) and take the WATER SYMBOL (E).
- Exit the area one time to the fire and ice room.
- Take the final SLEDGHAMMER piece from in front of the icy doorway.
- Click on the wall of statues (F) on the right and use the SLEDGEHAMMER on the bricks in the middle.
- Look close at the hands of the middle statue (G) and click a few times to crumble the stone (H) and take the FOUR-FINGERED HAND.
- Back away from the statues and enter the fiery room on the left.
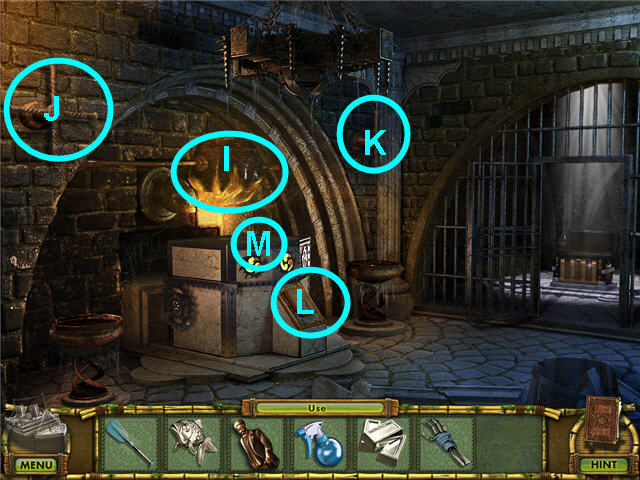
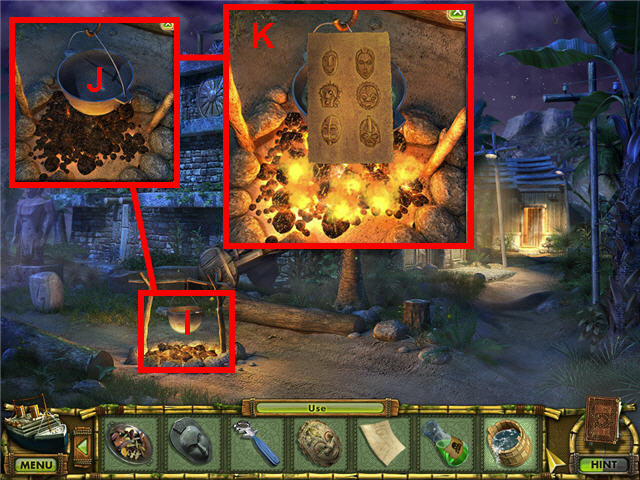
- Place the SILVER BRICKS in the smelting pot (I).
- Turn the left handle (J) and right handle (K) to turn the pot.
- Place the FOUR-FINGERED HAND on the hand imprint (L) on the front of the smelter.
- Click on the smelter (M) and take the FIRE SYMBOL.
- Back out of the area one time.
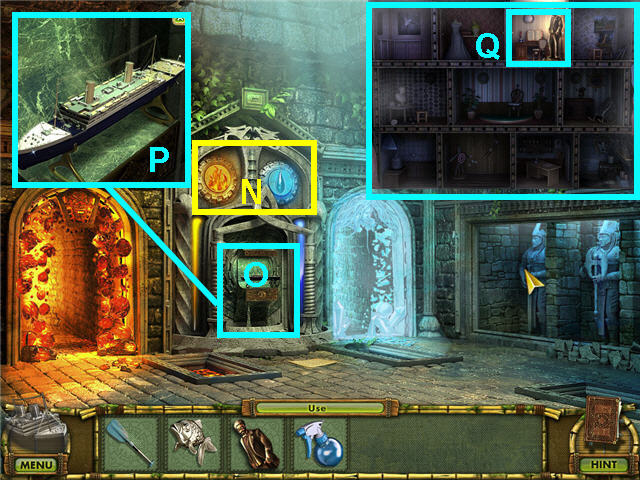
- Use the WATER SYMBOL and the FIRE SYMBOL on the top of the secret panel (N).
- Click on the secret panel (O) and take the SHIP (P).
- Place the WOODEN WRITER in his cabin (Q) and get an OILER.
- Back out of the area to the cave entrance and head right to the dock.
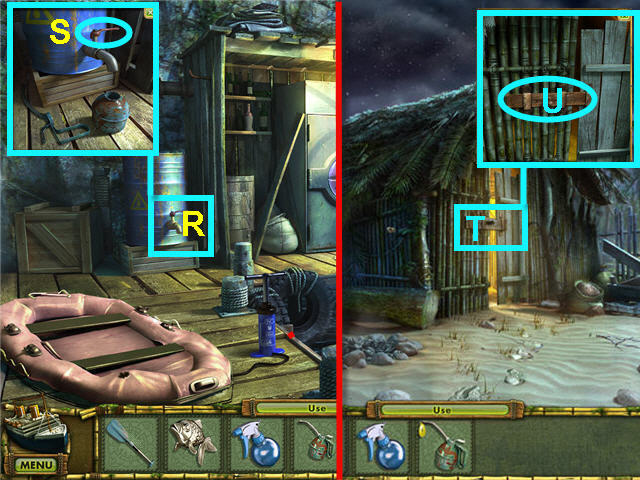
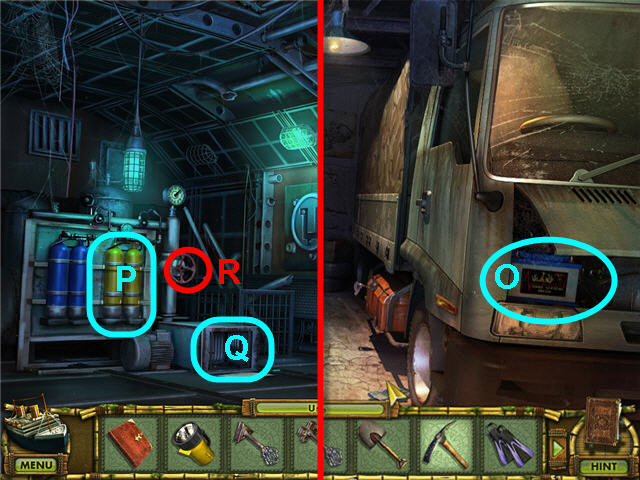
- Use the OILER on the barrel of oil (R) and turn the spigot (S) to get a FULL OILER.
- Exit out one time and head up the stairs.
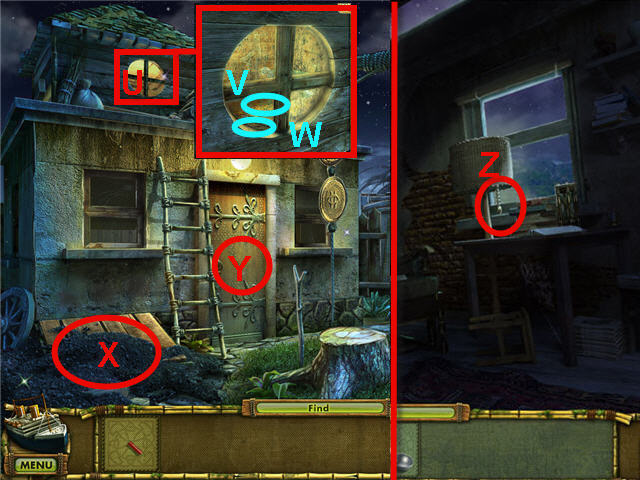
- Look close at the door (T) and use the FULL OILER on the lock (U) and click the handle to open.
- Enter the hut.
- Find the BEYOND ITEM 10.
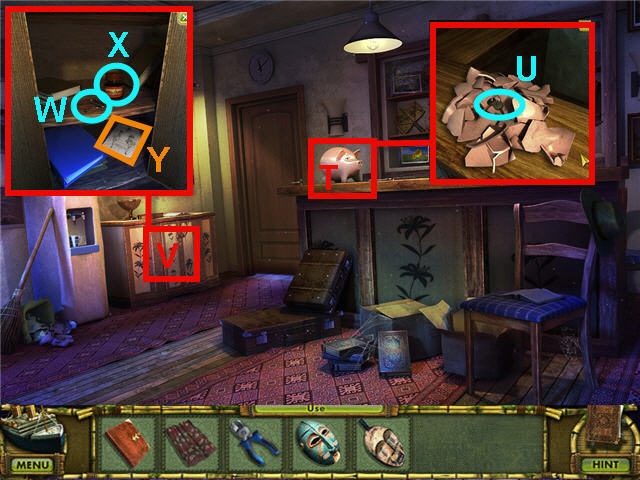
- Read the note (V) and take the RUBY (W).
- Find the pieces for the BROOM, GLUE, and the SHIP’S WHEEL.
- Find all the pieces except the red one for the SPONGE.
- Look close at the bamboo wardrobe (X) on the right and use the BROOM on the cobwebs.
- Click on the boots and note you need something to cut a patch.
- Look close at the clock and note the missing face.
- Back out of the area three times to the cave area.
- Enter the cave and head up the stairs.
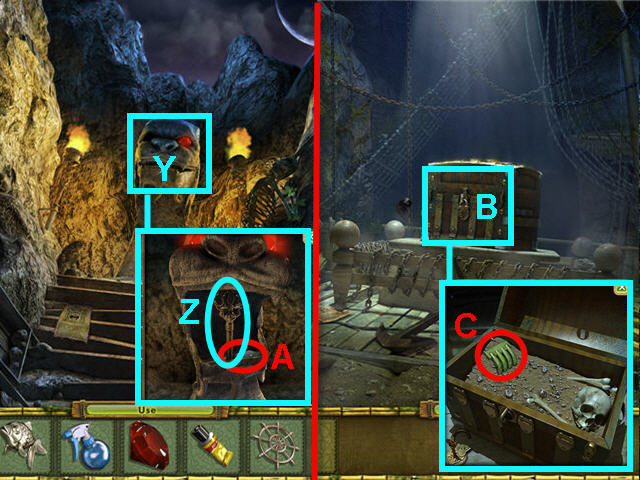
- Use the RUBY on the statue head (Y).
- Look close at the mouth and take the final piece of the SCISSOR (A) and the KEY (Z).
- Exit the room one time.
- Click on the chest (B) and use the KEY on the lock.
- Take the final piece of the RAKE (C).
- Exit the temple and head to the right and up to the hut.
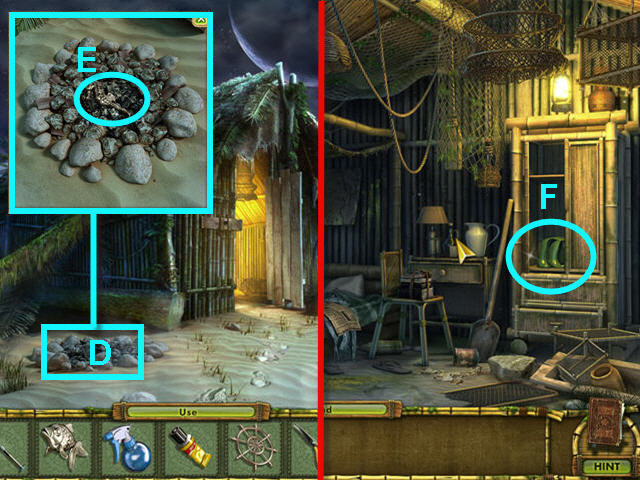
- Use the RAKE on the fire pit (D) and take the SEAHORSE (E).
- Head into the hut.
- Use the SCISSORS on the boots (F) and take a RUBBER PATCH.
- Back out of the area two times and head right to the dock.
- Use the GLUE and then the RUBBER PATCH on the hole in the raft (G).
- Click on the pump (H) to inflate the boat.
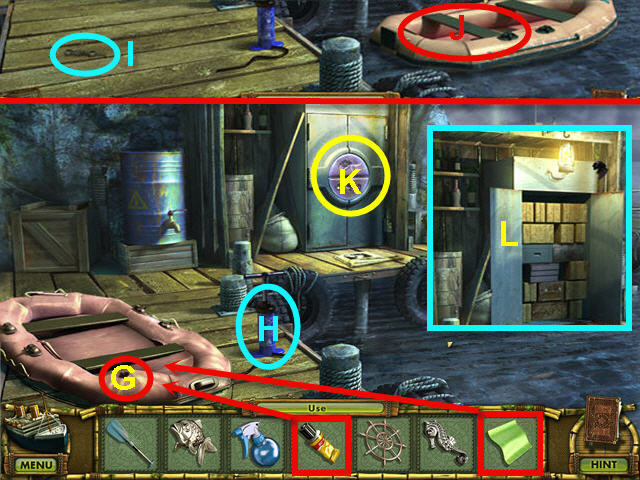
- Click on the inflated boat to launch it and take the HOUR HAND (I) from the dock.
- Place the OAR on the boat (J) and note you need another oar.
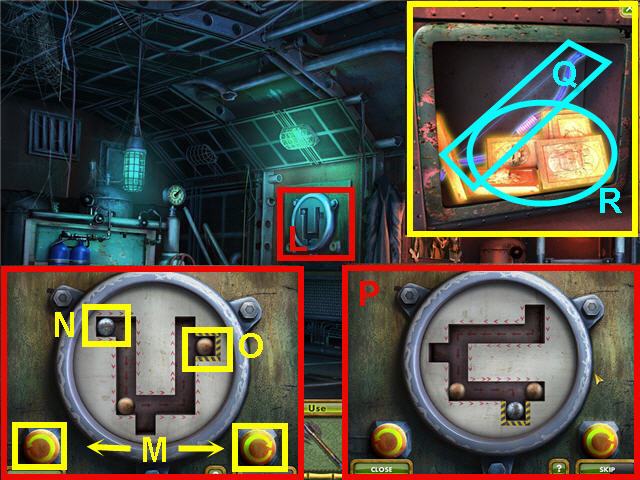
- Look close at the locker (K) and use the SEAHORSE and FISH on the lock.
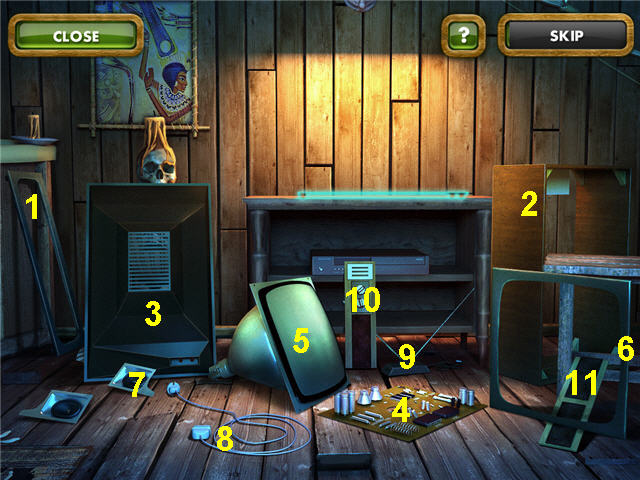
- Click on the opened locker (L) to access a puzzle.
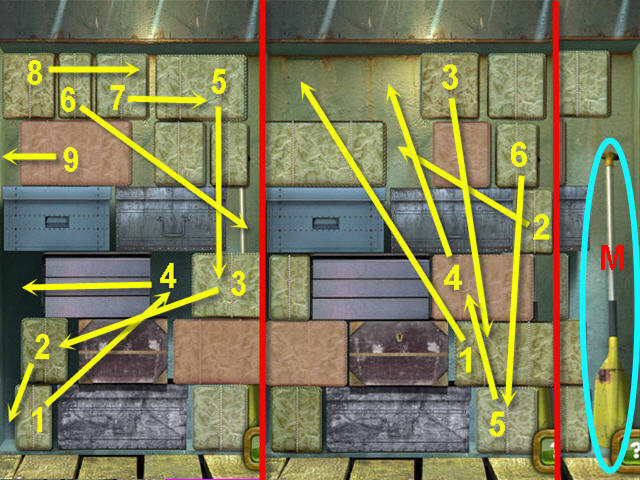
- The goal is to rearrange the luggage so that you can access the OAR on the right side of the locker.
- Luggage in pink cannot be moved till the above piece is moved.
- See screenshot for my solution.
- Take the OAR (M).
- Place the OAR in the boat and click on the front of the boat to head out to the tugboat.
- Find the BEYOND ITEM 11.
- Click on the ballet dancer.
- Enter into the cabin.
- Find the BEYOND ITEM 12.
- Find the pieces to the CROWBAR and CLOCK FACE.
- Look close at the locked cabinet (N) and note the time.
- Place the SHIP’S WHEEL on the stem.
- Back out two times to the dock.
- Use the CROWBAR on the crate (O) on the left corner and take the MINUTE HAND (P).
- Back out one time and head up the stairs and into the hut.
- Place the CLOCK FACE, HOUR HAND and MINUTE HAND on the clock (Q).
- Click-hold the minute hand and rotate it to set the clock to the time you found on the locked cabinet of the tugboat cabin. The solution is 4:30 (R).
- Click on the lower portion of the clock (S) and take the final piece of the SPONGE (T) and the KEY (U).
- Back out two times and head right twice and enter the tugboat cabin.
- Use the GLASS CLEANER and the SPONGE the windows (V).
- Use the KEY on the locked cabinet (W).
- Take the BALLET SHOES (X).
- Exit the cabin.
- Give the BALLET SHOES to the ballerina (Y) and get the WOODEN BALLET DANCER.
- Place the WOODEN BALLET DANCER in her cabin (Z) and get a LEVER.
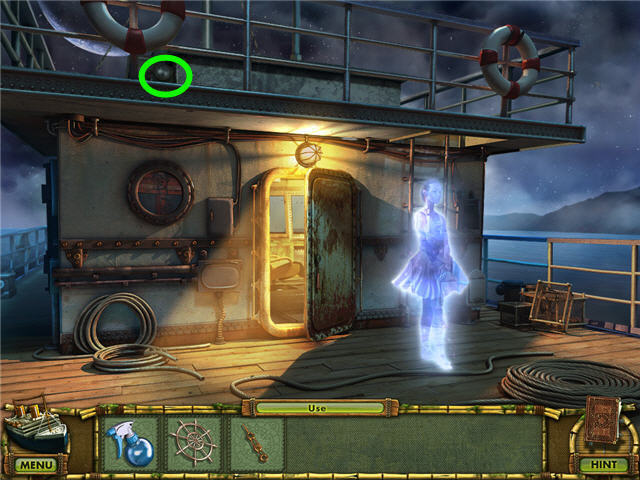
- Exit out of the dollhouse ship and click on the glowing symbols on the deck.
- Enter into the cabin and place the lever on the right pedestal (A).
- Click on the LEVER.
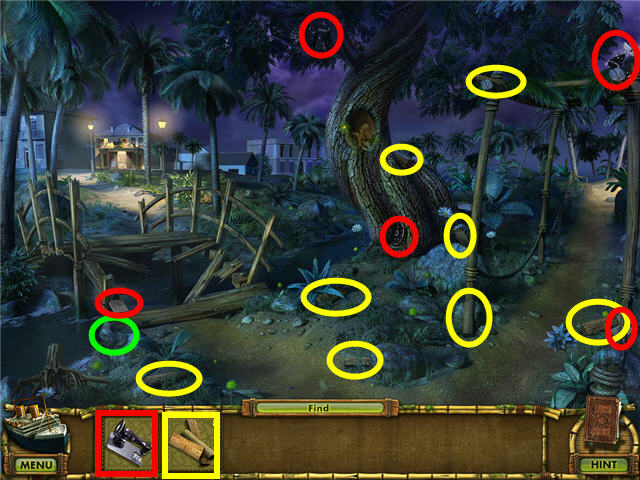
Chapter 2 – Southern-Coast of the Island
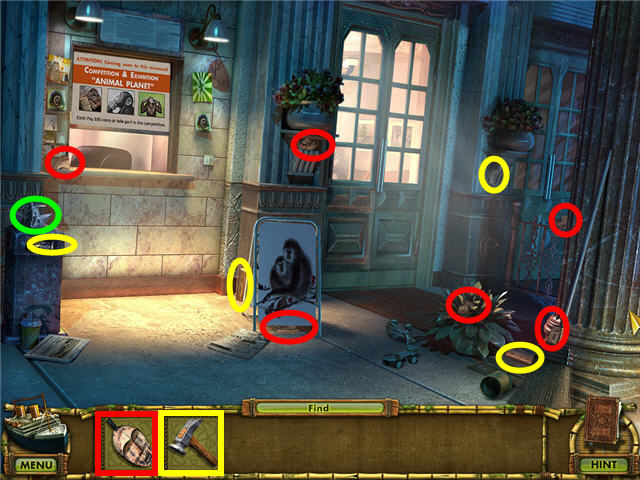
- Find the BEYOND ITEM 13.
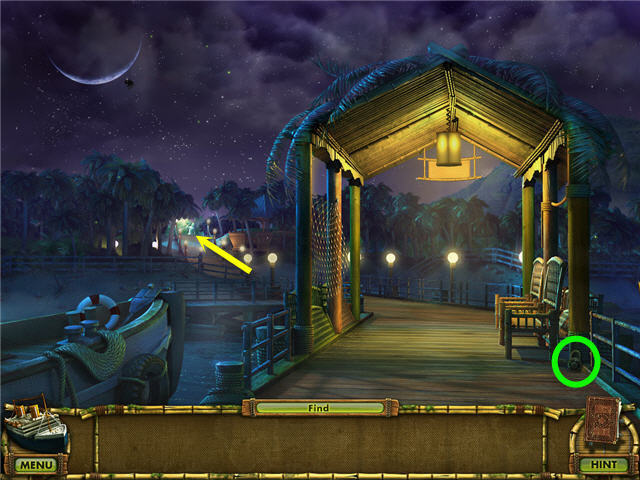
- Head down the pier to the fountain area.
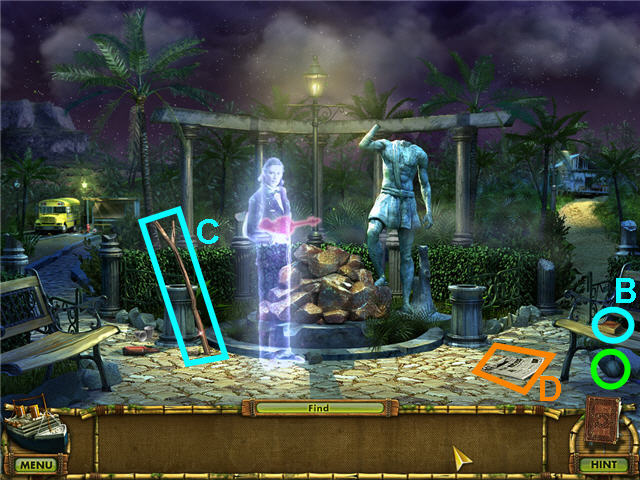
- Find the BEYOND ITEM 14.
- Click on the violinist.
- Take the RUNE (B) and the PROP (C).
- Read the note (D).
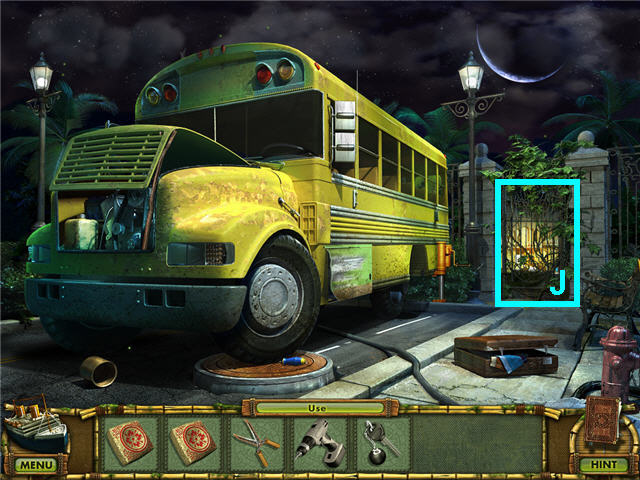
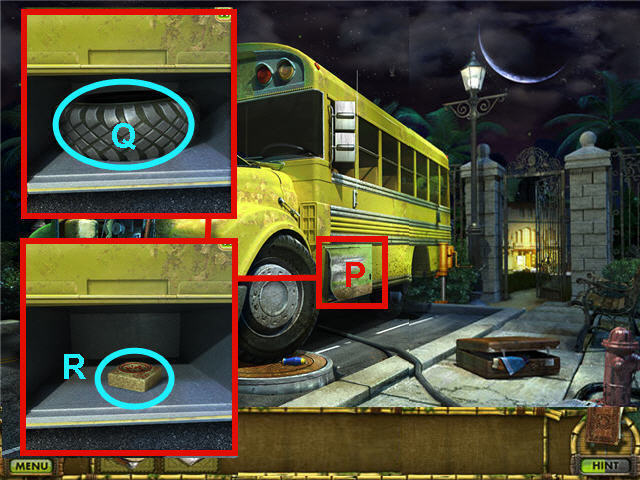
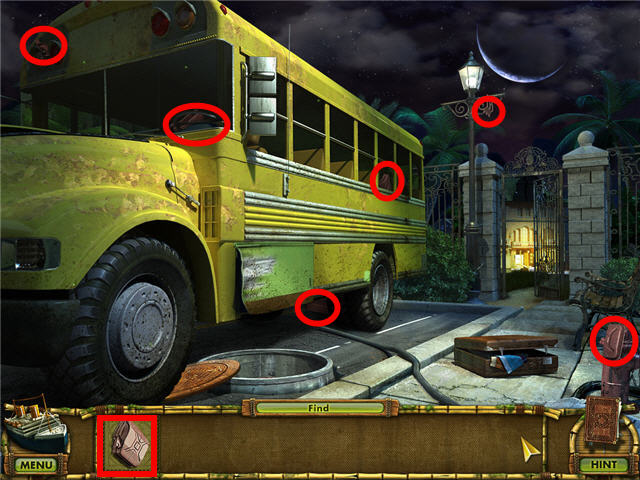
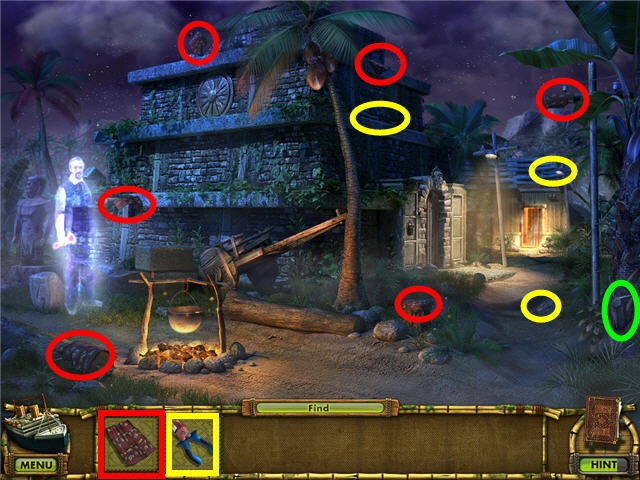
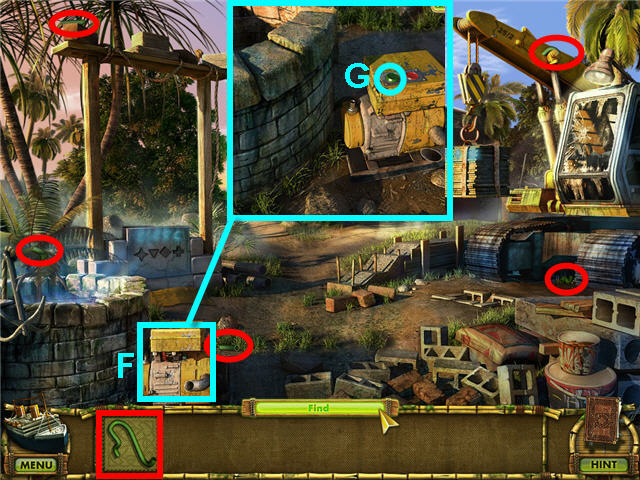
- Head to the school bus on the left.
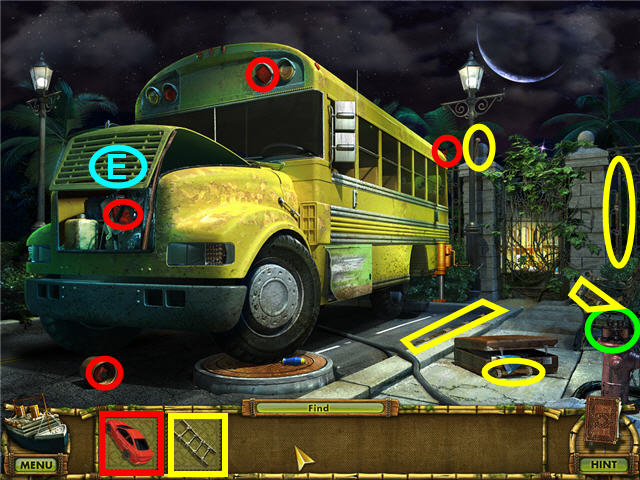
- Find the BEYOND ITEM 15.
- Use the PROP on the hood of the school bus (E).
- Find the pieces of the TOY CAR.
- Find all the pieces for the LADDER except for the red one.
- Click on the rear wheel well, the jack, the screwdriver, the vines covering the gate and the front window of the school bus to see items needed.
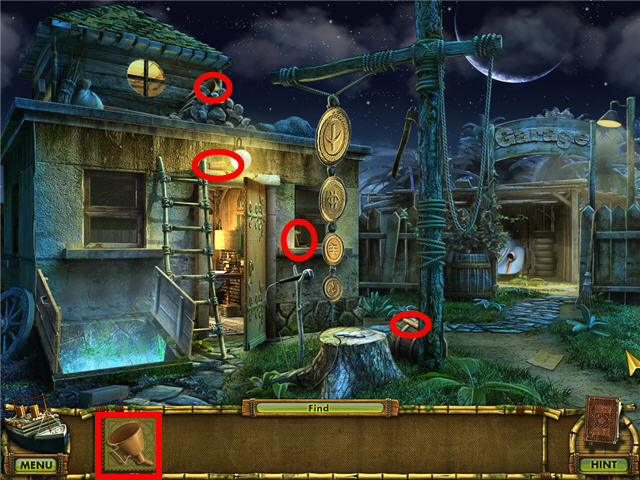
- Back out of the area and head right to Enrico’s house.
- Find the BEYOND ITEM 16.
- Take the RUNE (F).
- Find all the NUTS except for the one in red.
- Click on the grate (G) and note the NUT beyond your reach.
- Click on the drying line and the fireplace to note missing items.
- Enter the house.
- Find the BEYOND ITEM 17.
- Find the pieces for the STATUE FRAGMENT, PRUNING SHEARS, STATUE FRAGMENT and ELECTRIC SCREWDRIVER.
- Click on the symbols on the right wall and the hole in the wall.
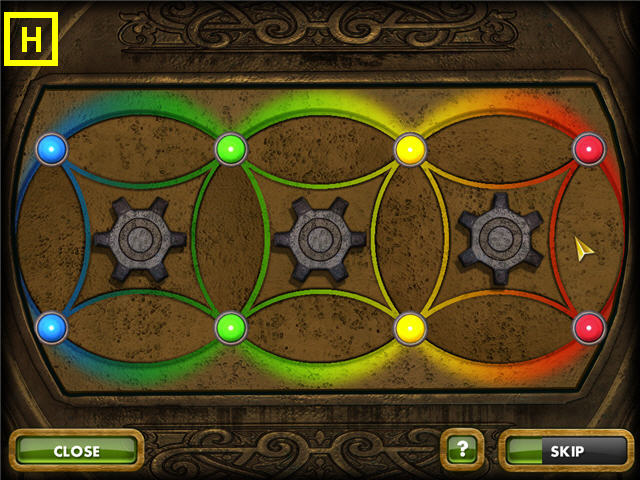
- Use the TOY CAR on the puzzle box on the wall (H) to trigger a puzzle.
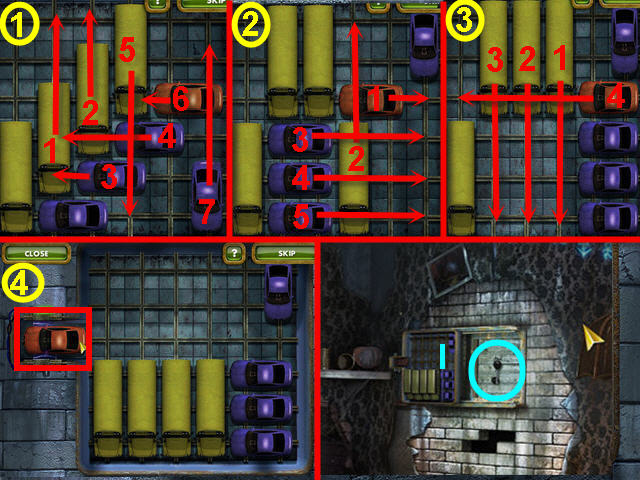
- The goal is to move the blue cars and yellow busses out of the way of the red car so that it may exit on the left (4). See screenshot for solution.
- Take the KEY (I) when complete.
- Back out of the area to the fountain area and head left to the school bus.
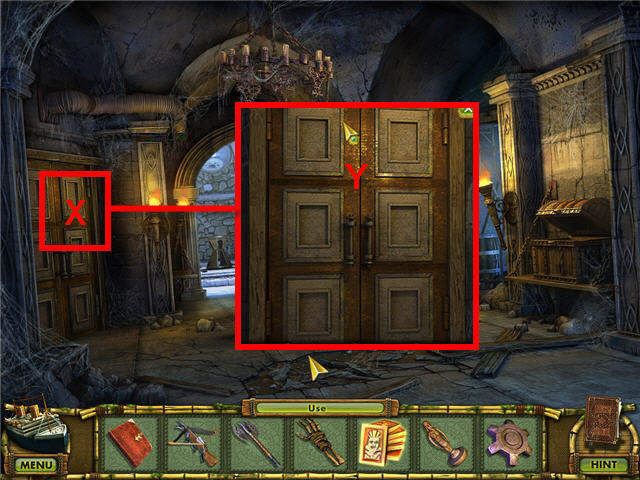
- Use the PRUNING SHEARS on the vines (J) covering the gate.
- Enter the now opened gate.
- Find the BEYOND ITEM 18.
- Take the RUNE (K).
- Find the pieces for the HOOK.
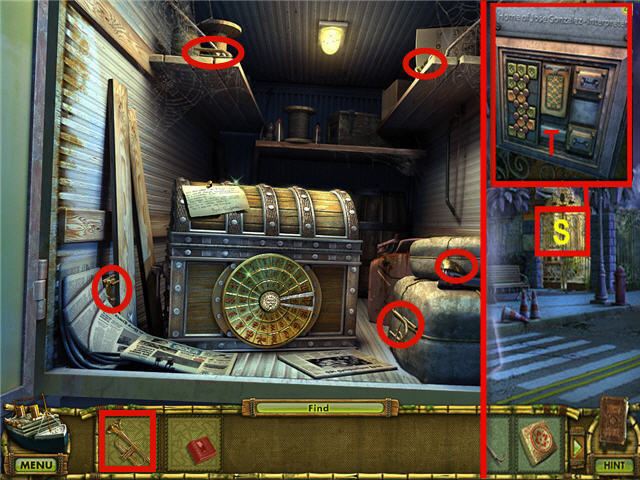
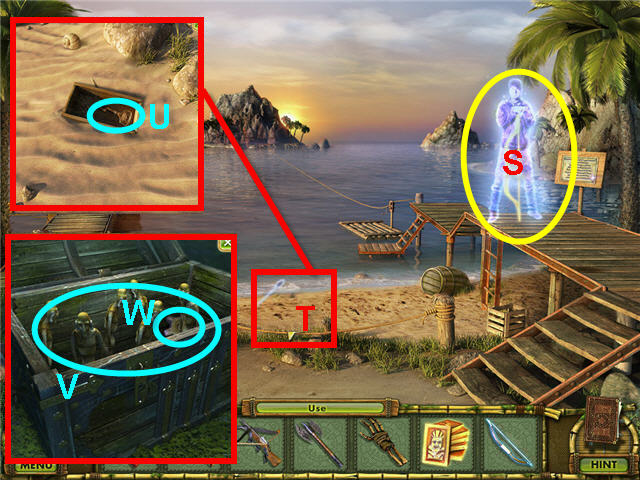
- Read the note (L) and click on the artist.
- Enter into the back of the truck (M).
- Find the BEYOND ITEM 19.
- Read the note (N).
- Find the pieces to the STORAGE KEY.
- Find the all the pieces except the red on for the TAPE RECORDER.
- Look close at the lock on the chest.
- Back out one time and enter into the hotel.
- Find the BEYOND ITEM 20.
- Take the RUNE (O).
- Find the pieces for the MAGNIFYING GLASS and the PRINTER CARTRIDGES.
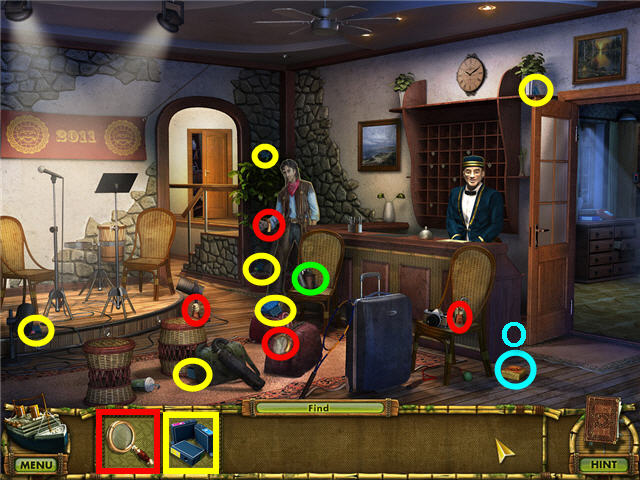
- Speak to the hotel clerk and note he needs five instruments.
- Back out of the area three times to the fountain and head into Enrico’s Room on the right.
- Find the pieces for the BANJO.
- Back out of the room one time.
- Find the pieces for the TAMBOURINE.
- Back out one time and head left to the school bus.
- Use the STORAGE KEY on the side compartment (P) on the bus.
- Take the TIRE (Q) and the RUNE (R).
- Head through the gate to the hotel and enter the truck on the left.
- Find the pieces for the TRUMPET.
- Exit the truck and click on the golden gate (S) and place the 5 RUNES on the lock (T).
- Click on the lock after all the RUNES have been placed to trigger a puzzle.
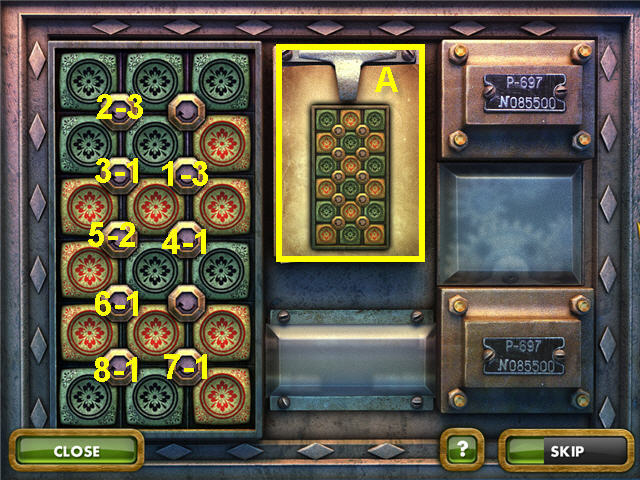
- The goal is to arrange the pieces on the grid to match the layout on the upper right panel (A).
- Clicking on the buttons with the curved arrow turns all 4 surrounding squares.
- See screenshot for solution; the 1st number is the order in which to turn them, the second number is the number of times to turn the dial.
- Enter through the now opened golden gate.

- Find the BEYOND ITEM 21.
- Find all the pieces for the LADLE, MAGNET, and WATERING CAN.
- Find all the pieces except for the red ones for the DRUM and the SHOVEL.
- Click on the door, the hanging plates, the cellar and the attic window to note items needed.
- Enter the garage on the right.
- Find the BEYOND ITEM 22.
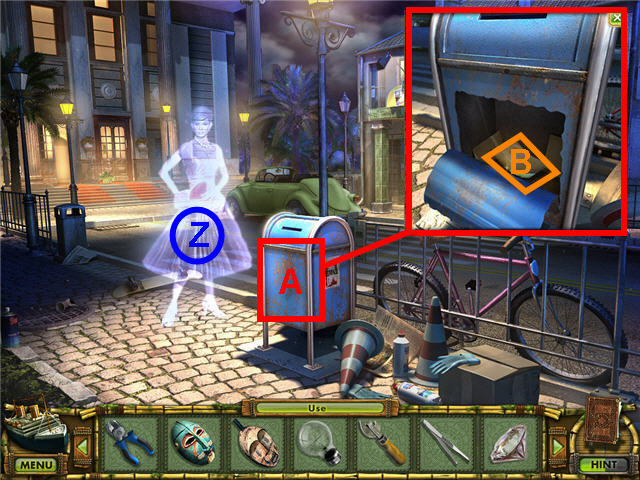
- Look close at the mailbox.
- Find all the pieces for the TIRE IRON and the STATUE FRAGMENT.
- Find all the pieces except for the red one for the VALVE HANDLE.
- Back out four times to the fountain and head to Enrico’s house on the right. .
- Use the MAGNET on the rope on the right (U) to get a ROPE WITH A MAGNET.
- Look close at the grate (V) and use the ROPE WITH A MAGNET on the NUT (W).
- Click on the NUT at the end of the ROPE WITH A MAGNET to get the final NUT.
- Back out one time to the fountain.
- Place the 3 STATUE FRAGMENTS on the statue (X) and note the fountain is broken.
- Head to the school bus on the left.
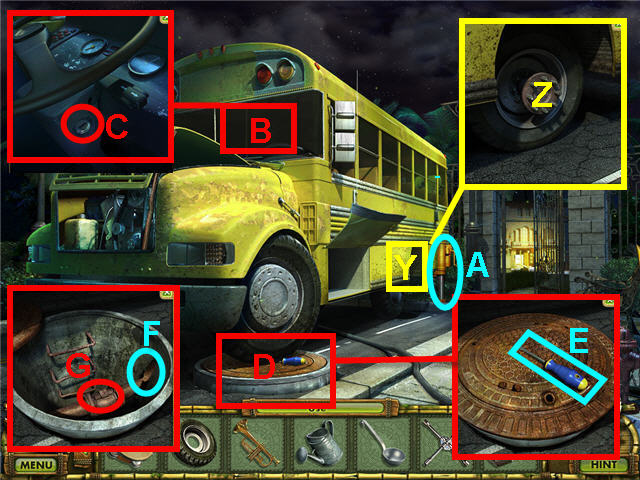
- Look close at the rear wheel well (Y) and place the TIRE and the NUTS on the axle (Z).
- Use the TIRE IRON on the NUTS.
- Take the JACK (A).
- Look close at the bus windshield (B) and place the KEY in the ignition (C).
- Turn the KEY to move the bus.
- Look close at the sewer cover (D) and take the SCREWDRIVER (E).
- Use the HOOK on the sewer cover and take the final piece of the LADDER (F).
- Notice the valve is missing a handle (G).
- Back out to the fountain and then right to Enrico’s house.
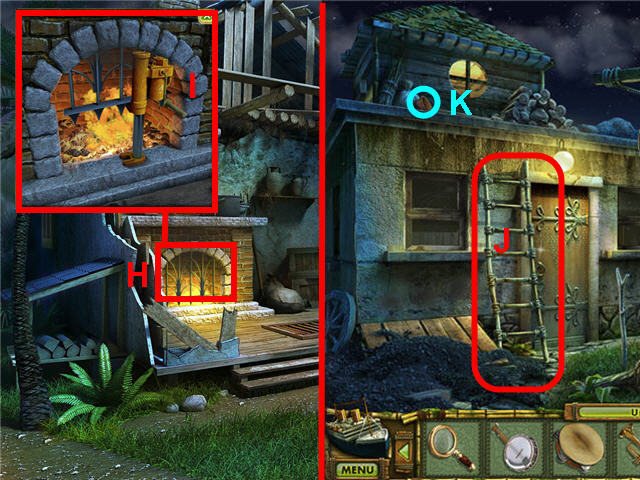
- Look close at the fireplace (H) and use the JACK on the grill (I).
- Click on the handle of the jack to raise the grill and note you need something to put out the fire.
- Back out to the fountain and go left to the translator’s house.
- Use the LADDER to the left of the doorway (J) and take the final piece of the DRUM (K).
- Look close at the attic window and note you need to break the glass.
- Head to the garage on the right.
- Look close at the mailbox (L).
- Use the SCREWDRIVER on the mailbox (M) and take the final piece of the VALVE HANDLE (N).
- Read the note (O).
- Back out of the area to the school bus.
- Look close at the sewer (P) and use the VALVE HANDLE on the stem (Q) and turn it.
- Back out one of the area one time to the fountain.
- Use the WATERING CAN on the fountain (R) to get a FULL WATERING CAN.
- Head to Enrico’s house to the right.
- Look close at the fireplace (S) and use the FULL WATERING CAN on the fire.
- Click in the ashes to pull out a violin.
- Click on the violin in the case to get a VIOLIN (T).
- Back out of the area to the fountain.
- Give the VIOLIN to the violinist and get a WOODEN VIOLINIST.
- Place the WOODEN VIOLIST in the center cabin of the ship and get a HAMMER.
- Back out of the area and head down the left path to the translators house.
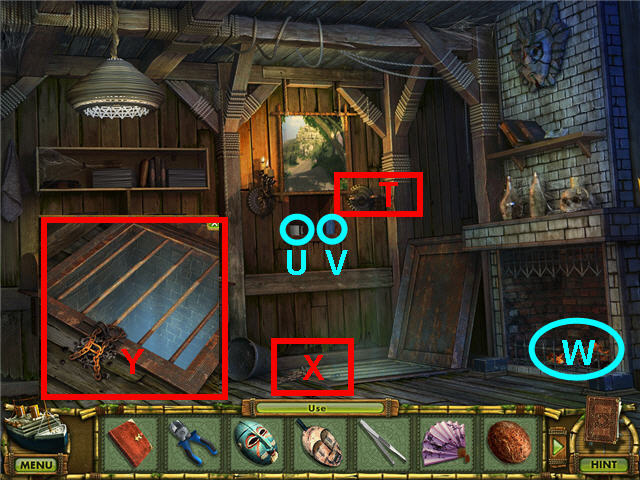
- Look close at the attic window (U) and use the HAMMER on the bottom left pane to break the glass.
- Take the KEY (V) and the final piece to the SHOVEL (W).
- Use the SHOVEL to dig the dirt off the cellar door (X).
- Look close at the cellar door and note we need wire cutters.
- Look close at the front door(Y) and use the KEY on the lock.
- Enter the house and pull the chain on the lamp (Z) to turn on the light.
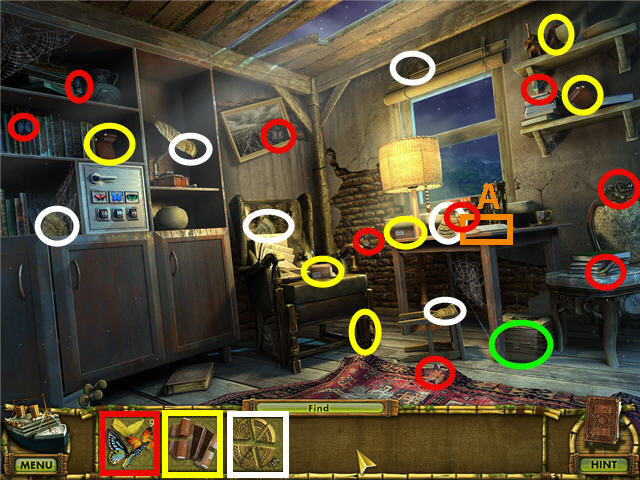
- Find the BEYOND ITEM 23.
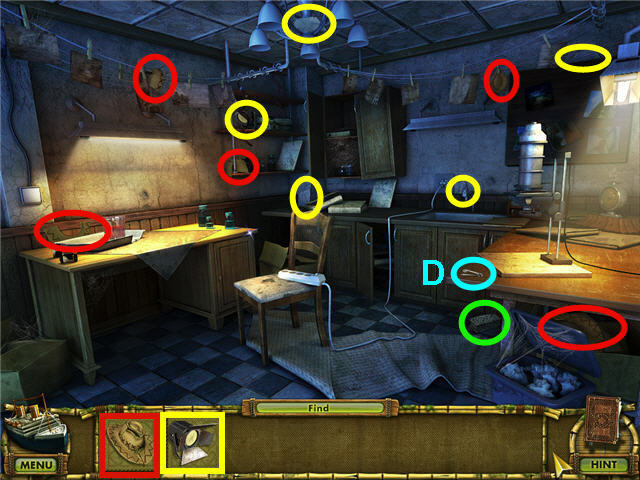
- Read the notes (A) on the desk.
- Find the BUTTERFLIES and the pieces for the ACCORDIAN and the METAL PLATE.
- Back out of the area to the hotel and enter into the lobby.
- Place the BANJO, TAMBOURINE, TRUMPET, DRUM and ACCORDION on the stage (B).
- Take the ACCESS CARD(C) from the hotel clerk.
- Enter the room on the right of the hotel desk.
- Find the BEYOND ITEM 24.
- Look close at the locked cabinet (D) and use the ACCESS CARD on the lock (E).
- Look at the package and note it is tied tight.
- Find the pieces of the OIL LAMP.
- Place the PRINTER CARTRIDGES on the printer (Z).
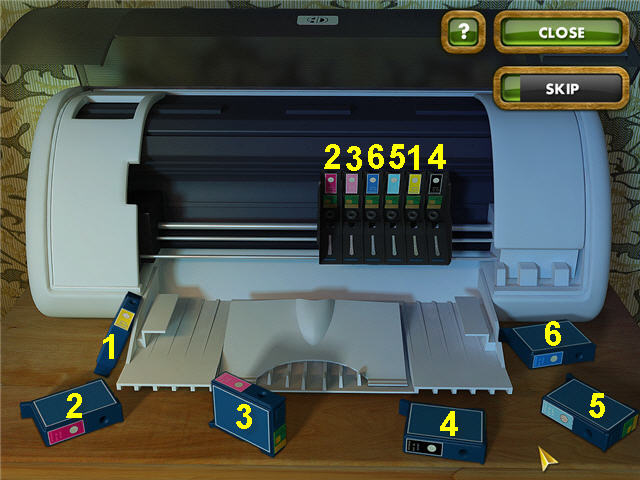
- Place the PRINTER CARTRIDGES into the correct matching colored slot on the printer. See screenshot for solution.
- Note that the printer needs paper.
- Exit to the hotel lobby and into the room on the left.
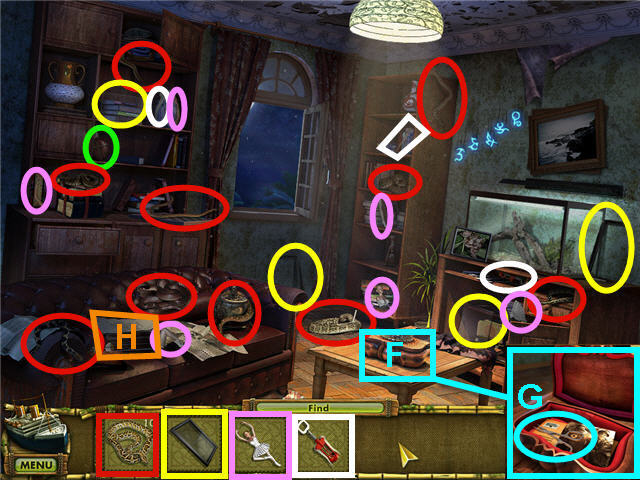
- Find the BEYOND ITEM 25.
- Find the SNAKES and the pieces of the TERRARIUM COVER.
- Look at the symbols on the wall.
- Place the SNAKES in the terrarium and then place the TERRARIUM COVER on top.
- Find the pieces to the BALLET DANCER and CORKSCREW.
- Look close at the music box (F) and place the BALLET DANCER on top.
- Click on the music box after the dancer stops to open it and take the SCISSORS (G) and click on the photo.
- Read the note (H) on the couch.
- Back out of the room to the lobby and head into the office on the right.
- Look close at the package in the cabinet (I) on the left and use the SCISSORS on the string (J).
- Use the CORKSCREW on the bottle (K), read the scroll and take the SCRAPS OF PAPER (L).
- Click on the scanner (M) to open the lid and place the SCRAPS OF PAPER on top.
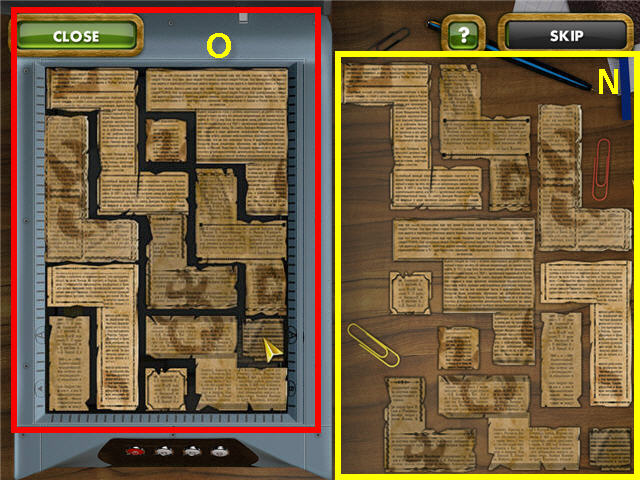
- Arrange the SCRAPS OF PAPER (N) on the glass so that they all fit without leaving any spaces or overlapping. See screenshot for solution (O).
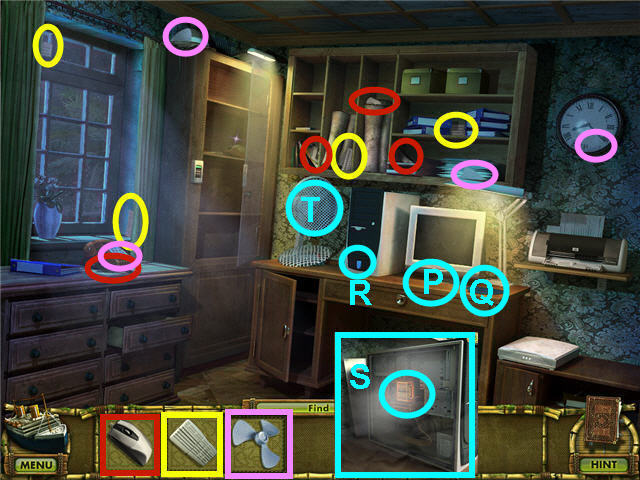
- Find the pieces of the MOUSE and KEYBOARD.
- Place the KEYBOARD by the monitor (P) and the MOUSE on the mouse pad (Q).
- Push the on button (R) on the bottom of the computer and note it is too hot.
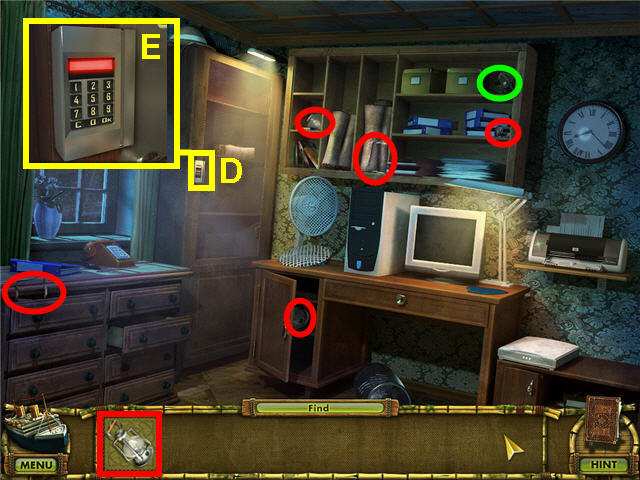
- Look close at the computer and use the ELECTRIC SCREWDRIVER on the side panel.
- Click on the side panel after unscrewing it.
- Click on the glowing hot insides (S) of the computer to trigger the fan item.
- Find the pieces of the FAN.
- Place the FAN blades on the fan (T) and push the red button on the base.
- Push the button (R) on the computer.
- Back out of the hotel to the fountain area and then head right into Enrico’s room.
- Use the OIL LAMP on the hole in the wall (U) and look close.
- Take the PLIERS (V).
- Exit the area to the fountain and head left to the translator’s house.
- Look close at the cellar door (W) and use the PLIERS on the wire (X).
- Enter into the opened cellar.
- Find the BEYOND ITEM 26.
- Take the POLYNESIAN DICTIONARY (Y) and then take the piece of the SHEET OF THE PAPER (Z).
- Click on the side of the desk (A) to get a close-up and take the piece of the METAL PLATE.
- Find the pieces of the SHEET OF PAPER and the METAL PLATE.
- Place the BUTTERFLIES on the board (B) to get a close-up.
- Arrange the BUTTERFLIES on the board by matching the shapes. See screenshot for solution.
- Exit the cellar.
- Hang the 2 METAL PLATES on the gong (C).
- Use the LADLE on the gong and note you need to record the sound.
- Head into the house and look close at the safe (D).
- Note the butterfly shapes/colors and look in your journal to see the number that corresponds with that butterfly.
- The code from left to right is 159. See screenshot for solution (E).
- Click the handle to open the safe and take the SPYGLASS (F).
- Exit the house and give the SPYGLASS to the sailor and get a WOODEN SAILOR.
- Place the WOODEN SAILOR in his cabin and get an AUDIO TAPE.
- Exit the ship scene.
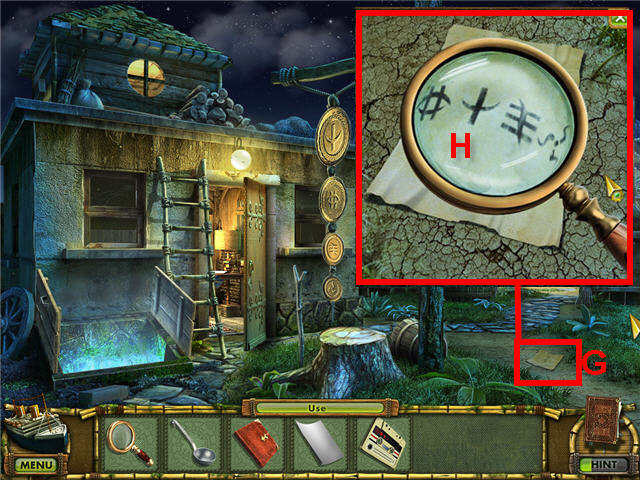
- Pick up the note (G) on the ground.
- Use the MAGNIFYING GLASS on the note (H) and see the code.
- Back out of the area and into the hotel.
- Head into the manager’s office on the right.

- Use the SHEET OF PAPER on the printer (I).
- Make sure the computer is on and look close at the computer monitor (J) and click on the scanner button (K).
- After the item is scanned click the printer button (L).
- Look close at the printed page (M) and use the POLYNESIAN DICTIONARY on the sheet (N).
- Exit the hotel and enter the back of the truck.
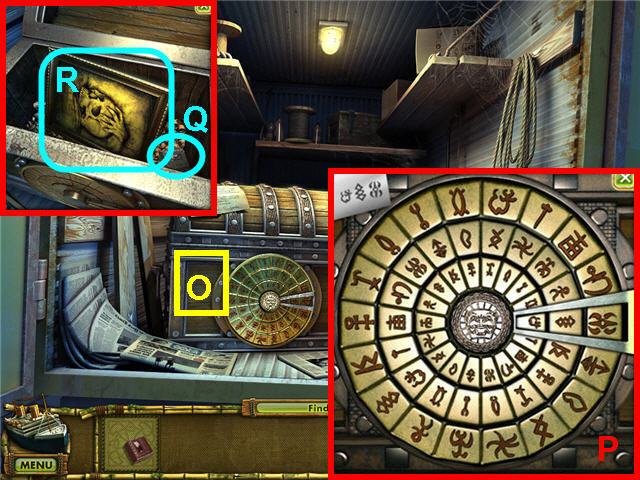
- Click on the chest (O) and note the code on the upper left of the close-up.
- Rotate the 3 rings to match the code in the upper left.
- Click on the ring to release when you have it set correctly. See screenshot for solution (P).
- Click on the open chest.
- Take the final piece of the TAPE RECORDER (Q) and the PAINTING (R).
- Exit the truck.
- Give the PAINTING to the artist and get the WOODEN ARTIST.
- Place the WOODEN ARTIST in his cabin on the ship and get a KEY.
- Look close at the symbols on the ground (S).
- Use the POLYNESIAN DICTIONARY on the symbols in close-up (T) and get a message (U).
- Head to the translator’s house on the right.
- Place the TAPE RECORDER on the tree stump (V) by the gong.
- Look close at the TAPE RECORDER and press the right button (W).
- Place the AUDIO TAPE in the recorder (X) and click the lid closed.
- Click on the red record button and note you need a microphone.
- Back out of the area and into the hotel lobby.
- Take the MICROPHONE (Y) from the stage.
- Head back to the translator’s house.
- Place the MICROPHONE on the TAPE RECORDER.
- Look close at the TAPE RECORDER and push the red button.
- Use the LADLE on the gongs in the order of symbols from the note the sailor dropped (Z). The solution from the top is; 2-1-3-4.
- Click on the TAPE RECORDER and get a TAPE RECORDER WITH A TAPE.
- Enter the cellar.

- Look close at the safe in the side of the desk (A).
- Place the TAPE RECORDER on the little shelf (B) and press the green play button.
- Read the note (C).
- Back out of the area to the school bus.
- Look close at the windshield of the bus and click on the ignition.
- Find the pieces of the EMPTY GAS CAN.
- Head straight to the translator’s house.
- Find the pieces of the FUNNEL.
- Head right into the garage.
- Place the EMPTY GAS CAN on the ground in front of the tank (D).
- Click on the spigot and note you need rocks to raise the level of the gas in the tank.
- Click on the steering wheel of the car and open the glove box.
- Take the TAILLIGHT piece from the glove box.
- Find the pieces of the TAILLIGHT and 8 STONES.
- Place the STONES in the tank (E) and click on the spigot to get a FULL GAS CAN.
- Click on the gas cap on the car (F) and click to open.
- Place the FUNNEL in the tank and use the FULL GAS CAN on the FUNNEL.
- Place the TAILLIGHT on the hole in the right quarter panel of the car (G) to access a puzzle.
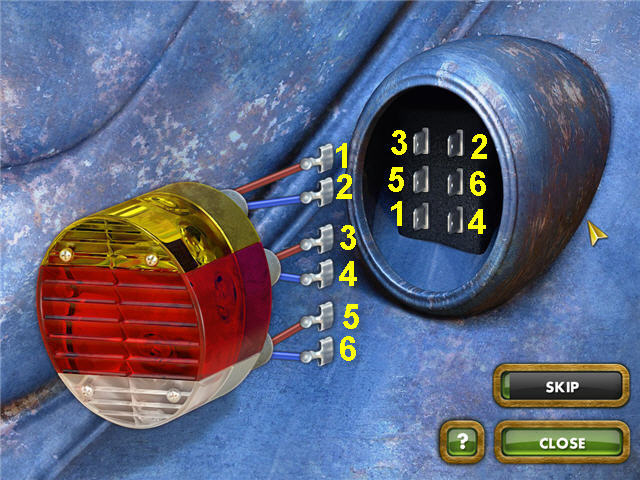
- Connect the wires so that the taillight lights up.
- There are 3 sets of lights to light up, the yellow top, red center and white bottom.
- See screenshot for the solution.
- Click on the steering wheel to get a close-up and place the key in the ignition.
Chapter 3 – Central Part of the Island
- Find the BEYOND ITEM 27.
- Find the pieces of the SEWING MACHINE and the 8 LOGS.
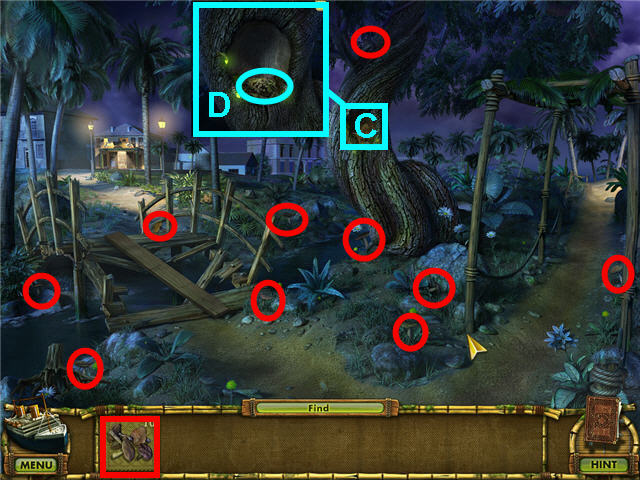
- Look close at the hole in the tree and broken bridge.
- Head down the right path to the pyramid area.
- Find the BEYOND ITEM 28.
- Look close at the doorway and note the missing mask and code; use the POLYNESIAN DICTIONARY on the symbols.
- Click on the cart, the kettle above the fire, the coconut, and the sculptor.
- Find the pieces for the CURTAIN.
- Find all the pieces except the red one for the WIRE CUTTER.
- Head into the Shaman’s room on the right.
- Find the BEYOND ITEM 29.
- Look close at the sink at turn the handle to note there is no water.
- Find the pieces of the TV, BOOMERANG and RAZOR.
- Read the note (H).
- Place the TV on the TV cabinet (I) to trigger a puzzle.
- Assemble the TV by clicking on the pieces and dropping them on the highlighted area on the TV stand with the same shape.
- See screenshot for the order in which I assembled but you can accomplish it in a different order. If you can see the shape of the piece highlighted on the TV stand, you may place that corresponding piece.
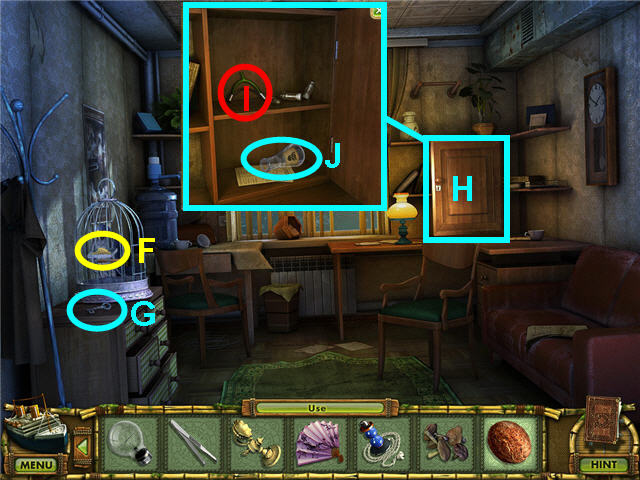
- Head into the room on the left.
- Find the BEYOND ITEM 30.
- Pick up the THREAD (J).
- Look at the fireplace (L).
- Look close at the chain on the floor hatch.
- Find all the pieces for the SAW, VIDEOTAPE and GLASS CUTTER except for the red ones.
- Back out of the area two times to the pyramid area.
- Use the BOOMERANG on the coconut (M).
- Look close at the area that the coconut dropped (N).
- Take the final piece of the WIRE CUTTER (P), the MATCHES (O) and note the coconut with milk.
- Head back into the Shaman’s house and into the room on the left.
- Place the LOGS in the fireplace.
- Use the MATCHES on the fireplace and take the final piece of the SAW (Q).
- Note that the coals on the fireplace are too hot to take.
- Back out of the house to the pyramid.
- Use the SAW on the cart (R) to get a PLANK.
- Back out of the area and use the PLANK on the broken bridge to the left.
- Head over the bridge to Sunset Blvd.
- Find the BEYOND ITEM 31.
- Click on the girl.
- Find the pieces for the MASK.
- Head into the museum on photography studio on the right.
- Find the BEYOND ITEM 32.
- Find all the pieces except for the red ones for the SHOVEL and the WEIGHTS.
- Look close at the water cooler, the piggy bank, cabinet and door.
- Use the RAZOR on the painting (A) and note you need a stethoscope.
- Back out of the area and head to the museum entrance on the left.
- Find the BEYOND ITEM 33.
- Find the pieces for the MASK and the HAMMER.
- Look close at the box office window.
- Back out one time and head right into the photography studio.
- Look close at the piggy bank (T) and use the HAMMER to break it.
- Take the KEYS (U) from the broken piggy bank.
- Look close at the cabinet on the left (V) and use the KEYS on the lock.
- Take the PAPERCLIP (W), the PAINT (X) and click on the sketch (Y) to get it added to your journal.
- Look close at the door to the right and use the PAPERCLIP on the lock.
- Enter into the newly opened room to the right.
- Find the BEYOND ITEM 34.
- Take the FLASHDRIVE (Z).
- Find the pieces for the INSTANT CAMERA, NIGHT CAP and HAT.
- Look close at the camera (A) and open the side compartment.
- Place the FLASHDRIVE in the open compartment (B).
- Click on the camera and note you need hats.
- Head into the room on the right.
- Find the BEYOND ITEM 35.
- Take the SAFETY PIN (D).
- Find the pieces of the TORN HAT and the STAGE LIGHT.
- Back out of the area four times and head right into the 2nd room of the Shaman’s house.
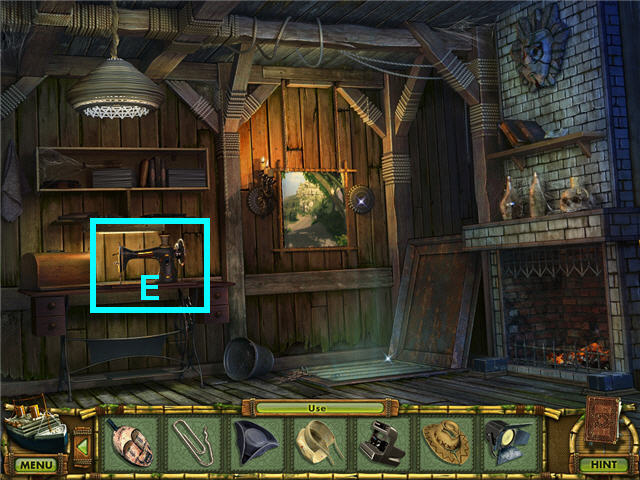
- Place the SEWING MACHINE on the sewing machine cabinet (E).
- Place the THREAD on the SEWING MACHINE.
- Place the TORN HAT on the sewing machine to get a HAT.
- Back out of the area to the bridge and head left and into the photography studio.
- Hang the CURTAIN on the window (F) and use the SAFETY PIN to hold them together.
- Hang the STAGE LIGHT on the pole (G).
- Place the cowboy HAT on the monkey on the left (H), the pirate HAT on the monkey on the right (I) and the NIGHT CAP on the monkey in the middle (J).
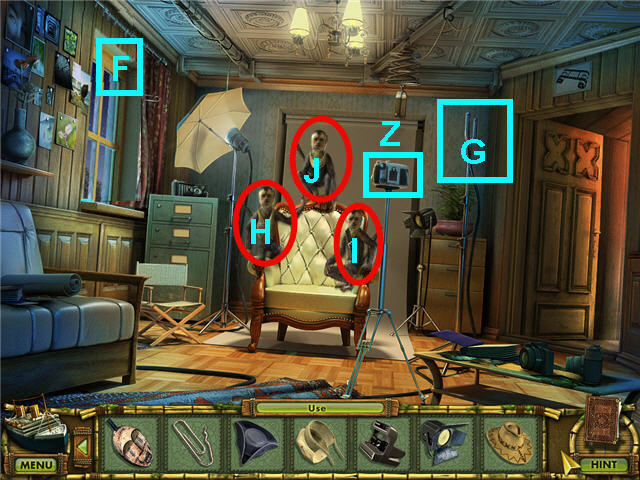
- Click on the camera (Z) to trigger a puzzle.
- The object is to take 3 photos of the monkeys while all 3 are facing forward. See screenshot for solution.
- Click on the green camera button (K) to take a photo.
- The counter (L) of correct photos is on the upper right.
- Get a PHOTO OF MONKEYS when complete.
- Exit the studio and head left to the museum.
- Use the PHOTO OF MONKEYS on the box office window and the door will automatically open.
- Enter the museum.
- Find the BEYOND ITEM 36.
- Use the POLYNESIAN DICTIONARY on the symbols on the archway (M).
- Look close at the light on the left (N).
- Flip the switch off (O) and remove the light cover (P) and take the LIGHT BULB (Q).
- Look close at the door down the hall (R) and use the PAPERCLIP on the lock.
- Enter into the door down the hall.
- Find the BEYOND ITEM 37.
- Look close at the table (S) and take the CAN OPENER piece (T) and read the note (U).
- Find the pieces of the BIRDCAGE and CAN OPENER.
- Enter into the room on the right.
- Find the BEYOND ITEM 38.
- Place the BIRCAGE on the base (V) on the left dresser and note you need seeds.
- Find the pieces of the GLUE and the TWEEZERS.
- Click on the bird and the locked cabinet.
- Find all the pieces except the red one for the STETHOSCOPE.
- Back out of the area two times and head up the stairs.
- Find the BEYOND ITEM 39.
- Use the INSTANT CAMERA on the display (W) to get a PHOTO OF THE EXHIBIT.
- Place the GLUE on the end of the spear and then place the PHOTO OF THE EXHIBIT on the glued spear (X).
- Find the pieces of the FAN and CANDLESTICK.
- Take the DIAMOND (Y).
- Click on the glass case by the mask (W) and note you need a glass cutter.
- Back out of the museum to Sunset Blvd.
- Give the DIAMOND to the girl (Z) and get a WOODEN GIRL.
- Place the WOODEN GIRL in her cabin on the ship and get a LAMP.
- Exit the ship scene.
- Look close at the mailbox (A) and use the CAN OPENER on the front panel.
- Look closely at the note (B) and use the POLYNESIAN DICTIONARY on the symbols and click on it to get a recipe in your journal.
- Back out to the bridge area.
- Find the 10 MUSHROOMS.
- Look close at the hole in the tree (C) and take the GRAIN (D).
- Head over the bridge and into the museum and through the door under the stairs and into the room on the right.
- Place the GRAIN by the birdcage (F) and take the KEY (G).
- Look close at the locked cabinet (H) and use the KEY.
- Take the final piece of the STETHOSCOPE (I) and the FLASK (J).
- Exit the museum and head into the photography studio reception area.
- Use the STETHOSCOPE on the safe (K).
- Turn the dials one click at a time and stop when you hear a loud click or see the stethoscope chest piece flash with a white glow.
- The solution is random. See screenshot for my solution (L).
- Take the final piece of the WEIGHTS (M) and SHOVEL (N) and the CHISEL (O).
- Look close at the water cooler (P) and click on the left spigot.
- Pour the PAINT in the cup of water.
- Place the LIGHT BULB in the PAINT and get a RED LIGHT BULB.
- Place the WEIGHTS and the MUSHROOMS on the scale (Q) to trigger a puzzle.
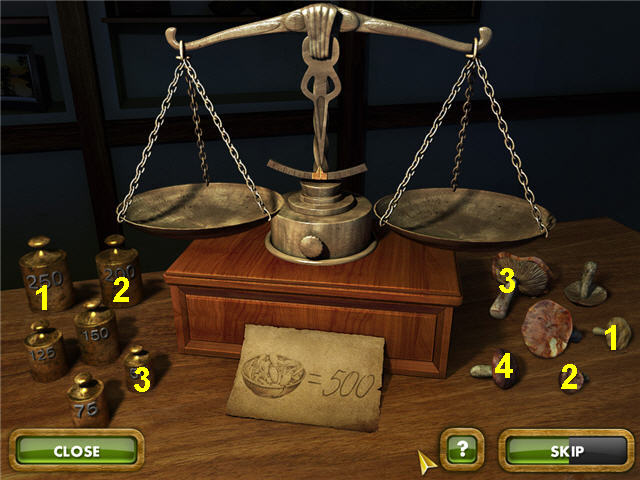
- The goal is to weight out 500 grams of MUSHROOMS on the scale.
- Place 500 grams of weights on the scale first by placing the 250, 200 and 50 gram weights on the left scale, then you can place the mushrooms on the right side till the scale is balanced. See screenshot for solution.
- Get 500 GRAMS OF MUSHROOMS.
- Back out of the area to the bridge and head over to the pyramid area.
- Take the COCONUT (R).
- Give the CHISEL to the sculptor (S) and get a WOODEN SCULPTOR.
- Place the WOODEN SCULPTOR in his cabin on the ship and get a MASK.
- Exit the ship scene.
- Head right and into the back room of the Shaman’s house.
- Place the CANDLESTICK on the right of the painting on the wall (T) and click on it to turn it.
- Take the final pieces of the GLASS CUTTER (U) and the VIDEOTAPE (V).
- Use the SHOVEL on the hot coals in the fireplace (W) to get BURNING COALS.
- Place the BURNING COALS on the chains on the hatch (X).
- Use the WIRE CUTTER on the glowing chains (Y).
- Head down into the cellar.
- Find the BEYOND ITEM 40.
- Find the pieces of the PIPE JOINT, MASK, WRENCH and BUCKET.
- Look close at the gated storage (Z) on the right and use the TWEEZERS to get the FADED PIECE OF PAPER.
- Look close at the leaking pipe (A) and use the PIPE JOINT on the hole.
- Use the FLASK on the bottle of acid (B) to get ACID.
- Look close at the bicycle (C) and use the WRENCH on the front axle to get a BICYCLE TIRE.
- Use the BICYCLE TIRE on the missing pipe (D).
- Head up the ladder and back one time to the Shaman’s TV room.
- Look close at the sink (E) and turn the right spigot (F).
- Place the BUCKET in the sink and get a BUCKET WITH WATER (G).
- Place the VIDEOTAPE in the VCR (H) and watch the video.
- Back out one time to the pyramid.
- Look close at the kettle above the fire pit (I).
- Add the BUCKET WITH WATER, COCONUT, ACID and 500 GRAMS OF MUSHROOMS to the kettle (J).
- Use the FAN on the coals under the kettle.
- Use the FADED PIECE OF PAPER on the steam (K) and get the mask diagram in your journal.
- Back out to the bridge and head into the museum and up the stairs.
- Use the GLASS CUTTER on the center display case and take the MASK (J).
- Back out of the area to the bridge and right to the pyramid.
- Click on the entrance to the pyramid.
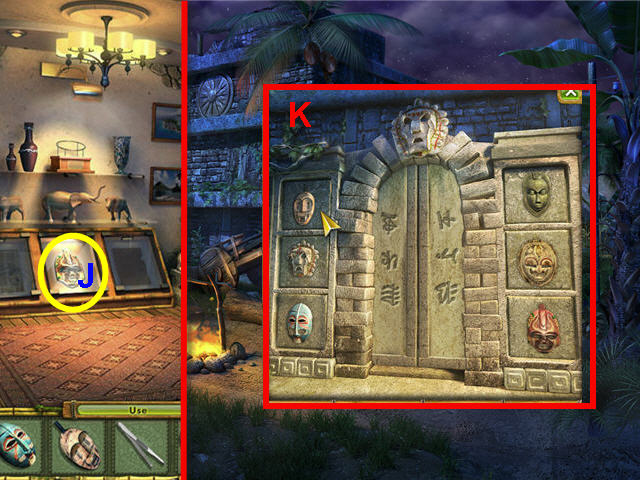
- Arrange the 5 MASKS on the empty blocks around the doorway using the mask diagram in your journal from the recipe. See screenshot for solution (K).
- Head into the pyramid.
- Find the BEYOND ITEM 41.
- Find the pieces of the TRAY and the PLUNGER.
- Read the note (L).
- Look close at the symbols on the wall (M) and use the POLYNESIAN DICTIONARY on it to translate.
- Click on the door on the left and look close at the buttons on the pedestal.
- Exit the pyramid and enter the Shaman’s house and go down the hatch in the back room.
- Look close and use the PLUNGER on the plate on the back wall (N).
- Take the PHOTO NEGATIVE (O).
- Exit the cellar via the ladder and back out to the bridge, then head into the laboratory in the back of the photo studio.
- Place the LAMP on the power strip (P).
- Place the RED LIGHT BULB on the LAMP.
- Click on the wall switch (Q) to the left to turn on the lamp.
- Look close at the developer on the right (R) and place the PHOTO NEGATIVE on the photo paper (S).
- Use the TWEEZERS to pick up the UNDEVELOPED PHOTO.
- Place the TRAY on the table (T) and look close.
- Click on the red beaker (U) in the upper left of the tray in close-up.
- Place the UNDEVELOPED PHOTO in the tray (V) and get the code for the pedestal in the pyramid added to your journal.
- Back out to the bridge, head right and enter the pyramid.
- Look close at the pedestal and push the buttons in the order of the code from the negative.
- From the top, push the 3rd, 1st, 4th and 2nd button. See screenshot for solution.
- Take the SKULL from the top of the pedestal.
- Give the SKULL to the Shaman (W) and get the WOODEN SHAMAN.
- Place the WOODEN SHAMAN in his cabin on the ship and get RUNES.
- Exit the ship scene.
- Find the 2 STAKES.
- Place the RUNES on the door to the left to access a puzzle.
- The goal is to rotate the runes to complete the picture. See screenshot for solution (X).
- Enter into the newly opened door.
Chapter 4 – Northern Coast of the Island
- Find the BEYOND ITEM 42.
- Look close at the statue (Z) and take the piece of the STEPLADDER.
- Find the 6 available STARS and the pieces of the STEPLADDER.
- Use the POLYNESIAN DICTIONARY on the symbols on the left wall.
- Look close at the inlay on the floor to the left of the right candle.
- Take the STONE (Y).
- Use the STEPLADDER on the hole (A).
- Look close at the slab on the left (B) and use the STAKE on the holes in the slab.
- Use the STONE on the STAKES.
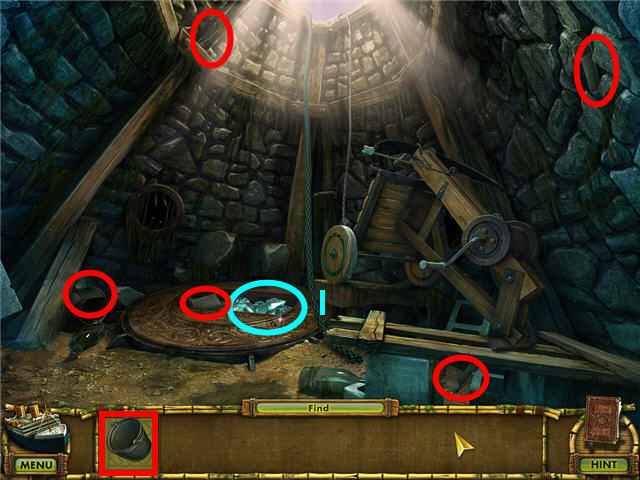
- Head down the hole.
- Find the BEYOND ITEM 43.
- Find the pieces of the NAILS and the HAMMER.
- Find all the pieces except for the red for the CROWBAR.
- Take the LOG (C).
- Use the POLYNESIAN DICTIONARY on the symbols on the pedestals.
- Head down the passage on the right.
- Find the BEYOND ITEM 44.
- Find all the pieces except the red for the ROPE and the STATUE’S HEAD.
- Use the POLYNESIAN DICTIONARY on the symbols on the raised stone slab in the center.
- Click on the small stones (D) multiple times until cleared away.
- Use the LOG on the large boulder (E) and take the final piece of ROPE (F).
- Head down to the armory on the right.
- Find the BEYOND ITEM 45.
- Use the POLYNESIAN DICTIONARY on the symbols on the right pedestal.
- Read the note (G).
- Find the pieces of the BROOM and the SABRE.
- Back out of the area two times and up the ladder.
- Look close at the inlay on the floor (H) and use the BROOM to clean it off.
- Take the final STAR piece (I) and note the pattern on the lion.
- Head down the hole and down the passage to the temple hall.
- Use the STARS on the door (J) to trigger a puzzle.
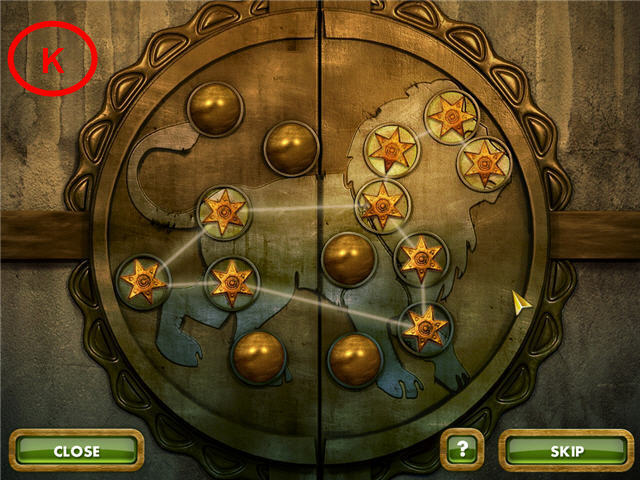
- The goal is to click on the dots to lay a star on them to duplicate the constellation that you found on the inlay in the descent room. See screenshot for solution (K).
- Head through the opened doorway to the temple of the sun room.
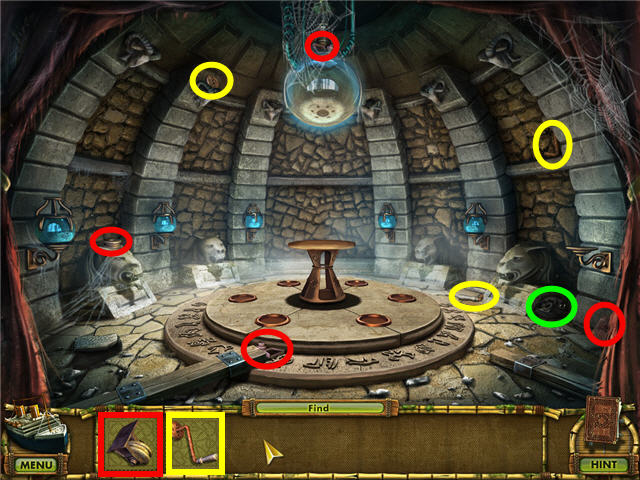
- Find the BEYOND ITEM 46.
- Find the pieces for the PULLEY and HANDLE.
- Back out of the area two times to the dungeon.
- Place the HANDLE on the spool (L) to the left of the door.
- Place the PULLEY on the top left of the door (M).
- Use the ROPE on the spool (L).
- Crank the handle to lift the door and take the final piece of the CROWBAR (N).

- Head down the passage.
- Look close at the chest (O).
- Use the CROWBAR on the lock and take the final piece of the STATUE’S HEAD (P).
- Back out of the area one time.
- Place the STATUE’S HEAD on the statue (Q).
- Crank the handle on the right (S) and then cut the rope of the battering ram with the SABRE.
- Head through the new opening on the left.
- Find the BEYOND ITEM 47.
- Take the WHEEL (T).
- Back out one time and go forward and down to the right to the armory.
- Place the WHEEL on the catapult (U) to trigger a puzzle.
- The goal is to assemble the catapult.
- Place the items on the matching shaped glowing section. See screenshot for solution.
- Get the CATAPULT in inventory.
- Back out two times and head to the well on the left.
- Place the CATAPULT on the boards (V).
- Click on the handle (W) to shoot the grapple hook.
- Head up the well to the construction site.

- Find the BEYOND ITEM 48.
- Click on the chef.
- Look close at the generator (X) and take the piece of the flashlight.
- Find the pieces of the FLASHLIGHT and the GEAR.
- Use the POLYNESIAN DICTIONARY on the symbols on the pallet of wood.
- Head into the garage.
- Find the BEYOND ITEM 49.
- Take the PLANK (A).
- Look close and read the note (Y) on the bench and take the KEYS (Z).
- Find the pieces of the CHAIN and HANDLE.
- Look at the gas tank, the locked cabinet and the battery on the truck.
- Back out of the garage and head straight to the coast.
- Find the BEYOND ITEM 50.
- Take the TRIANGULAR KEY (B).
- Find the pieces of the HOOK.
- Back out to the construction site.
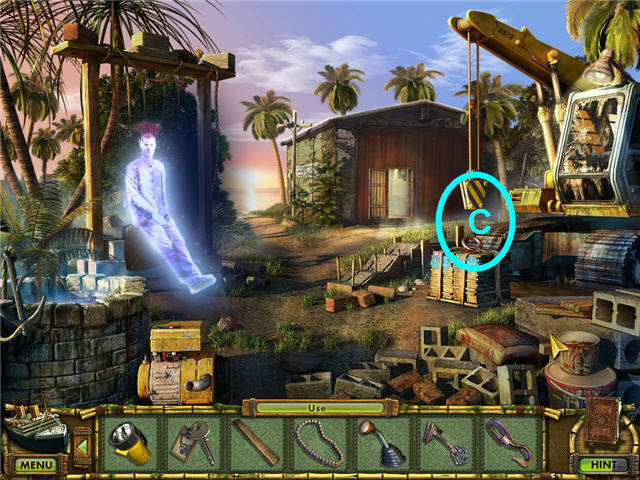
- Place the HOOK on the crane (C).
- Enter the crane.
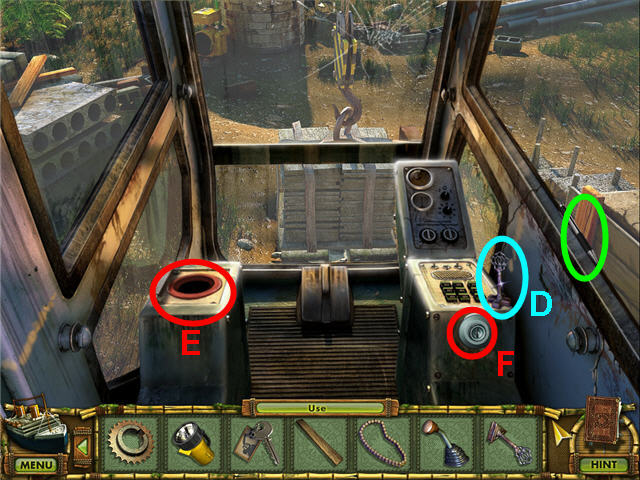
- Find the BEYOND ITEM 51.
- Take the CROSS-SHAPED KEY (D).
- Place the HANDLE in the slot on the left (E).
- Place the KEYS in the ignition (F) and turn the key.
- Click on the handle (E) to raise the pallet.
- Exit the crane.

- Pick up the CHEF’S HAT (G).
- Give the CHEF’S HAT to the cook (H) and get the WOODEN COOK.
- Place the WOODEN COOK in his cabin on the ship and get a SCREWDRIVER.
- Exit the ship scene.
- Use the POLYNESIAN DICTIONARY on the wall where the cook was sitting and get a code added to your journal.
- Head straight to the coast.
- Click on the raft in the water (I).
- Use the PLANK on the raft (J).
- Use the NAILS on the PLANK.
- Use the HAMMER on the NAILS.
- Look close at the pulley (K) and place the GEAR and then the CHAIN on it.
- Click on the Cursed Rocks (L) to head over there.
- Find the BEYOND ITEM 52.
- Use the POLYNESIAN DICTIONARY on the symbols under the nurse.
- Find the pieces of the HACKSAW, SPADE and MANOMETER.
- Read the plaque under the bell and look close at the diving equipment.
- Place the MANOMETER on the tank (A) and take the EMPTY OXYGEN TANK.
- Back out of the area to head back to the coast.
- Look close at the submarine (M) at the end of the pier.
- Use the HACKSAW on the lid.
- Enter the submarine.

- Find the BEYOND ITEM 53.
- Look close at the electrical box (N) and use the SCREWDRIVER on the panel; note that it requires a battery.
- Find the pieces of the PICKAXE, FLIPPERS and SCUBA MASK.
- Look at the photo, the panel under the photo and the device missing the buttons on the right wall.
- Exit the submarine via the ladder on the right and back out one time and head into the garage.
- Take the TRUCK BATTERY (O) from under the hood.
- Exit the garage and head back into the submarine.
- Place the EMPTY OXYGEN TANK on the compressor (P).
- Look close at the battery compartment (Q) and place the TRUCK BATTERY inside.
- Turn the valve (R) and fill the tanks.
- Take the FULL OXYGEN TANK (P).
- Exit the submarine and head to Cursed Rock.
- Look close at the rocks the nurse is sitting on and use the PICKAXE on them to get the FIRST-AID KIT (S).
- Give the FIRST-AID KIT to the nurse and get a WOODEN NURSE.
- Place the WOODEN NURSE in her cabin on the ship and get a DIAMOND-SHAPED KEY.
- Exit the ship scene.
- Look close at the diving equipment board (T) and hang the FULL OXYGEN TANK (U), FLIPPERS (V), SCUBA MASK (W) and FLASHLIGHT (X) on their appropriate hook.
- Head into the water on the left.
- Find the BEYOND ITEM 54.
- Use the POLYNESIAN DICTIONARY on the symbols on the side of the ship.
- Find the pieces of the POLE AXE and the CROSSBOW.
- Click on the algae and note there is something in there.
- Enter into the hole in the cargo hold of the ship.

- Find the BEYOND ITEM 55.
- Take the SICKLE (Y) and read the note (Z).
- Look close at the shaman (A) and take the AMULET (B).
- Use the POLYNESIAN DICTIONARY on the symbols on the right side.
- Look close at the chest and note it requires a key.
- Back out of the cargo hold.
- Use the SICKLE on the algae (C).
- Take the STAR-SHAPED KEY (D).
- Exit out via the top of the screen.
- Look close at the crate on the rock (E) and click the lid to open the crate.
- Take the BUTTON (F).
- Back out of the area to the construction site and head into the garage.
- Look close at the locked cabinet on the left (G).
- Place the DIAMOND SHAPED KEY, the CROSS SHAPED KEY, the STAR SHAPED KEY and the TRIANGULAR KEY in their matching slot.
- Turn the keys in the order of the message that the chef gave you.
- The solution is; turn the STAR SHAPED KEY, the TRIANGULAR KEY, and the DIAMOND SHAPED KEY and last the CROSS SHAPED KEY.
- Take the BUTTON (H).
- Exit the garage, head down the well, and head up to the descent room.
- Look close at the statue on the right (I).
- Place the AMULET in the slot (J).
- Take the FOUR-FINGERED HAND (K) from the center pedestal.
- Head down the hole, through the well on the left and down to the submarine.
- Look close at the machinery statue on the right (L).
- Place the 2 BUTTONS on the empty slots (M) to trigger a puzzle.
- The goal is to move the silver ball (N) to the spot with the stripes (O) by rotating the knobs.
- Turn the knobs (M) the number of times and in the order listed; L-Left /R =Right; 1L, 2R, 2L, 3R, 1L, 1R, 1L. See screenshot for solution (P).
- Get a SPHERE-SHAPED KEY.
- Look close at the locked panel to the left of the ladder.
- Use the SPHERE-SHAPED KEY on the lock. Take the TILES (R), BOW (Q) and read the note.
- Exit the submarine.
- Give the BOW to the archer (S) and get a WOODEN ARCHER.
- Place the WOODEN ARCHER in his cabin on ship and get an OILER.
- Look close at the arrow in the sand (T) and use the SPADE to unearth a small chest.
- Click on the chest to remove the lid and take the KEY (U).
- Head out to Cursed Rocks, dive down and enter the ship’s cargo hold.
- Look close at the chest and use the OILER and then the KEY on the lock.
- Take THE SIX MOAI (V) and the GEAR (W) from the chest.
- Exit the ship, head up and go back two times, through the well, and down the right passage to the temple hall.
- Look close at the door on the left (X) and place the TILES on the panels (Y); they will put themselves in the correct spot.
- Head into the newly opened door to the steam engine.
- Find the BEYOND ITEM 56.
- Look close at the bars on the right (Z) and take the piece of the BRUSH and note the SHIELD piece that is out of reach.
- Place the FOUR-FINGERED HAND on the hand print (A) on the front of the device.
- Click on the furnace (B) and note you need gas.
- Use the POLE AXE on the ropes (C) holding the wheel and note they are too dull.
- Take the TORCH (D).
- Find the pieces of the GRINDSTONE and BRUSH.
- Find all but the red piece of the SHIELD.
- Use the BRUSH on the stone slab (E) and then use the POLYNESIAN DICTIONARY on the symbols.
- Back out of the room one time.
- Use the TORCH on the burning torches on the left of the hallway to get a BURNING TORCH.
- Back out one time, head left and exit the top of the well to the construction site.
- Find the pieces of the HOSE.
- Use the HOSE on the pump (F) and press the green button (G).
- Head down the drained well.
- Click on the colored disk and use the GEAR on the center to trigger a puzzle.
- The goal is to click the gears to turn the beads and get the beads to their corresponding colored section.
- The solution is as follow; Click Left 2x, Middle 3x, Left 3x, Right 3x, Middle 1x, Right 2x. See screenshot for solution (H).
- Find the pieces of the BUCKET.
- Take the GEMS (I).
- Exit the top of the well and head into the garage.
- Use the BUCKET on the gas tank (J).
- Click on the hose (K) to get a BUCKET WITH GAS.
- Exit the garage, go down the well, back out one time, head forward and then right to the armory.
- Place the GRINDSTONE on the grinder (L).
- Use the POLE AXE on the GRINDSTONE to get a SHARP POLE AXE.
- Back out one time and head left into the steam engine room.
- Use the SHARP POLE AXE on the ropes (M) to get a VALVE HANDLE.
- Place the VALVE HANDLE on the machine (N).
- Place the BUCKET WITH GAS in the furnace (O).
- Use the BURNING TORCH in the furnace.
- Click on the VALVE HANDLE to turn it.
- Click on the bars to the right (P) and take the final piece of the SHIELD (Q).
- Exit the room and head down the right to the armory.
- Place the CROSSBOW on the knight on the left (R).
- Place the SHIELD on the warrior on the right (S).
- Click on the CROSSBOW on the left knight to shoot an arrow.
- Look close at the pedestal under the right warrior and take the OIL LAMP (T).
- Back out of the room and go forward into the temple of the sun room.
- Place the OIL LAMP on the lamp holder (U).
- Click the GEMS on the top of the lamp (V).
- Place THE SIX MOAI around the pedestal (W).
- Place the SHIP on the pedestal (X).
- Congratulations! You have successfully completed The Treasures of Mystery Island: the Ghost Ship.
Created at: 2011-04-02